Mít více e-mailových adres je snadné, ale kontrola každé schránky je časově náročná a nejtěžší práce. Pomocí tohoto triku můžete spravovat všechny e-maily z webové pošty v jedné schránce Gmailu.
Nyní se můžete snadno zbavit vestavěných e-mailových klientů cPanelu, jako jsou Roundcube, Squirrel Mail atd. Pomocí této techniky můžete odesílat a přijímat e-maily z více vlastních e-mailových adres na jedno ID Gmail.
Chcete-li nakonfigurovat webmail ve službě Gmail, postupujte podle následujících dvou kroků.
Požadavky
- Access to the Hosting cPanel
- A Gmail account
Přeposílání e-mailů z cPanelu do Gmailu
Krok 1. Přihlaste se do svého panelu cPanel a přejděte na stránku Email accounts section
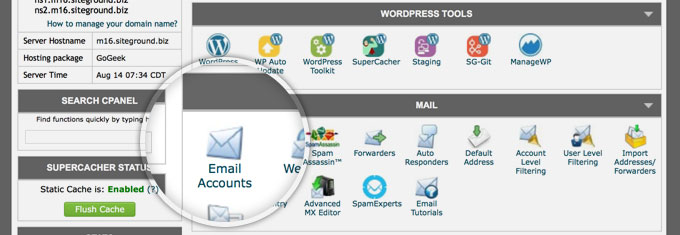
Krok 2. Vyberte svůj e-mail, z More drop-down option click on Access Webmail
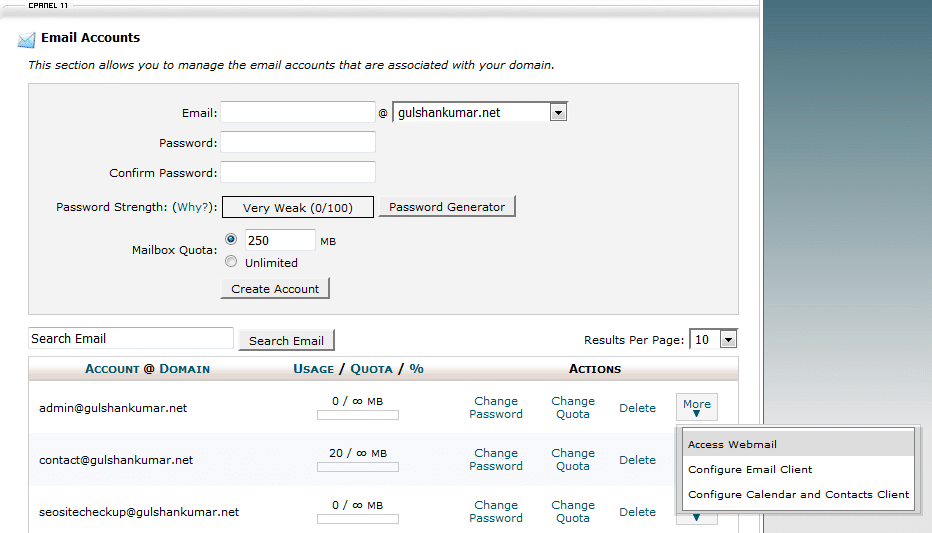
Krok 3. Go to Forwarding Options
Krok 4. Click on Add Forwarder button
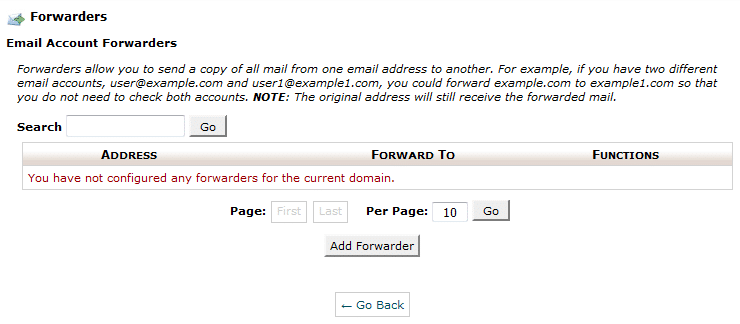
Krok 5. Zadejte svou e-mailovou adresu, na kterou chcete dostávat všechny e-maily vlastní domény. Poté klikněte na tlačítko Add Forwarder.
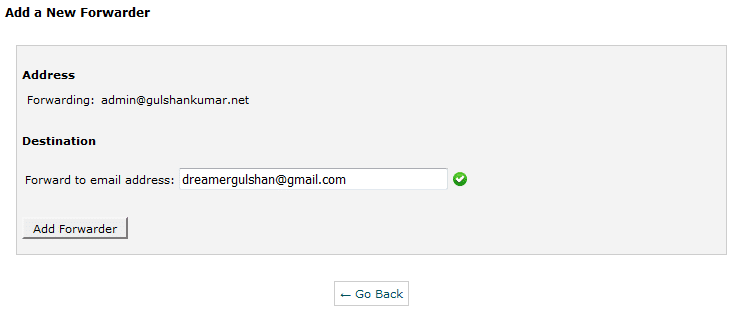
Krok 6. Zobrazí se tato potvrzovací zpráva.

Odesílání e-mailů ze služby Gmail prostřednictvím protokolu SMTP
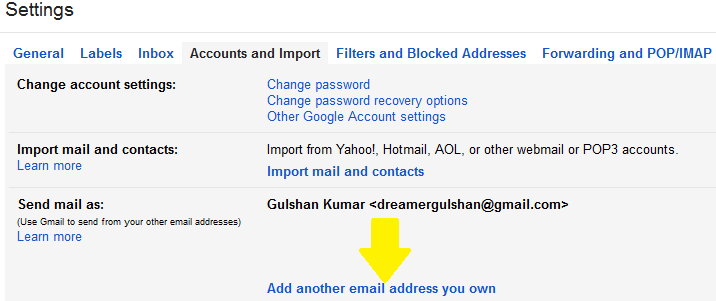
Nyní přejděte na Gmail Settings
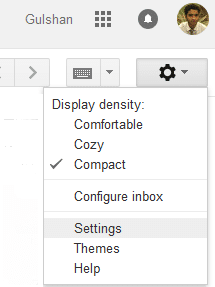
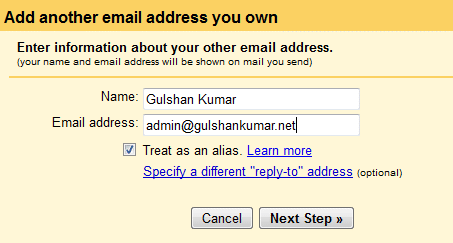
Krok 1. V části Účty a možnost Import klikněte na možnost Přidat další e-mailovou adresu.
Krok 2. Zde zadejte svou vlastní e-mailovou adresu a klikněte na Další krok.
Krok 3. Zjistěte podrobnosti o SMTP kliknutím na ‚Configure Email Client‚ možnost v e-mailové sekci vašeho cPanel. (Ref: Step 3). Informace o protokolu SMTP můžete získat také od hostitele.

Krok 4. Na stránce konfigurace můžete najít své SMTP server name and PORT no.
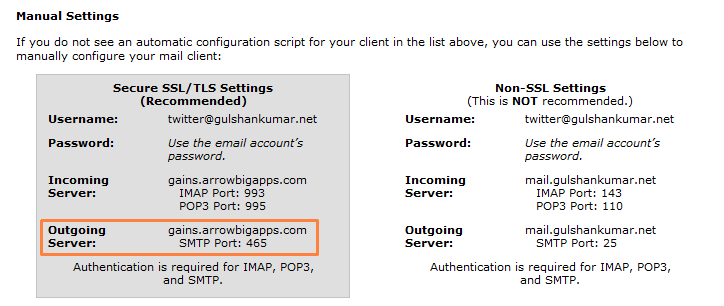
Krok 5. V závislosti na vašem hostitelském prostředí. Jen málo hostitelů umožňuje přístup k poště přes PORT 25 (nezabezpečený) a jen málo hostitelů z bezpečnostních důvodů striktně vyžaduje nastavení SSL/TLS. Můj hostitel vyžaduje bezpečné nastavení. Moje nastavení tedy bude následující. I když doporučuji použít port 587.
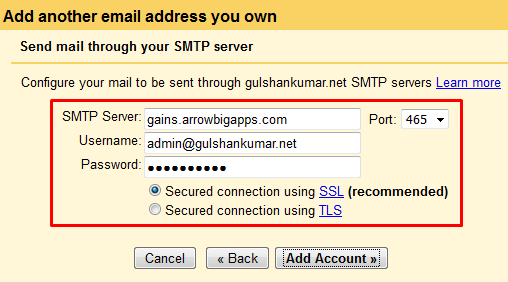
Krok 6. Nyní je čas ověřit e-mailovou adresu pro odesílání e-mailů z vlastní domény prostřednictvím služby Gmail. Laskavě zkontrolujte svou vlastní e-mailovou schránku a klikněte na potvrzovací odkaz.

nebo zadejte ověřovací kód ručně. Obojí by mělo fungovat bez problémů.

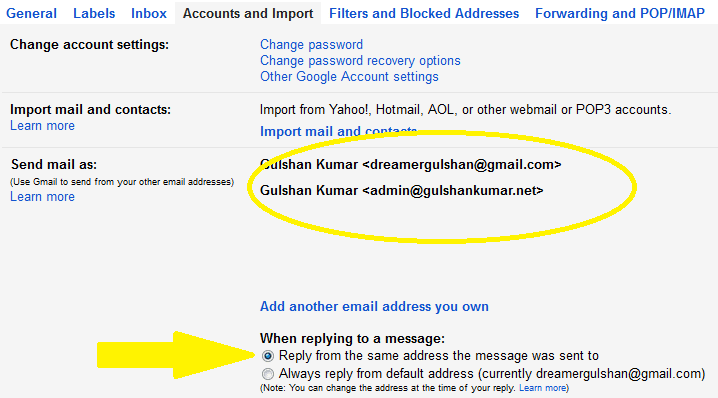
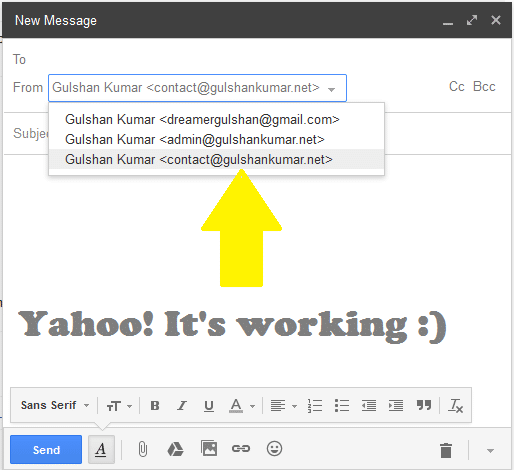
Krok 7. Pro vaše pohodlí byste měli zvolit možnost „Odpovědět ze stejné adresy, na kterou byla zpráva odeslána“.
Krok 8. Můžete si to vyzkoušet prostřednictvím sestavení nového e-mailu. Uvidíte, že funguje správně a nyní můžete odeslat e-mail komukoli s vlastní e-mailovou adresou, aniž byste museli otevřít webového poštovního klienta cPanel.
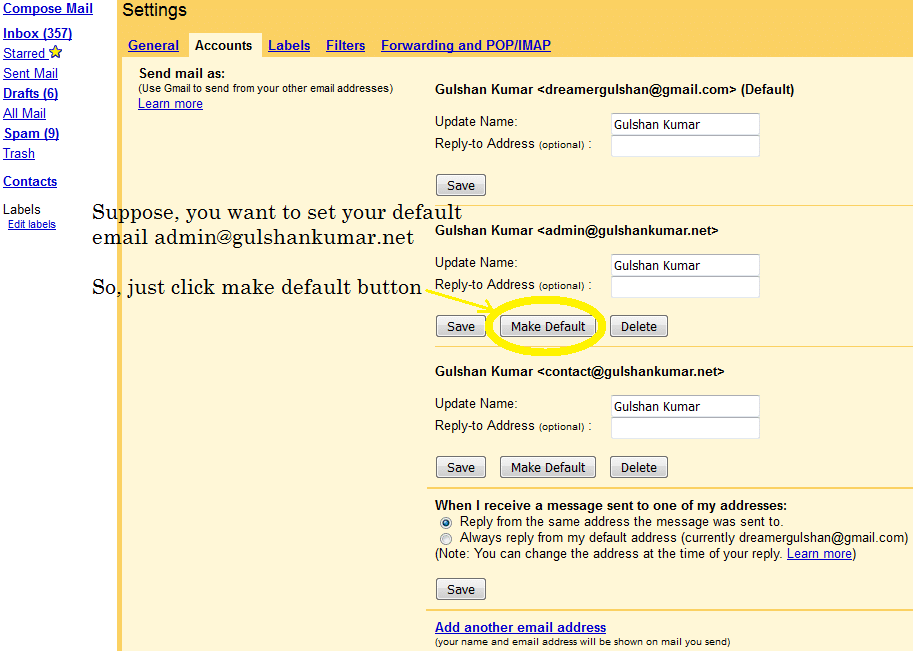
Krok 9. Vlastní e-mail můžete v Gmailu nastavit jako svůj default email for compose email dialogue box. Tuto funkci můžete získat na adrese Gmail setting > Accounts and Import.
V režimu HTML služby Gmail nemůžete změnit položku „z e-mailu“ přímo z pole pro vytváření pošty, takže tato technika zlepší zážitek z používání e-mailu i při pomalém připojení k internetu.
Laskavě nedělejte kompromisy s bezpečností. Velmi vám doporučuji, abyste průběžně aktualizovali své mobilní číslo a ujistili se, že jste v nastavení svého účtu Gmail povolili dvoufázové ověření. Protože dobře víte, že Gmail není jako Yada..Yada falešný Facebook account. ID Gmailu možná používáte k přihlášení k mnoha dalším službám Google a také k aplikacím třetích stran. Proto je zabezpečení tohoto e-mailu nesmírně důležité. Toto nastavení můžete spravovat na adrese accounts.google.com v možnosti přihlášení..
Velmi bych ocenil, kdybyste se s námi podělili o zpětnou vazbu nebo návrhy k tomuto článku. Děkuji.
✅ Jak mohu přeposlat e-mail z cPanelu na Gmail?
Přihlaste se do cPanelu a nastavte přesměrování e-mailů v možnosti Přesměrování e-mailových účtů.
✅ Blokuje Gmail přeposílání?
Ne, Gmail neblokuje přeposílání.
✅ Jak dlouho trvá přesměrování Gmailu?
Zpravidla 5-10 minut. Postupujte správně krok za krokem podle tohoto návodu.
✅ Je přeposílání e-mailů z cPanelu na Gmail zdarma?
Tato metoda je omezena na odesílání a přijímání e-mailů. Pokud však chcete hostovat e-maily přímo na serveru Gmail a kromě hostování e-mailů chcete využívat plný přístup ke službám Google, pak byste měli určitě dát přednost Google Workspace.
Good post Gulshan. I have implemented this trick for one of my company business mail. Thanks for sharing.
Very useful.
Hi, This is awesome post and you are saving our money for buying custom emails. I would really appreciate you ! 🙂
Hi, glad to see you here. Thanks for your kind comment.
Hi Gulshan,
Nice post, also i want to know what this actually mean „Note: Well, this method is limited for sending and receiving email“ ? I mean after following whole above steps( receiving and sending email), is it working only for 30 days or more ?
Hello Satinder, Thanks for kind words.
The above step which you learned about forwarding, will work for lifetime as long you will have custom domain linked to any Gmail id.
Please note, the limit comes with self hosted email, I’m not saying about Gmail for this whole steps. Suppose, if you have very busy email so chances are it will use more resources which your hosting can’t handle or they may set daily limits over it. So, it is my personal recommendation that for every business email always go with Google Apps for Work. It comes with 30 days free trial. After then, they will charge $5/mo.
If you have any more question, or need help with anything please let me know.
Regards,
Gulshan
Dear Gulshan!
Thank you for this post! Thanks to you I was able to send/receive custom emails through gmail.
Hi, how can I get the mail on my phone using gmail and a custom domain?
Hi Gulshan,
Thanks for this important idea.
I have implemented this for my blog email ID and I forwarded it to the Gmail personal ID. I found that when we receive the email to blog’s email id then it took few more minutes to reach at Gmail inbox.
If we directly configure the blog’s email id to any app, then it will come there real time.
Thanks,
Amit
Finally, I learned how to get free email with own domain. Thank you.
Thanks a lot for this guide. It have actually helped me to configure my email client properly.
There is a problem with this article: gmail and outlook will generally tag email forwarded this way as spam, because of a SPF fail or softfail. Email forwarded this way appears to come from a random server owned by your host, and not from your domain.
There is a simple fix: don’t use forwarding. Both gmail and outlook are willing to check email directly; go to settings and add account. Check it with security (995 pop3, 465 outgoing SSL). This just works and you get the benefit of effective spam filtering from gmail or outlook.
To be clear, if you want to use gmail to check
joe@example.comandsue@example.com, where example.com is your domain, you can forwardjoe@example.comtosue@example.comand just checksue@example.com, because forwarding “inside” your host works fine. But forwarding to gmail or outlook gets tagged as spam most of the time.Hi Preston, Thanks for your feedback at my article.
Hi Gulshan,
Is there any workaround for the spam issue? I tried to use direct email check as suggested by Preston but somehow my gmail is having problem connecting to my cpanel mail sever. Not sure how to fix that thus if you know the solution to forwarding as spam issue, please let me know.
my gmail is having problem connecting to my cpanel mail sever.
This is not helpful for me to understand your query. Could you please share any screenshot or particular error message?
Thanks
Sorry for my poor English, I meant to ask about Gmail sending forwarded emails from Cpanel webmail to the spam folder. I would like to know if you know of any way to avoid that?
1. Login to Gmail from the Desktop
2. In the Search bar, type
to:admin@your-domain.com3. Click on Show Search Option > Create a filter > Choose Never send it to spam. See Screenshot for help.
4. Make sure you’ve correct SPF records at DNS as per email hosting server.
If you feel above process is too difficult, I would recommend going with G Suite instead.