WebP on kuvien tiedostomuoto, joka tarjoaa häviöttömän ja häviöllisen pakkauksen. Jos käytät WordPressiä, voit helposti tarjota kaikki kuvat WebP-muodossa muutamalla perusparannuksella.
Useimmat selaimet tukevat WebP:tä
- Caniusen tietojen mukaan WebP:tä tuetaan tällä hetkellä 94 prosentissa selaimista, joihin kuuluvat Apple Safari, Google Chrome, Opera, Mozilla Firefox, Microsoft Edge ja Android-selaimet.
- Voit silti käyttää JPEG/PNG-muotoa varasuunnitelmana selaimille, jotka eivät tue selaimia.
WebP-muodossa olevan kuvan käytön tärkeimmät edut
- Verrattuna normaalin JPG- tai PNG-kuvan kokoon, samanmittainen kuva WebP voi palvella pienissä tavuissa. Näin ollen kuvat latautuvat nopeammin. Siitä on hyötyä erityisesti mobiilikäyttäjille.
- Laadukkaiden kuvien tarjoaminen muutamalla tavulla säästää kaistanleveyttä huomattavasti.
- Pidä verkkosivustosi ajan tasalla uusimpien trendien kanssa. Älä menetä keskustelua härkäkärryn hitaan latauksen takia.
- Google Developers suosittelee WebP:tä. Auttaa sinua ohittamaan Google PageSpeed Insightin ”serve images in next-gen format” -suosituksen.
Näin voit tarjota WebP:tä WordPress-sivustolle.
Serve WebP NGINX using ShortPixel Plugin
ShortPixel-lisäosa voi auttaa irtotavarana kuvan optimoinnissa WebP-muunnoksella ja tarjoilussa selaimen tuen mukaan. Parasta tässä lisäosassa on, että tämä lisäosa tekee käsittelyn palvelimellaan, joten se ei hidasta sivustosi toimintaa.
- Jos WordPress on isännöi Apache-palvelimen käyttäjä voit käyttää .htaccess uudelleenkirjoittaminen.
- NGINX:n tapauksessa voit käyttää alla olevaa uudelleenkirjoitussääntöä hosting-tuen avulla.
- This plugin is supported with WP Rocket cache plugin as well.
Lisää ensin tämä lohko ennen palvelindirektiiviä:
map $http_accept $webp_suffix {
    default "";
    "~*webp" ".webp";
}
Lisää tämä lohko palvelindirektiivin sisään:
location ~* ^(/wp-content/.+)\.(png|jpe?g)$ {
    set $base $1;
    set $webp_uri $base$webp_suffix;
    set $webp_old_uri $base.$2$webp_suffix;
    set $root "<<FULL PATH OF wp-content PARENT>>";
    root $root;
    add_header Vary Accept;
    if ( !-f $root$webp_uri ) {
        add_header X_WebP_SP_Miss $root$webp_uri;
    }
    try_files $webp_uri $webp_old_uri $uri =404;
}
Sijoittumisella on merkitystä. Lisää se siis huolellisesti.
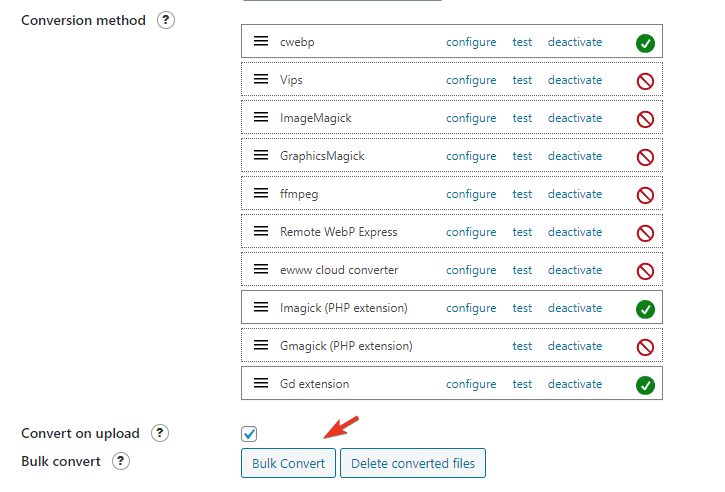
WebP Express -liitännäisen käyttäminen NGINX:ssä
- Asenna ja aktivoi WebP Express, ilmainen lisäosa. Suuret kiitokset kehittäjälle.
- Operation mode: Varied image responses.
- Scope: Upload only.
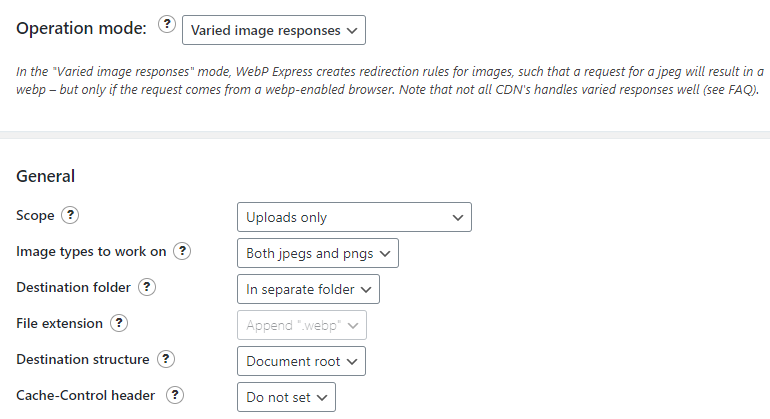
- Run Bulk Convert
- Apache-palvelimella isännöidylle WordPressille ei tarvita mitään asetuksia, koska .htaccess tekee kaiken taikuuden.
- NGINX server user need to modify configuration file with root access.
Koodin paremman organisoinnin vuoksi suosittelen, että se sijoitetaan ensin /etc/nginx/-hakemistoon nimellä webp.conf ja sisällytetään sitten pääpalvelinlohkoon.
Kirjoita alla oleva komento
cd /etc/nginx/ && nano webp.conf- Liitä alla oleva koodi napsauttamalla hiiren kakkospainikkeella nanoeditorin sisällä SSH-terminaalissa.
# WebP Express rules
# --------------------
location ~* ^/?wp-content/.*\.(png|jpe?g)$ {
  add_header Vary Accept;
  expires 365d;
  if ($http_accept !~* "webp"){
    break;
  }
  try_files
    /wp-content/webp-express/webp-images/doc-root/$uri.webp
    $uri.webp
    /wp-content/plugins/webp-express/wod/webp-on-demand.php?xsource=x$request_filename&wp-content=wp-content
    ;
}

# Route requests for non-existing webps to the converter
location ~* ^/?wp-content/.*\.(png|jpe?g)\.webp$ {
    try_files
      $uri
      /wp-content/plugins/webp-express/wod/webp-realizer.php?wp-content=wp-content
      ;
}
# ------------------- (WebP Express rules ends here)
- Tallenna painamalla CTRL+O ja Enter-näppäintä.
Vieraile nyt pääpalvelinlohkossa.
cd /etc/nginx/sites-available && lsMuokkaa asetustiedostoa ja laita include webp.conf; kuten alla näkyy.
# General
server {
    listen         80;
    server_tokens off;
    return 301 https://$host$request_uri;
}
server {
server_tokens off;
root /var/www/html;
index index.php index.html index.htm;
server_name .gulshankumar.net;
client_max_body_size 0;

    listen [::]:443 ssl http2 ipv6only=on;
    listen 443 ssl http2;
        ssl_protocols TLSv1.1 TLSv1.2 TLSv1.3;
        ssl_certificate /etc/comodo/cert.pem;
        ssl_certificate_key /etc/comodo/private.pem;
        ssl_prefer_server_ciphers on;
        ssl_session_cache   shared:SSL:20m;
        ssl_session_timeout 20m;
        ssl_ciphers 'TLS13+AESGCM+AES128:EECDH+AES128';

error_page 404 /404.html;
error_page 500 502 503 504 /50x.html;


# WebP Express rule goes here

include webp.conf;

# WebP Rule end

location / {
    try_files $uri $uri/ /index.php$is_args$args;
}
Lataa NGINX uudelleen tai käynnistä se uudelleen.
service nginx reloadHuomioitavaa
- Jos käytät BunnyCDN:ää, sinun on otettava käyttöön Vary Cache.
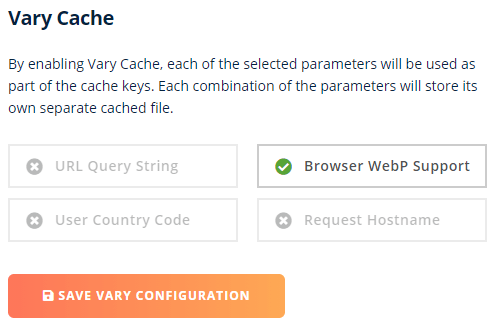
- Cloudflare ei tue Vary Cachea. Kokeile alla olevaa vaihtoehtoista lähestymistapaa.
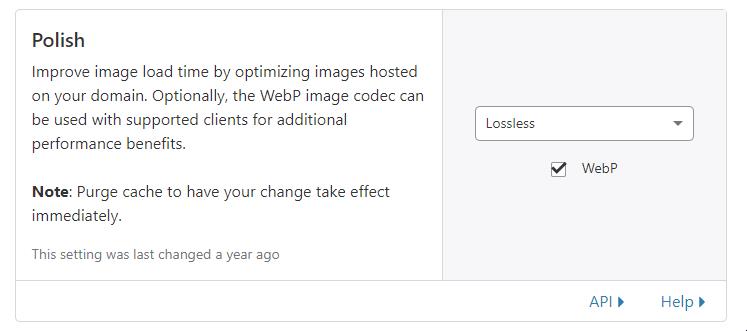
Käytä WebP:tä Cloudflare CDN:n avulla (ilman liitännäistä)
Jos olet Cloudflare Pro -käyttäjä, voit ottaa WebP:n käyttöön yhdellä napsautuksella Speed-välilehdeltä.
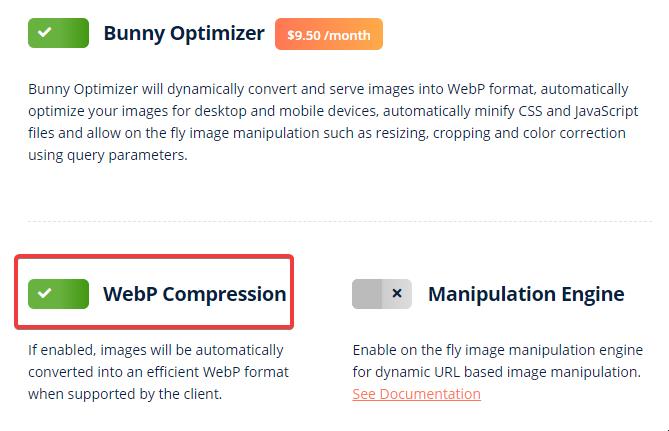
WebP:n tarjoaminen BunnyCDN Optimizerilla (ilman liitännäistä)
BunnyCDN tarjoaa Optimizer-palveluja, joissa on lennossa toimiva WebP-palveluratkaisu. Se on yhden napsautuksen ratkaisu 9,5 $/mo lisämaksusta.
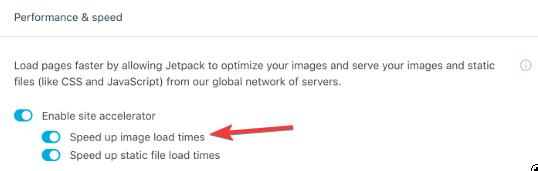
Serve WebP käyttäen JetPack Pluginia
- Asenna ja aktivoi JetPack-lisäosa
- Ota sivuston kiihdytin käyttöön.
Saatat huomata kuvanlaadun heikkenemisen, joka voidaan korjata alla olevalla suodattimella.
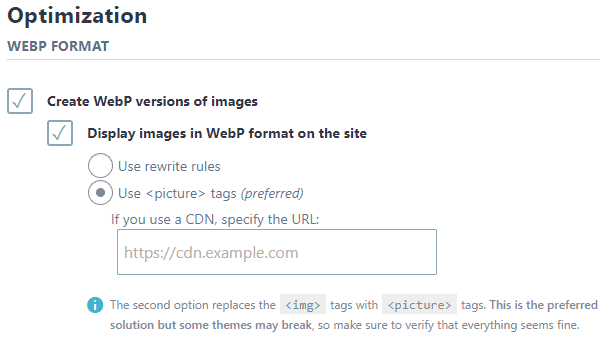
WebP:n palveleminen Imagifyn avulla
Imagify on WP Rocketin takana olevan WP Median tarjoama Image Optimization -lisäosa.
- Asenna ja aktivoi Imagify-lisäosa
- Anna API-avain
- Valitse asetuksista Kuvatunnisteet-tila pika-asetusta varten.
- Vaihtoehtoisesti voit käyttää uudelleenkirjoitussääntöä joidenkin palvelinkonfiguraatioiden kanssa, kuten tässä on kuvattu.Apachen kanssa .htaccess-koodin lisääminen tapahtuu automaattisesti, mutta NGINXin kanssa se on tehtävä manuaalisesti.
WebP jotta JPG
WebP saattaa heikentää kuvanlaatua hieman joissakin tapauksissa. Jos haluat palata WebP:stä takaisin JPG:hen, noudata näitä ohjeita.
- Deaktivoi ja poista WebP:hen liittyvä lisäosa.
- Poista siihen liittyvät asetukset asetustiedostosta (.htaccess)
- Poista .webp-tiedostoja ja säästä levytilaa.
find . -type f -name "*.webp*" -deleteJos haluat muuntaa WebP-tiedosto JPG, voit käyttää työkalua CloudConvert.
Manuaalinen menetelmä ilman Pluginia
Tämä osio on tarkoitettu vain tiedoksi.
Vaihe 1: WebP-muodon lisääminen HTML-dokumenttiin
Ensin sinun on muunnettava kaikki kuvasi WebP-muotoon ja käytettävä varakuvana aiempaa kuvaformaattia. On olemassa jokin lisäosa, kuten Optimus, joka voi tehdä tämän työn automaattisesti. Mutta näytän toisen helpon tavan tehdä tämä manuaalisesti.
- Siirry tälle verkkosivustolle image.online-convert.com/convert-to-webp
- Liitä kuvalinkki ja napsauta Muunna. WebP-muotoiset kuvasi ladataan
- Muokkaa nyt raakaa HTML-koodia, jossa normaali kuvasi näkyy.
Sanotaan, että alussa Image HTML-koodisi oli tällainen.
<img src="https://www.gulshankumar.net/wp-content/uploads/2016/09/webplogo.png" alt="gulshan kumar" width="186" height="66" />Sinun täytyy kääriä yllä oleva koodi hieman enemmän HTML-merkintää.
<picture>
	<source srcset="https://www.gulshankumar.net/wp-content/uploads/2016/09/webplogo.webp" type="image/webp" />
	<img src="https://www.gulshankumar.net/wp-content/uploads/2016/09/webplogo.png" alt="gulshan kumar" width="186" height="66" />
</picture>
Nyt HTML-dokumenttisi on valmis palvelemaan kuvia WebP-muodossa.
Vaihe 2 : Määritä palvelimen asetukset
Just one more step, you need to configure some Apache Webserver settings via .htacccess so browser and web server can treat it properly like all other images.
Web Hosting -palvelimesi ei välttämättä tiedä, minkä mime-tyypin kuvia sen on palveltava. Joten on lisättävä oikea mime-tyyppi. Lisäksi olisi syytä asettaa expiry-otsikko välimuistiin tallentamista varten.
# Serve Images with correct Mime Type
AddType image/webp .webp

# Setup Cache
ExpiresActive On
ExpiresByType image/webp A2592000
Huomaa ystävällisesti: Varmista, että käytät WordPress 5.8 tai uudempaa versiota.
Jos käytät WordPressin vanhempaa versiota 5.8, se ei tue WebP-muotoisen kuvan lataamista. Saatat saada virheilmoituksen ”Tämä tiedostotyyppi ei valitettavasti ole sallittu turvallisuussyistä”, kun lataat .webp-kuvia.
Joten, on korjattava tämä ongelma lisäämällä tämä koodi teema functions.php Se olisi hyödyllistä, jos lataat kuvia suoraan WordPress Dashboard > Media vaihtoehto.
function webp_upload_mimes( $existing_mimes ) {
	// add webp to the list of mime types
	$existing_mimes['webp'] = 'image/webp';

	// return the array back to the function with our added mime type
	return $existing_mimes;
}
add_filter( 'mime_types', 'webp_upload_mimes' );
Done.
Jos tarvitset apua, katso kommenttiosio. Olisi ilo auttaa sinua.
Lisähuomautukset
- Jos olet Cloudways-käyttäjä, et voi toimittaa WebP:tä .htaccessin uudelleenkirjoituksella, koska he käyttävät NGINX:ää erityisesti staattisiin tiedostoihin. Tässä tapauksessa sinulla on kaksi vaihtoehtoa. Pyydä hosting-tiimiä muokkaamaan konfigurointitiedostoa puolestasi tai käytä JavaScriptiä tai kolmannen osapuolen CDN-pohjaista ratkaisua, kuten Bunnya tai CF:ää.
Lisälukemista
Jos olet utelias oppimaan lisää WebP:stä, katso nämä linkit.
Kiitos.
I didn’t try the webp format as of now in WordPress. But now after reading this post I will try to implement it. I will compare the image quality from other formats as well. Thank you for sharing this article.
Have you experienced the WebP format causing problems for seo? is it better to use it as jpg or this way?
Google officially recommends using WebP format images along with JPG as fallback.
How to remove hyperlink for the webp image format?
I guess you want to remove .webp extension from URL. You need to try rewrite approach.
I have a question about ShortPixel method.
I use Plesk panel with NGINX
There is a section called Additional nginx directives
Here you can specify the settings for the nginx reverse proxy server that runs in front of Apache. Your directives will override the server-wide nginx configuration. For example, you may want to change the connection timeout or to pack requests with gzip. Use the same syntax as you use for nginx.conf. For example, if you want to pack all the proxied requests with gzip, add the line: ’gzip_proxied any;’.
https://i.imgur.com/OLWu9bJ.png
can i add codes there i dont know?
map $http_accept $webp_suffix {
default ””;
”~*webp” ”.webp”;
}
location ~* ^(/wp-content/.+).(png|jpe?g)$ {
set $base $1;
set $webp_uri $base$webp_suffix;
set $webp_old_uri $base.$2$webp_suffix;
set $root ”<>”;
root $root;
add_header Vary Accept;
if ( !-f $root$webp_uri ) {
add_header X_WebP_SP_Miss $root$webp_uri;
}
try_files $webp_uri $webp_old_uri $uri =404;
You used these sentences!
before the server directive and inside directive.
I read your Installing WordPress at NGINX topic so
If i try to add these from codes is this right?
map $http_accept $webp_suffix {
default ””;
”~*webp” ”.webp”;
}
server {
listen 80;
return 301 https://$host$request_uri;
}
server {
location ~* ^(/wp-content/.+).(png|jpe?g)$ {
set $base $1;
set $webp_uri $base$webp_suffix;
set $webp_old_uri $base.$2$webp_suffix;
set $root ”<>”;
root $root;
add_header Vary Accept;
if ( !-f $root$webp_uri ) {
add_header X_WebP_SP_Miss $root$webp_uri;
}
try_files $webp_uri $webp_old_uri $uri =404;
}
# Document Root
root /var/www/html;
index index.php index.html index.htm;
server_name .example.com;
client_max_body_size 0;
listen [::]:443 ssl http2 ipv6only=on;
listen 443 ssl http2;
ssl_protocols TLSv1.1 TLSv1.2 TLSv1.3;
ssl_certificate /etc/letsencrypt/live/example.com/fullchain.pem;
ssl_certificate_key /etc/letsencrypt/live/example.com/privkey.pem;
ssl_prefer_server_ciphers on;
ssl_session_cache shared:SSL:20m;
ssl_session_timeout 20m;
ssl_ciphers ’TLS13+AESGCM+AES128:EECDH+AES128’;
error_page 404 /404.html;
error_page 500 502 503 504 /50x.html;
location / {
try_files $uri $uri/ /index.php$is_args$args;
}
location ~* .php$ {
if ($uri !~ ”^/uploads/”) {
fastcgi_pass unix:/run/php/php7.4-fpm.sock;
}
include fastcgi_params;
fastcgi_param SCRIPT_FILENAME $document_root$fastcgi_script_name;
fastcgi_param SCRIPT_NAME $fastcgi_script_name;
}
location = /favicon.ico {
log_not_found off;
access_log off;
}
location = /robots.txt {
log_not_found off;
access_log off;
allow all;
}
location ~* .(css|gif|svg|ico|jpeg|jpg|js|png)$ {
expires 1y;
log_not_found off;
}
# Enable Gzip compression.
gzip on;
# Disable Gzip on IE6.
gzip_disable ”msie6”;
# Allow proxies to cache both compressed and regular version of file.
# Avoids clients that don’t support Gzip outputting gibberish.
gzip_vary on;
# Compress data, even when the client connects through a proxy.
gzip_proxied any;
# The level of compression to apply to files. A higher compression level increases
# CPU usage. Level 5 is a happy medium resulting in roughly 75% compression.
gzip_comp_level 5;
# Compress the following MIME types.
gzip_types
application/atom+xml
application/javascript
application/json
application/ld+json
application/manifest+json
application/rss+xml
application/vnd.geo+json
application/vnd.ms-fontobject
application/x-font-ttf
application/x-web-app-manifest+json
application/xhtml+xml
application/xml
font/opentype
image/bmp
image/svg+xml
image/x-icon
text/cache-manifest
text/css
text/plain
text/vcard
text/vnd.rim.location.xloc
text/vtt
text/x-component
text/x-cross-domain-policy;
}
Is this right?
And what do you think about plesk how i use webp at plesk?
Thanks
Please consult a freelancer. It is out of scope to guide here.
Hi, this is a good article, but
It is better to install the plugin or put the code directly for webp
This way, each image does not create two urls. Does it cause a problem in the SEO site?
Dynamic rewriting from Server side doesn’t create two URLs instead it servers same just by changing response as per browser support.
A plugin is recommended way.
Hi Gulshan. Any free plugin(totally free) for converting jpg to webp format. God Bless you.
First option which is WebP Express.
Thank You! Gulshan
Hey Gulshan Kumar ,
Awesome post with good information. It is my first time commenting on your blog post and am glad to say that you have done a fabulous work and provided helpful & easy tips to serve webp format images in WordPress. I really like and appreciate the way you have explained the things in such a step-by-step process making the concept very clear and easy to understand. while scrolling through your blog post i have noticed that you have also discussed about the major benefits of using webp format image that are also providing good understanding. You have explained all the vital things in an easy language that are true enough to understand and educate the readers.
After going through this complete guide i really gain ideas and am sure that this post is definitely going to help lots of people & especially WordPress-users to sort out their query. Good work and keep sharing more similar post.
Eventually thanks for sharing your knowledge, ideas and such an informative post.
Regards
-Aadarsh
Hi Adarsh, Thanks for your kind words. It really means a lot to me.
Hello. Please check Hiwebp plugin wordpress.
https://wordpress.org/plugins/hiwebp/
Works a treat, thanks!
If you disable copy function then it’s better to not include any code reference. okay?
Thanks for notifying. I have allowed copying function for snippet in this article.
I have tried this method to enable WebP format images on my site, but I am encountering some unknown error. My site showing a low score on google page speed insight.
May I know please which specific method you have tried? Also, please share the screenshot of error. I will try my best to help you.
Why is not wordpress supporting WEBP format by default?Its high time now.
It works great in Chrome and Firefox on the PC/Laptop. BUT, the webp images are not displayed on iPhone (Chrome and Safari)
Safari is not supporting webP. Chrome on iOS is based on Safari, too. So webP won‘t work on iOS at all and you have to serve a fallback image.
Works a treat, thanks!
Hi,
I am not quite clear on where this needs to be inserted. I am looking to Optimise my header image to Webp. Is there a video or screenshot based write up on how I can include this?
Would really appreciate the help
Regards
Shwetha
Hello Gulshan,
Thanks for sharing this article.
I did follow the steps mentioned in here in this format.
But the image is not appearing on Firfox, and IE. Did I miss any thing in here.
Please suggest.
This code no longer works. He’s not loading. I don’t know why it doesn’t work.
It should work fine. Please share your site URL so I can check.
Hi..Just wondering if i need to edit each image tag or is there somewhere in my theme templates this could be done.
Any guidence would be great.
Thanks
Mark
Do I need to edit all the image tags one by one now? Isn’t there another way to do that?
Hi Gulshan,
Even after putting the code snippet in the function.php file.
I still have the same error message when I try to upload webp format. The message is ”sorry this file type is not permitted for security reasons”.
Can you help fix this?
Thanks.
Martin
Hello Martin,
At my end it’s working fine. For a demo, I have sent a quick video on your email. Please check and revert back if I can help with any thing else.
Thanks
I haven’t added anything except the last code from your post in function.php to support Webp format on all of future media uploads. Do I need to add any thing else ? or will it create any kind of issue for users whose browsers are yet unsupported to this format?
anyway keep up the good work 😉
That’s all. Now you can easily upload webp directly in your WordPress Dashboard. No extra things to do. Just feel free to use it with picture HTML tag. So, it will support for all browsers, without any issues. Thanks
The problem with the suggested HTML implementation is that Chrome will make two requests, one for WEBP and another one for JPEG resulting in double requests and increasing the page load time.
Hey dear,
It doesn’t create two requests(as you are saying) instead it automatically serve only one type image format either WebP or JPEG according to HTTP accept type.
I’d suggest please try one more time and look carefully at Network Timeline in the browser console. If you see there are double requests, please email me your HTML code and timeline screenshot also. I’d love to review it. I believe it should work fine for you too.
Thanks & Regards,
Gulshan
I installed the code into the functions.php. And as you said it did allow me to upload in my WP theme. The problem is that the image doesn’t allow cropping so it won’t allow me to use it on the site.