Ce tutoriel vous guidera dans le processus d’installation de WordPress sur un serveur Ubuntu 22.04 en utilisant NGINX comme serveur web, MariaDB comme système de gestion de base de données et PHP 8.2 comme langage de programmation.
Tout d’abord, nous allons couvrir l’installation et la configuration de NGINX, MariaDB, et PHP 8.2. Ensuite, nous créerons une nouvelle base de données MariaDB et un nouvel utilisateur pour WordPress. Ensuite, nous téléchargerons et configurerons WordPress, et enfin, nous testerons l’installation et ferons les ajustements nécessaires.
À la fin de ce tutoriel, vous aurez un site Web WordPress entièrement fonctionnel fonctionnant sur un serveur Ubuntu 22.04 avec NGINX, MariaDB et PHP 8.2. Cette configuration est idéale pour les sites Web performants et sécurisés.
Suivez ces 3 étapes et regardez la vidéo. Besoin d’aide ? Contactez-moi. 😊
Partie A : Maintenir les serveurs de nom Cloudflare actifs
Nous allons utiliser le DNS de Cloudflare pour obtenir le certificat SSL Wildcard de Let’s Encrypt. Effectuez d’abord cette étape pour profiter d’une migration sans temps mort.
Vérifier les serveurs de noms actuels
- Trouvez vos serveurs de noms actifs à https://www.whatsmydns.net/#NS/example.com
- Si vous utilisez le NS par défaut de votre ancien hébergeur ou registraire de domaine, vous devez le remplacer par Cloudflare.
- Apprendre how to use Cloudflare DNS
Partie B : Préparer un serveur Ubuntu Server 22.04 LTS

1. Inscrivez-vous à Vultr pour obtenir 100 $ de crédits gratuits (valable pendant 30 jours).
J’ai essayé de nombreuses sociétés de serveurs en nuage, mais mon expérience m’a appris que vous ne pouvez pas vous tromper avec Vultr. Ces gars-là sont authentiques et attentifs quand il s’agit de soutien et de services.
⚡ Performance
- NVME / SSD
- 3.7 GHz CPU
- Vitesse du réseau jusqu’à 5Gbps
- Datacenter in America, Europe, Asia, Austraillia
- IPV6 prêt
💡 Caractéristiques
- Tableau de bord convivial pour les débutants
- Snapshot en un clic
- Automtatic Backup (Payant)
- Pare-feu en nuage gratuit
- DDoS protection (Paid)
- 100% KVM Virtualization
⚙ Soutien
- PayPal/Carte
- Assistance ticket 24/7
- Documentation
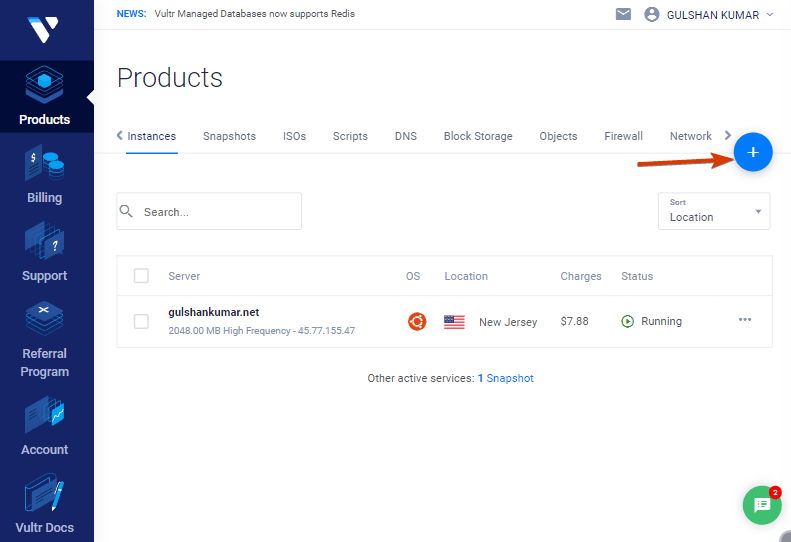
2. Créer un nouveau serveur VPS
Il suffit de cliquer sur le bouton plus pour commencer
3. Choisissez le serveur haute fréquence
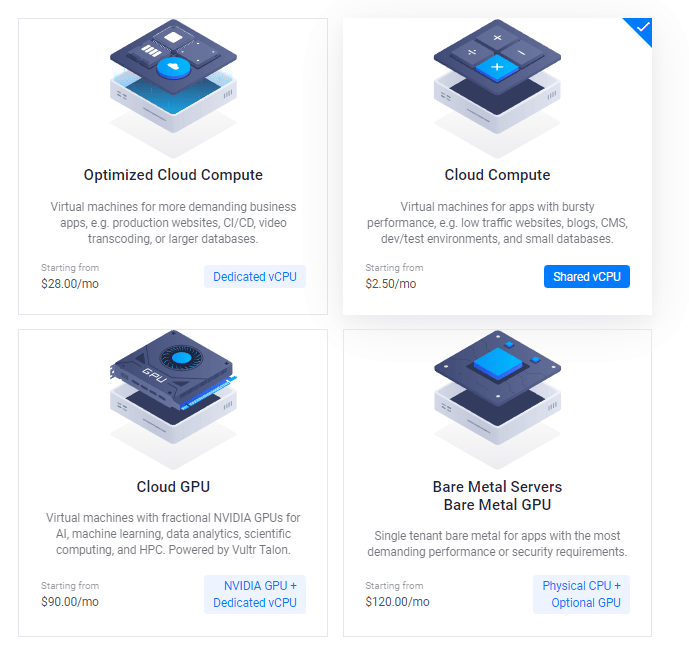
Ensuite, vous pouvez sélectionner l’option AMD High Performance ou Intel High Frequency dans CPU & Storage Technology. Cette dernière offre le CPU et le disque NVMe les plus rapides qui soient. Si votre budget est inférieur, optez pour le plan régulier avec CPU Intel, qui vous permettra d’obtenir un disque SSD.

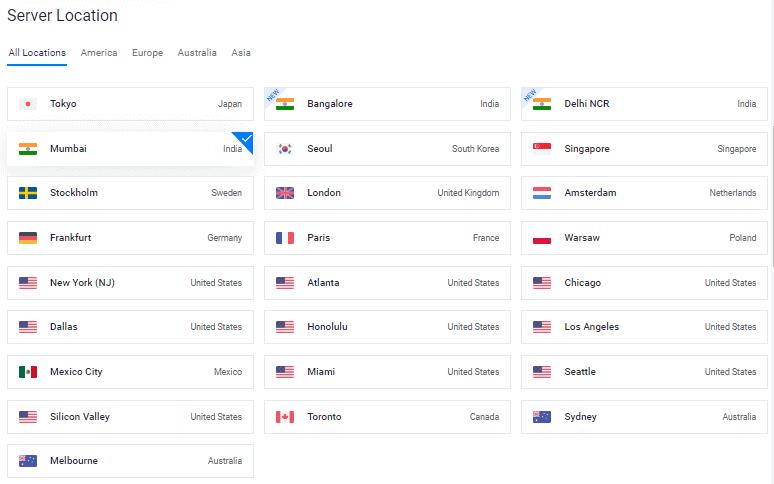
4. Choisir un emplacement de serveur
Choisissez un emplacement de serveur qui soit proche de votre public cible.
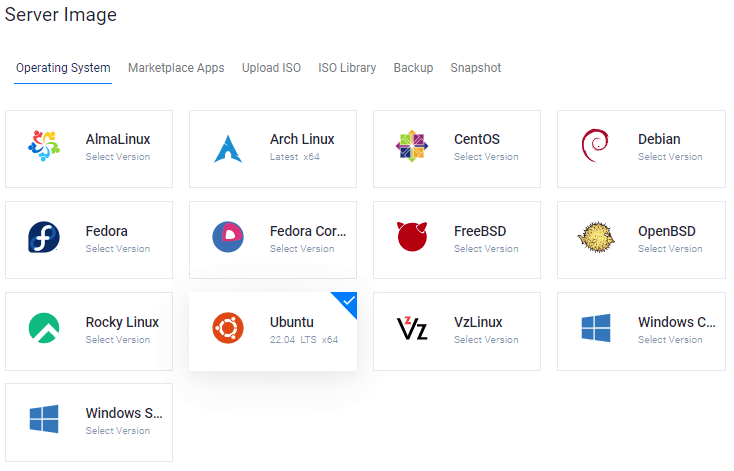
5. Sélectionnez le système d’exploitation Ubuntu 22.04 x64.
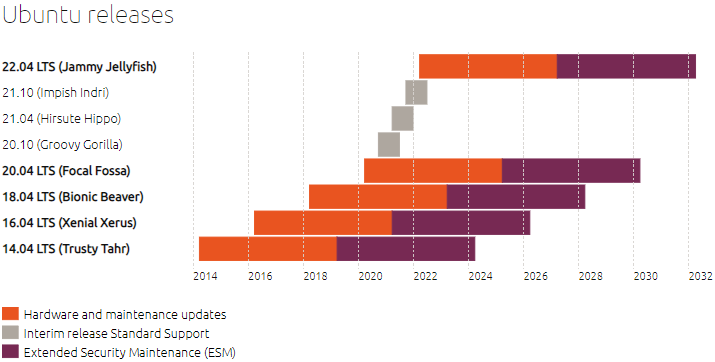
Actuellement, Ubuntu 20.04×64 et 22.04×64 sont toutes deux des versions LTS (Long Term Supported) compatibles avec la plupart des paquets que nous allons installer.
6. Choisir une taille de serveur
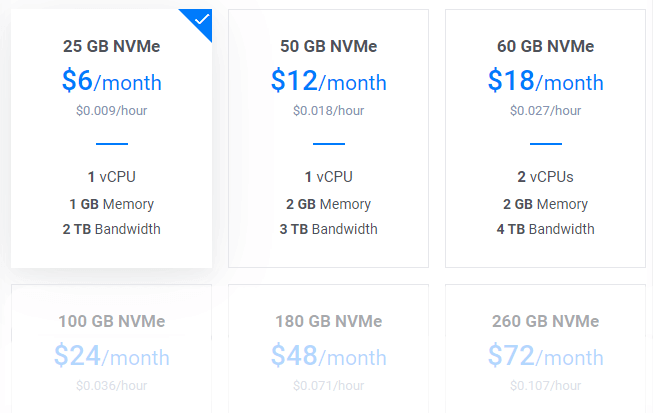
Un plan de 6 $/mois serait un excellent point de départ pour un nouveau blog. Vous pouvez l’améliorer à tout moment en fonction de vos besoins.
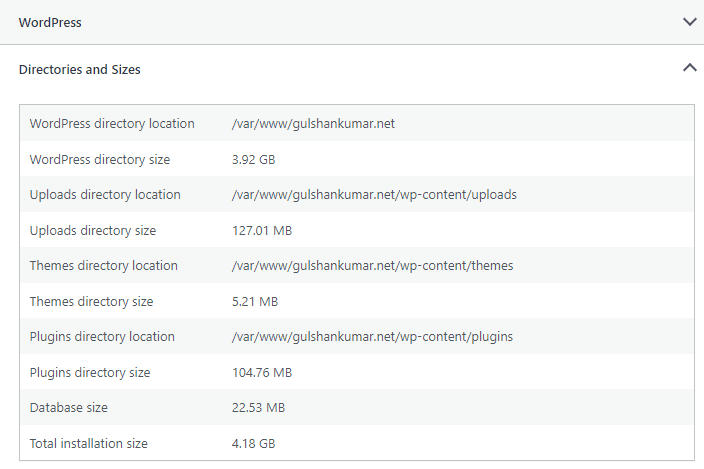
Conseil : si vous effectuez une migration, vérifiez la taille totale de l’installation dans les informations sur la santé du site.
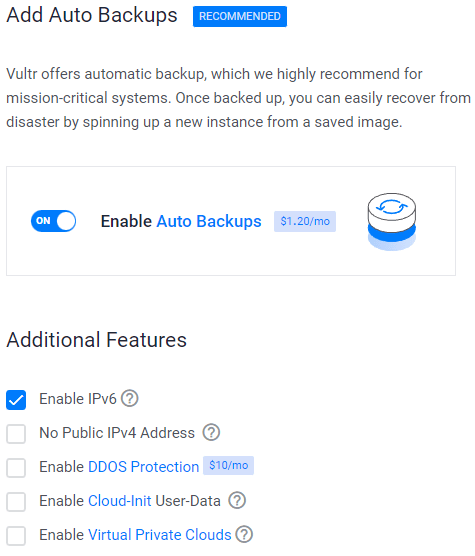
7. Activer IPV6, Sauvegarde
8. Ajouter une clé SSH
Il s’agit d’une étape recommandée mais facultative pour une sécurité renforcée.
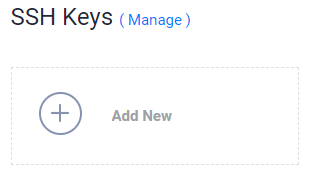
- Cliquez sur le bouton Ajouter nouveau pour ajouter une nouvelle clé SSH afin de soumettre votre clé 🔒Publique.
- Générez les clés en utilisant la méthode ci-dessous en fonction de votre système d’exploitation.

- Téléchargez l’application PuTTy.
- Recherchez PuTTygen dans le menu Démarrer.
- Cliquez sur le bouton Générer et survolez le pointeur de la souris.
- Copiez la clé publique et fournissez-la à Vultr
- Entrez la phrase de passe de la clé
- Enregistrez la clé privée 🔑Private Key à l’endroit le plus sûr.
- Ceci peut être utilisé pour la connexion à SSH ou SFTP.

- Run:
ssh-keygen -t rsa. For a more secure 4096-bit key, run:ssh-keygen -t rsa -b 4096 - Appuyez sur la touche Entrée lorsqu’on vous demande où vous voulez enregistrer la clé (l’emplacement par défaut sera utilisé).
- Saisissez une phrase de passe pour votre clé.
- Run
cat ~/.ssh/id_rsa.pub– cela vous donnera la clé dans le bon format à coller dans le panneau de contrôle. - Make sure you backup the
~/.ssh/id_rsafile. Il ne peut être récupéré s’il est perdu.
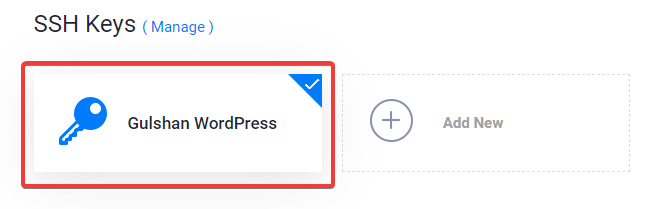
Sélectionnez votre clé SSH
En suivant ces étapes, vous attacherez votre clé publique à votre nouvelle Instance. Ensuite, vous serez en mesure de vous connecter à SSH en utilisant à la fois le mot de passe en texte brut et la clé SSH.
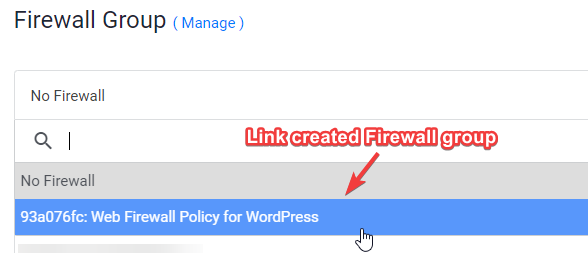
9. Lier la règle du pare-feu Web à l’instance du serveur
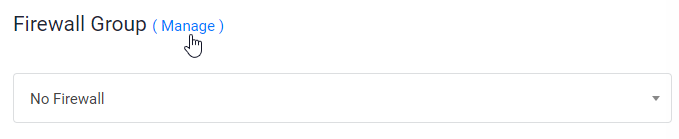
- Cliquez sur Gérer et créez un nouveau groupe de pare-feu.
- Autoriser le port TCP 22 pour SSH. 80 pour HTTP et 443 HTTPS pour les règles IPV4 et IPV6.
- Une fois cela fait, associez le groupe Pare-feu à votre Instance.
10. Entrez le nom d’hôte et l’étiquette cliquez sur Déployer maintenant
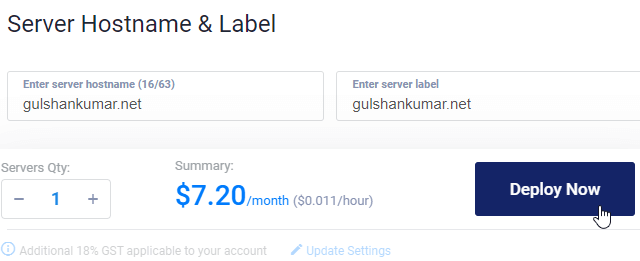
Maintenant, vous verrez l’installation dans la progression
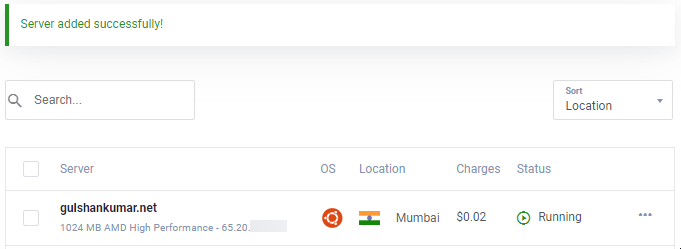
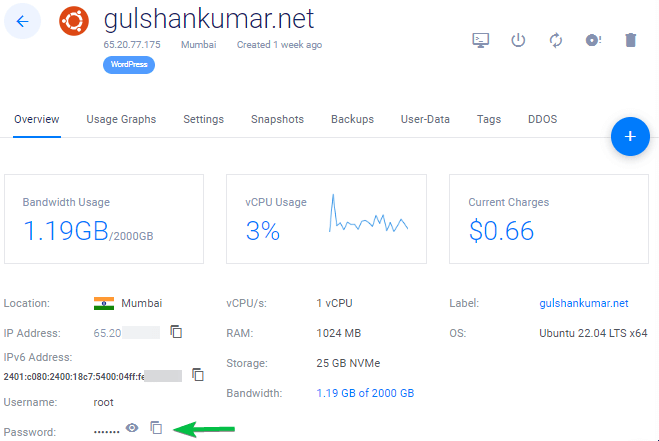
11. Aller à la page New Instance
Copiez l’adresse IP, le nom d’utilisateur et le mot de passe. Votre port par défaut est le 22.
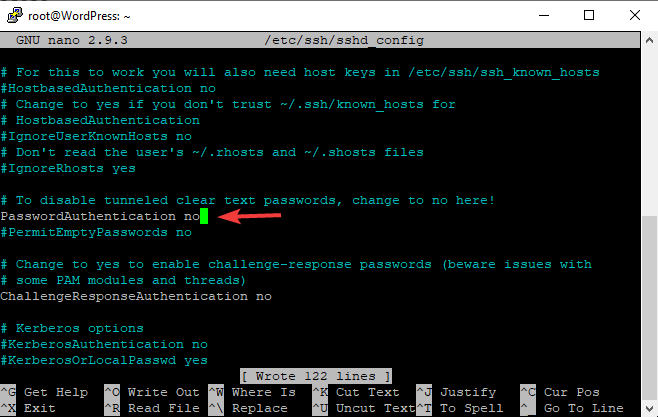
12. Désactiver la connexion par mot de passe
Pour des raisons de sécurité, il est recommandé de désactiver l’authentification par mot de passe et de n’autoriser que l’authentification par clé.
- Modifier le fichier de configuration
nano /etc/ssh/sshd_config - Trouvez (CTRL + W) et recherche
PasswordAuthentication - Changer la valeur de oui à non
- Pour sauvegarder, tapez, CTRL + O
- Redémarrez le service SSH en utilisant la commande
sudo service ssh restart
A partir de la prochaine fois, vous pourrez utiliser SSH via une clé uniquement comme indiqué dans la vidéo.
Pour Linux ou Mac, utilisez le Terminal avec une commande comme celle-ci
ssh root@192.168.1.1 -p 22 -i id_rsa
Étape 13. Désactiver l’UFW
Lorsque vous déployez une nouvelle instance de VULTR, elle est livrée avec un UFW (Uncomplicated Firewall) activé qui bloque tous les ports sauf le port SSH 22. Cela peut renvoyer l’erreur ERR_CONNECTION_REFUSED dans le navigateur. Pour résoudre ce problème, je vous suggère de désactiver l’UFW.
ufw disableAssez d’explications pour les choses de base. Maintenant, je vais accélérer le processus original de déploiement de WordPress sur la pile LEMP.
Partie C. Déployer WordPress sur la pile LEMP
Mise à jour des référentiels
Tapez la commande suivante et appuyez sur la touche Entrée
sudo -sapt update && apt upgrade -y && apt dist-upgrade && apt autoclean && apt autoremove -y && rebootou
wget -qO update https://dl.gulshankumar.net/update && chmod +x updateLa prochaine fois, utilisez toujours le raccourci de commande ci-dessous pour mettre à jour.
./updateInstaller MariaDB avec la sécurité
Connectez-vous à nouveau et entrez la commande suivante
sudo apt install mariadb-server -y && sudo mysql_secure_installationRépondez aux questions ci-dessous
- Enter current password for root (enter for none): Appuyez sur la touche Entrée
- Switch to unix_socket authentication [Y/n]: Tapez n et appuyez sur la touche Entrée.
- Set root password? [Y/n]: Appuyez sur la touche Entrée.
- New password: Copiez un mot de passe fort à partir du générateur de mots de passe Dashlane. Pour coller un mot de passe dans la console SSH, faites un clic droit et appuyez sur la touche Entrée. Le mot de passe ne sera pas visible à l’écran.
- Re-enter new password: Faites un clic droit et appuyez à nouveau sur la touche Entrée.
Après avoir réussi à définir le mot de passe, vous verrez
Password updated successfully!
Reloading privilege tables..
... Success!
Vous devez également répondre aux questions suivantes.
Remove anonymous users? [Y/n]: Appuyez sur Y et entrez
Disallow root login remotely? [Y/n]: Appuyez sur Y et entrez
Remove test database and access to it? [Y/n]: Appuyez sur Y et entrez
Reload privilege tables now? [Y/n]: Appuyez sur Y et entrez
3. Créer une nouvelle base de données pour WordPress
Connectez-vous à MySQL, appuyez sur la touche entrée lorsqu’il vous demande votre mot de passe.
mysql -u root -pCréez une nouvelle base de données, et accordez des privilèges à son utilisateur avec un mot de passe. C’est là que WordPress stocke toutes les informations concernant les articles, les pages, les thèmes, les plugins, etc.
create database wordpress;
grant all on wordpress.* to gulshan@localhost identified by '5pY8CKJxDRJEGQNkX7';
flush privileges;
exit;
Où votre …
la base de données est wordpress
nom d’utilisateur est gulshan
le mot de passe est 5pY8CKJxDRJEGQNkX7
Conseil : Pensez à utiliser un identifiant de connexion unique
Installez PHP 8.2, NGINX et définissez les permissions.
À l’heure actuelle, PHP 8.2 est la dernière version stable. Si vous avez besoin d’une version différente de PHP, vous devez conserver la même version dans toutes les commandes ci-dessous.
sudo add-apt-repository ppa:ondrej/php -y && apt update && apt install php8.2-fpm php8.2-common php8.2-mysql php8.2-xml php8.2-xmlrpc php8.2-curl php8.2-gd php8.2-imagick php8.2-cli php8.2-dev php8.2-imap php8.2-mbstring php8.2-soap php8.2-zip php8.2-bcmath -y && sed -i 's/;cgi.fix_pathinfo=1/cgi.fix_pathinfo=0/g' /etc/php/8.2/fpm/php.ini && service php8.2-fpm restart && apt install nginx -y && chown -R www-data:www-data /var/www/ && chmod -R 755 /var/wwwModifier la configuration de PHP
La plupart des thèmes et plugins de fantaisie nécessitent une configuration PHP haut de gamme pour fonctionner. Par conséquent, nous devons effectuer ces modifications.
sed -i 's/memory_limit = 128M/memory_limit = 512M/g' /etc/php/8.2/fpm/php.ini
sed -i 's/post_max_size = 8M/post_max_size = 128M/g' /etc/php/8.2/fpm/php.ini
sed -i 's/max_file_uploads = 20/max_file_uploads = 30/g' /etc/php/8.2/fpm/php.ini
sed -i 's/max_execution_time = 30/max_execution_time = 900/g' /etc/php/8.2/fpm/php.ini
sed -i 's/max_input_time = 60/max_input_time = 3000/g' /etc/php/8.2/fpm/php.ini
sed -i 's/upload_max_filesize = 2M/upload_max_filesize = 128M/g' /etc/php/8.2/fpm/php.ini
service php8.2-fpm restart
5.Installer le certificat SSL Let’s Encrypt Wildcard
Créez un fichier cloudflare.ini dans le répertoire /root/.secrets/.
mkdir -p /root/.secrets/ && cd /root/.secrets/ && nano cloudflare.iniAjoutez le code ci-dessous et enregistrez en utilisant CTRL+O et quittez en utilisant CTRL+X.
dns_cloudflare_email = "your-cloudflare-email@example.com"
dns_cloudflare_api_key = "XXXXXXXXXXXXXXXXX"
Trouvez votre e-mail Cloudflare et votre clé API globale dans « Mon profil » > Jetons API > Clé API globale.
chmod 0400 /root/.secrets/cloudflare.iniInstallez Certbot et DNS Authenticator en fonction du système d’exploitation et du serveur web HTTP.
snap install --beta --classic certbot
snap set certbot trust-plugin-with-root=ok
snap install --beta certbot-dns-cloudflare
snap connect certbot:plugin certbot-dns-cloudflare
Obtenir un certificat SSL Wildcard
certbot certonly --dns-cloudflare --dns-cloudflare-credentials /root/.secrets/cloudflare.ini -d example.com,*.example.com --preferred-challenges dns-01Renouvellement automatique à l’aide d’une tâche Cron
- Type
crontab -e - Type 1 pour l’éditeur nano
- Entrez la commande suivante et enregistrez-la
0 0 * * * /etc/init.d/nginx reload >/dev/null 2>&1Renouvellement des tests
certbot renew --dry-run6. Configurer le bloc du serveur Nginx
C’est un point important où vous devez configurer votre domaine, comment NGINX doit traiter vos requêtes HTTP.
Supprimer les blocs de serveur par défaut.
rm /etc/nginx/sites-available/default && rm /etc/nginx/sites-enabled/defaultCréer un nouveau bloc serveur
cd /etc/nginx/sites-available/
nano example.com- Remplacer exemple.com par son propre domaine
- Entrez le code ci-dessous et appuyez sur ctrl+o pour enregistrer et ctrl+x pour quitter.
Général
server {
    listen         80;
    return 301 https://$host$request_uri;
}
server {
# Document Root
root /var/www/html;
index index.php index.html index.htm;
server_name .example.com;
client_max_body_size 0;

    listen [::]:443 ssl http2 ipv6only=on;
    listen 443 ssl http2;
        ssl_protocols TLSv1.1 TLSv1.2 TLSv1.3;
        ssl_certificate /etc/letsencrypt/live/example.com/fullchain.pem;
        ssl_certificate_key /etc/letsencrypt/live/example.com/privkey.pem;
        ssl_prefer_server_ciphers on;
        ssl_session_cache   shared:SSL:20m;
        ssl_session_timeout 20m;
        ssl_ciphers 'TLS13+AESGCM+AES128:EECDH+AES128';


error_page 404 /404.html;
error_page 500 502 503 504 /50x.html;

# Block XMLRPC
location = /xmlrpc.php {
    deny all;
}

location / {
    try_files $uri $uri/ /index.php$is_args$args;
}

location ~* \.php$ {
if ($uri !~ "^/uploads/") {
fastcgi_pass unix:/run/php/php8.2-fpm.sock;
}
include fastcgi_params;
fastcgi_param SCRIPT_FILENAME $document_root$fastcgi_script_name;
fastcgi_param SCRIPT_NAME $fastcgi_script_name;
}
location = /favicon.ico {
log_not_found off;
access_log off;
}

location = /robots.txt {
log_not_found off;
access_log off;
allow all;
}

location ~* .(css|gif|svg|ico|woff2|eot|jpeg|webp|jpg|js|png)$ {
expires 1y;
log_not_found off;
}

# Enable Gzip compression.
gzip on;

# Disable Gzip on IE6.
gzip_disable "msie6";

# Allow proxies to cache both compressed and regular version of file.
# Avoids clients that don't support Gzip outputting gibberish.
gzip_vary on;

# Compress data, even when the client connects through a proxy.
gzip_proxied any;

# The level of compression to apply to files. A higher compression level increases
# CPU usage. Level 5 is a happy medium resulting in roughly 75% compression.
gzip_comp_level 5;

# Compress the following MIME types.
gzip_types
 application/atom+xml
 application/javascript
 application/json
 application/ld+json
 application/manifest+json
 application/rss+xml
 application/vnd.geo+json
 application/vnd.ms-fontobject
 application/x-font-ttf
 application/x-web-app-manifest+json
 application/xhtml+xml
 application/xml
 font/opentype
 image/bmp
 image/svg+xml
 image/x-icon
 text/cache-manifest
 text/css
 text/plain
 text/vcard
 text/vnd.rim.location.xloc
 text/vtt
 text/x-component
 text/x-cross-domain-policy;
}
Pour la cachette Enabler
server {
    listen         80;
    return 301 https://$host$request_uri;
}
server {
# Document Root
root /var/www/html;
index index.php index.html index.htm;
server_name .example.com;
client_max_body_size 0;

    listen [::]:443 ssl http2 ipv6only=on;
    listen 443 ssl http2;
        ssl_protocols TLSv1.1 TLSv1.2 TLSv1.3;
        ssl_certificate /etc/letsencrypt/live/example.com/fullchain.pem;
        ssl_certificate_key /etc/letsencrypt/live/example.com/privkey.pem;
        ssl_prefer_server_ciphers on;
        ssl_session_cache   shared:SSL:20m;
        ssl_session_timeout 20m;
        ssl_ciphers 'TLS13+AESGCM+AES128:EECDH+AES128';


error_page 404 /404.html;
error_page 500 502 503 504 /50x.html;


# Block XMLRPC
location = /xmlrpc.php {
    deny all;
}


# Rules for Cache Enabler Plugin - Static File Serving

    set $cache_uri $request_uri;

    # bypass cache if POST requests or URLs with a query string
    if ($request_method = POST) {
    set $cache_uri 'nullcache';
    }

    if ($query_string != '') {
    set $cache_uri 'nullcache';
    }

    # bypass cache if URLs containing the following strings
    if ($request_uri ~* '(/wp-admin/|/xmlrpc.php|/wp-(app|cron|login|register|mail).php|wp-.*.php|/feed/|index.php|wp-comments-popup.php|wp-links-opml.php|wp-locations.php|sitemap(index)?.xml|[a-z0-9-]+-sitemap([0-9]+)?.xml)') {
    set $cache_uri 'nullcache';
    }

    # bypass cache if cookies contain the following strings
    if ($http_cookie ~* '(wp-postpass|wordpress_logged_in|comment_author)_') {
    set $cache_uri 'nullcache';
    }

    # custom installation subdirectory
    set $custom_subdir '';

    # default HTML file
    set $cache_enabler_uri '${custom_subdir}/wp-content/cache/cache-enabler/${http_host}${cache_uri}${scheme}-index.html';

    # WebP HTML file
    if ($http_accept ~* 'image/webp') {
    set $cache_enabler_uri '${custom_subdir}/wp-content/cache/cache-enabler/${http_host}${cache_uri}${scheme}-index-webp.html';
    }

    location / {
    gzip_static on; # this directive is not required but recommended
    try_files $cache_enabler_uri $uri $uri/ $custom_subdir/index.php?$args;
    }

location ~* \.php$ {
if ($uri !~ "^/uploads/") {
fastcgi_pass unix:/run/php/php8.2-fpm.sock;
}
include fastcgi_params;
fastcgi_param SCRIPT_FILENAME $document_root$fastcgi_script_name;
fastcgi_param SCRIPT_NAME $fastcgi_script_name;
}
location = /favicon.ico {
log_not_found off;
access_log off;
}

location = /robots.txt {
log_not_found off;
access_log off;
allow all;
}

location ~* .(css|gif|svg|ico|jpeg|webp|woff2|eot|jpg|js|png)$ {
expires 1y;
log_not_found off;
}

# Enable Gzip compression.
gzip on;

# Disable Gzip on IE6.
gzip_disable "msie6";

# Allow proxies to cache both compressed and regular version of file.
# Avoids clients that don't support Gzip outputting gibberish.
gzip_vary on;

# Compress data, even when the client connects through a proxy.
gzip_proxied any;

# The level of compression to apply to files. A higher compression level increases
# CPU usage. Level 5 is a happy medium resulting in roughly 75% compression.
gzip_comp_level 5;

# Compress the following MIME types.
gzip_types
 application/atom+xml
 application/javascript
 application/json
 application/ld+json
 application/manifest+json
 application/rss+xml
 application/vnd.geo+json
 application/vnd.ms-fontobject
 application/x-font-ttf
 application/x-web-app-manifest+json
 application/xhtml+xml
 application/xml
 font/opentype
 image/bmp
 image/svg+xml
 image/x-icon
 text/cache-manifest
 text/css
 text/plain
 text/vcard
 text/vnd.rim.location.xloc
 text/vtt
 text/x-component
 text/x-cross-domain-policy;
}- Vous devez installer le plugin Cache Enabler pour bénéficier des avantages du cache.
FastCGI
Si vous souhaitez utiliser FastCGI Cache, mettez en œuvre le bloc de serveur ci-dessous.
# NGINX Cache path
fastcgi_cache_path /var/run/nginx-cache levels=1:2 keys_zone=WORDPRESS:100m inactive=6h;
fastcgi_cache_key "$scheme$request_method$host$request_uri";
fastcgi_cache_use_stale error timeout invalid_header http_500;
fastcgi_ignore_headers Cache-Control Expires Set-Cookie;

server {
    listen         80;
    return 301 https://$host$request_uri;
}
server {
root /var/www/html;
index index.php index.html index.htm;
server_name .example.com;
client_max_body_size 0;

    listen [::]:443 ssl http2 ipv6only=on;
    listen 443 ssl http2;
        ssl_protocols TLSv1.1 TLSv1.2 TLSv1.3;
        ssl_certificate /etc/letsencrypt/live/example.com/fullchain.pem;
        ssl_certificate_key /etc/letsencrypt/live/example.com/privkey.pem;
        ssl_prefer_server_ciphers on;
        ssl_session_cache   shared:SSL:20m;
        ssl_session_timeout 20m;
        ssl_ciphers 'TLS13+AESGCM+AES128:EECDH+AES128';

error_page 404 /404.html;
error_page 500 502 503 504 /50x.html;


set $skip_cache 0;
    if ($request_method = POST) {set $skip_cache 1;}
    if ($request_uri ~* "/wp-admin/|/xmlrpc.php|/wp-.*.php|index.php|sitemap") {set $skip_cache 1;}
    if ($http_cookie ~* "comment_author|wordpress_[a-f0-9]+|wp-postpass|wordpress_no_cache|wordpress_logged_in") {set $skip_cache 1;}
    if ($query_string = "unapproved*") {set $skip_cache 1;}
    if ($cookie_woocommerce_items_in_cart = "1" ){ set $skip_cache 1;}
    if ($request_uri ~* "/(cart|checkout|my-account)/*$") {set $skip_cache 1;}

# Block XMLRPC
location = /xmlrpc.php {
    deny all;
}

location / {
try_files $uri $uri/ /index.php$is_args$args;
}

location ~* \.php$ {

 if ($uri !~ "^/uploads/") {
        fastcgi_pass unix:/run/php/php8.2-fpm.sock;
        }

        try_files                       $uri =404;
        include                         /etc/nginx/fastcgi_params;
        fastcgi_param                   SCRIPT_FILENAME $document_root$fastcgi_script_name;
        fastcgi_pass                    unix:/run/php/php8.2-fpm.sock;
        fastcgi_index                   index.php;
                fastcgi_cache_bypass $skip_cache;
                fastcgi_no_cache $skip_cache;
                fastcgi_cache WORDPRESS;
                fastcgi_cache_valid 200 30d;
                fastcgi_cache_valid 301 302 303 307 308 404 410 451 1m;
                add_header X-Cache $upstream_cache_status;

}

location = /favicon.ico {
log_not_found off;
access_log off;
}

location = /robots.txt {
log_not_found off;
access_log off;
allow all;
}

location ~* .(css|gif|ico|svg|webp|woff2|eot|jpeg|jpg|js|png)$ {
expires 1y;
log_not_found off;
}

# Enable Gzip compression.
gzip on;

# Disable Gzip on IE6.
gzip_disable "msie6";

# Allow proxies to cache both compressed and regular version of file.
# Avoids clients that don't support Gzip outputting gibberish.
gzip_vary on;

# Compress data, even when the client connects through a proxy.
gzip_proxied any;

# The level of compression to apply to files. A higher compression level increases
# CPU usage. Level 5 is a happy medium resulting in roughly 75% compression.
gzip_comp_level 5;

# Compress the following MIME types.
gzip_types
 application/atom+xml
 application/javascript
 application/json
 application/ld+json
 application/manifest+json
 application/rss+xml
 application/vnd.geo+json
 application/vnd.ms-fontobject
 application/x-font-ttf
 application/x-web-app-manifest+json
 application/xhtml+xml
 application/xml
 font/opentype
 image/bmp
 image/svg+xml
 image/x-icon
 text/cache-manifest
 text/css
 text/plain
 text/vcard
 text/vnd.rim.location.xloc
 text/vtt
 text/x-component
 text/x-cross-domain-policy;
}
To save, press CTRL+O and Enter key. Then, exit nano editor using command CTRL+X.
Dans le cas de FastCGI, vous devez utiliser le plugin NGINX Helper. Il fonctionne également avec les URL codées en Hindi. Gardez à l’esprit qu’il ne prend pas en charge AMP. Personnellement, je n’utilise pas AMP. (Recommandé)
Sinon, le cache NGINX fonctionne pour purger les URL AMP mais il ne prend pas en charge les URL codées en Hindi. Dans les paramètres, vous devez conserver le chemin du cache /var/run/nginx-cache/.
Caution!
- Par exemple, si vous utilisez un thème de journal et un thème mobile distinct, évitez la méthode FastCGI et utilisez un plugin WP Rocket car il peut servir un cache mobile distinct dès le départ.
7. Créer des liens symboliques entre deux répertoires
Si vous ratez cette étape, vous risquez d’obtenir le message ERR_CONNECTION_REFUSED.
Pour activer le bloc serveur, créez un lien symbolique de votre fichier NGINX Server Block du répertoire /etc/nginx/sites-available/ vers /etc/nginx/sites-enabled
Avant d’exécuter la commande ci-dessous, veuillez remplacer exemple.com par votre propre domaine.
ln -s /etc/nginx/sites-available/example.com /etc/nginx/sites-enabled/Configuration du test
nginx -tRedémarrer et mettre à jour
service nginx restart && service php8.2-fpm restart && service mysql restart && apt-get update && apt upgrade -y8. Installer WordPress
Téléchargez les fichiers WordPress dans /var/www/html directory and set permission.
cd /var/www/html && wget https://fr.wordpress.org/latest-fr_FR.tar.gz && tar -xvzf latest-fr_FR.tar.gz && mv -v wordpress/* /var/www/html && rm -rf latest-fr_FR.tar.gz wordpress && chown -R www-data:www-data /var/www/html && sudo chmod -R 755 /var/www/htmlPour mettre à jour la permission dans le futur, utilisez la commande suivante
chown -R www-data:www-data /var/www/ && sudo chmod -R 755 /var/www9. Mise à jour du DNS
Si vous hébergez WordPress en local, que vous voulez contourner le proxy ou que vous voulez effectuer une migration sans interruption de service, cette étape est utile. Je préfère généralement dans le cas d’une zone de développement WordPress statique. 😉
- Il y a deux façons de faire pointer les DNS. Si vous migrez votre site vers Vultr et que vous voulez d’abord le tester localement, modifiez votre fichier hosts et faites pointer les DNS à cet endroit.
Pour Windows
- Allez dans les propriétés de
C:\Windows\System32\drivers\etc\hosts - Changez l’autorisation « Sécurité » en contrôle total pour votre nom d’utilisateur actuel.
- Vous pouvez maintenant modifier librement le fichier hosts sous votre utilisateur système et le sauvegarder.
# For same machine you can have localhost address else public IP
127.0.0.1 example.com
127.0.0.1 www.example.com
C’est comme ça que ça devrait être.
Pour Mac ou Linux
Vous pouvez éditer le fichier hosts en utilisant la commande suivante
sudo nano /etc/hostsMise à jour des DNS avec Cloudflare
- Si tout est parfait et que vous voulez mettre votre site en ligne, connectez-vous à Cloudflare DNS et mettez à jour la nouvelle IP.
| A | @ | IPV4 address |
| AAAA | @ | IPV6 address |
| CNAME | www | example.com |
où @ désigne le domaine nu exemple.com
9. Visitez votre nom de domaine pour configurer WordPress
Si vous souhaitez conserver le domaine de la version non-www pour votre WordPress, visitez la version non-www ou www.
https://example.com- Fournissez l’identifiant de connexion à la base de données pour commencer l’installation de WordPress.
- Installation d’exécution
- Remplissez les détails de base de votre nouveau site et installez WordPress.
- Connectez-vous à WordPress
- Si vous avez utilisé le bloc serveur FastCGI, la première chose à faire est d’installer le plugin NGINX Cache et de configurer /var/www/cache comme chemin du cache.
Autres choses nécessaires
Utilisez les services du plugin SMTP pour envoyer les emails sortants de WordPress, sinon vous ne pourrez pas recevoir les messages du lien de réinitialisation du mot de passe, du formulaire de contact 7.
Enfin, l’installation de WordPress est terminée. Gardez toujours une sauvegarde.
J’apprécie grandement le temps précieux que vous avez consacré à la lecture de cet article. Rendez-vous dans le prochain tutoriel !
Thanks a lot Gulshan. You save my breath
I search everywhere but not find any good article
You explained very well along with security concern
well done
Finally I loved this step by step tutorial with proper images.
Thanks Bhaiya you are awesome
Hi,
Thank you for this awesome guide.
How can I install WordPress multisite on Ubuntu 18.04 with Nginx?
Thanks Gulshan, Finally I moved to NGINX server. You have created a great tutorial for beginners.
You’re welcome bro 🙂
Thank you for your tutorial, its the first one that actually showed me the wordpress setup page.
When I went to upload a plugin I received this message. « The uploaded file exceeds the upload_max_filesize directive in php.ini »
How do I increase the max filesize?
Please see the step 33.5
Thanks sos un groso, very well tutorial
How to auto-renew SSL?
Add below cron job
crontab -eAdd below command and save.
15 3 * * 7 certbot renew --post-hook "service nginx restart"Very well. thank you so much
Hello Gulshan Bro, First i want to say you that this is very beautiful and required post. I am really appreciating your work. but i have a problem can you please tell me
i have a droplet with digitalocean ($5/month plan) and i want to host multiple wordpress sites only with nginx(lemp ubuntu 18.04).
In simple i mean that this tutorial is complete to install a single wordpress and i did it but tell host it in some other sites
Hey Rohit,
Assuming, second site is example2.org
You need to follow steps this way.
1. create a new directory and add WordPress (Ref: steps 31)
cd /var/www/mkdir example2
wget https://wordpress.org/latest.tar.gz
tar -xvzf latest.tar.gz
mv -v wordpress/* /var/www/example2
rm -rf index.nginx-debian.html latest.tar.gz wordpress
chown -R www-data:www-data /var/www/
sudo chmod -R 755 /var/www
2. Create a new Server block with root path located to new directory as created in step 1.
cd /etc/nginx/sites-available/

nano gulshankumar-org
server {listen 80;
root /var/www/example2;
index index.php index.html index.htm;
server_name example2.org www.example2.org;
...
3. Point your example2.org domain to DNS, then install SSL
certbot --nginx -d example2.org -d www.example2.org4. Create new MySQL database
sudo mysql -u root -pcreate database example2;
grant all on example2.* to example2@localhost identified by 'TYPE HERE PASSWORD';
flush privileges;
exit;
5. Proceed to Installation by visiting your site
https://example2.orgLet me know if you have any additional question. You can always visit our forum for quick assistance.
Thanks & Regards,
Gulshan
It Really Works Gulshan Bro. Thanks Really dear You are awesome…
Hello Gulshan you written a comprehensive guide i highly appreciate your work. Can you help me with an error? Actually i have two websites the first website i have already hosted on Vultr following the above guide.
But when try to host a another WordPress website iam getting error. I followed the above steps you mentioned in comments. But still not able to fix it. The error is my website not working after hosting another WordPress website.
If possible please guide me step by step instructions. It will help me alot. Thanks in advance.
Consider checking log available at
/var/log/nginx/directory. Usenginx -tcommand to see what mistake causing issue.It Really Works Gulshan Bro. Thanks Really dear You are awesome…
i want redirect too www plz help me urgent
If your WordPress General Settings has www version, server will do automatically. No additional action is required. In case you started WordPress installation at non-www version, then you need to migrate by changing at Database level.
You may use Better Search Replce plugin to perform this changes.
How Can I setup FastCGI on my ngnix server guided by you….
I have updated my article.
Wonderful tutorial just complete solution for Nginx Fast CGI
Thanks Wasim for your kind feedback.
Hi would like to know after configuring Fastcgi do we still need other caching plugin to speed up WordPress site?
Hey Gulshan,
In the 7th step while texting ngnix I got
nginx: [emerg] open() « /etc/nginx/sites-enabled/example.com » failed (2: No such file or directory) in /etc/nginx/nginx.conf:62
nginx: configuration file /etc/nginx/nginx.conf test failed
This error. How I can solve it? also what the error.
Please delete your existing server block and create again at sites-available and symlink at sites-enabled directory. The step 6 and 7 cover that clearly. Consider following patiently without any error. If you still face any problem, do let me know. Thanks for taking to leave your valuable comment.
How to check if fastcgi cache is working or not? while running sudo
curl -I https://example.comit is not showing x-cache parameterI am facing problem of infinite loop redirects. I had use fastcache code. how to fix it
Please try Full SSL mode of Cloudflare. Then check again!
Hi Gulshan, I am also receiving the test failed error on step 7. I have tried several times now on different setup and still stuck here. Please could you help?
Please carefully read the post and then copy-paste code in Terminal. Sometime you need to replace with your own domain. Doing mistake can return error. Else, no wise. I use this guide everyday for myself. I am not aware about any problem.
In case of trouble
1. Run test using
nginx -t2. Check logs to get proper hint
tail -f /var/log/nginx/error.log3. Delete existing or earlier created virtualhost
rm /etc/nginx/sites-available/default && rm /etc/nginx/sites-enabled/default4. Make sure to replace example.com at all places, a) when you create conf file, its naming. b) when you add conf file and c) when you create symlink, check your command its conf file name must match with first process.
I feel in most cases, chances are you did not replaced
server_name .example.com;to own domain, or you did not obtained SSL. All steps are written in serial order as it should be.This article is like Life-Saver for one of my website. I was about to move from Google Cloud to Digital Ocean because the trial was expired and I also wanted to use DigitaOcean because it is in-expensive yet powerful and gives great experience.
Previously, I used webinoly stack which was straightforward for installing WordPress but later on I got to know from Gulshan that there are so many issues with that stack so, this time I was going to do it manually. I checked the official guide by Digital ocean but end up with many confusion and issues. Then, I fortunately asked Gulshan for help and he recommended this article for me.
I installed WordPress easily and very fast even fast that Webinoly stack. Thanks a lot Gulshan for writing this amazing article. Hats off to you bro!!🎩
hi, Gulshan thanks for sharing.
can u please share how to install wp on subfoler?
I alwyas keep this guide bookmarket to my web browser! You never know when I would need to setup a new LEMP server ! Thanks Gulshan
Thanks for your comment.
Nice tutorial. Does it come with email hosting? Looking to make a small site in Singapore using VultrHF
E-mail is a different thing. G Suite by Google services is specialized in this segment.
What are the differences if any between doing this method and using the vultr 1 click install? I have also read about centminmod. Is that somrthing u will recommend for having a fast LEMP stack? Tnx
It was a good article
Thanks for your comment.
The FastCGI server block config throws 404 Errors.
fastcgi_pass unix:/run/php/php7.4-fpm-example.sock;
should be:
fastcgi_pass unix:/run/php/php7.4-fpm.sock;
And it is missing config for location /
This config must be defined:
location / {
try_files $uri $uri/ /index.php$is_args$args;
}
I see, it was intended for seperate user. But, to keep generic I have corrected. Thanks for pointing out.
Without the location / block only the home page was accessible.
When I added the below block i was able to access the post and pages.
location / {
try_files $uri $uri/ /index.php$is_args$args;
}
Hello Alpesh, Corrected. Thanks again for your tip.
Hey bro what is your thoughts on EasyEngine and SlickStack etc or one click app instead to automate? what is your favorite and will you make any tut bro
Sure, there is one. I will post about it. Thanks for your feedback.
hello gulshanji i wanted to use cloudflare ssl direct from thier website and not thru api with fast cgi then what would the config
Do all commands work for Centos 8?
Sorry, this is for Ubuntu OS only not for Centos 8.
What do you think about Plesk Panel?
It is easy to install plesk and create a wordpress site.
Easy to find trial keys and we can use it unlimited.
If it expires sites goes on ftp works and only plesk panel does not work but there are too much trial keys
It has nginx cache.
Do you recommend why and why not?
Thanks
I do not trust 3rd-parties installers.
Can we create multi wordpress sites on different domain in the same machine with this
method?
I think only changement is in the FastCGI?
server {
root /var/www/aaa.com/wordpress;
index index.php index.html index.htm;
server_name .aaa.com;
client_max_body_size 0;
server {
root /var/www/bbb.com/wordpress;
index index.php index.html index.htm;
server_name .bbb.com;
client_max_body_size 0;
server {
root /var/www/ccc.com/wordpress;
index index.php index.html index.htm;
server_name .ccc.com;
client_max_body_size 0;
is this make a problem cache path is the same path for 3 web site? /var/www/cache
Is this method works?
1 machine 3 different domain and wordpress?
Thanks
Not for multiple sites.
I have 2 questions
1) What if i have 2 domains on different cloudflare accounts?
Create a cloudflare.ini file inside /root/.secrets/ directory.
mkdir -p /root/.secrets/ && cd /root/.secrets/ && nano cloudflare.ini
Add below code and save using CTRL+O and exit using CTRL+X
dns_cloudflare_email = « your-cloudflare-email@example.com »
dns_cloudflare_api_key = « XXXXXXXXXXXXXXXXX »
/root/.secrets/1domaincloudfare.ini
/root/.secrets/2domaincloudfare.ini
certbot certonly –dns-cloudflare –dns-cloudflare-credentials 1domaincloudfare.ini -d example.com,*.1domain.com –preferred-challenges dns-01
certbot certonly –dns-cloudflare –dns-cloudflare-credentials 2domaincloudfare.ini -d example.com,*.2domain.com –preferred-challenges dns-01
Do this work?
2) If we have 2 domains in the same account on cloudflare can we use 1 cloudflare.ini
certbot certonly –dns-cloudflare –dns-cloudflare-credentials /root/.secrets/cloudflare.ini -d 1domain.com,*.example.com –preferred-challenges dns-01
certbot certonly –dns-cloudflare –dns-cloudflare-credentials /root/.secrets/cloudflare.ini -d 2domain.com,*.example.com –preferred-challenges
dns-01
3) If we dont use cloudflare what will our ns for domain?
CLoud VPNs IP?
ns1= 68.28.65.84
ns2= 68.28.65.84
Is this right?
thanks for your replies
1. True
2. True
3. I have no idea about it. I prefer using CF DNS.
which is the best & compatible server side cache plugin If I use FastCGI server block code along with Nginx Cache plugin..
W3 Total Cache or WP Rocket
I finally installed wordpress with this guide. But I see only www version but not the non-www version. Is there any changes that I need to do.
Redirects to www version even If I enter non-www version.
You need to point DNS records for both hostnames. Second, make sure dot is not missing from the beginning of example.com in this code –
server_name .example.com;in the NGINX connfig at step 6. Another thing, Redirect from www to non-www or vice-versa (as neccessary) is taken care automatically from WordPress. You do not need to put any extra code for it.Pour l’aide au cache de Nginx (je prends cette info du site officiel)
Il y a un bouton ‘purger tout’ ? Est-ce qu’il purge tout le site ?
Oui, c’est le cas. Il vide physiquement le répertoire de cache. Il est défini par défaut à /var/run/nginx-cache/.
La valeur par défaut est donc /var/run/nginx-cache/.
Pouvons-nous changer fastcgi_cache_path /var/www/cache en /var/run/nginx-cache/ ?
Merci
Si votre répertoire de cache est différent, vous pouvez remplacer ceci dans votre wp-config.php en ajoutant.
define('RT_WP_NGINX_HELPER_CACHE_PATH','/var/var/nginx-cache/');location ~* .(css|gif|ico|svg|jpeg|jpg|js|png)$ {
expires 1y;
log_not_found off;
}
is this code for page caching?
I use cloudflare so it has page cache too.
If i use that can i remove it from codes?
Can you please explain what is this code for?
Thanks
Ce code est destiné à mettre en place une mise en cache d’un an pour les fichiers statiques. Vous pouvez utiliser le cache de page Cloudflare comme vous le faites normalement. Il ne devrait pas y avoir de problème.
Pouvez-vous m’expliquer quelle est la différence entre les valeurs inactive et fastcgi_cache_valid ? Pouvez-vous les expliquer s’il vous plaît ? Merci
Exactly followed the same steps, but at the end i am getting 502 bad gateway. I built some sites with the same steps before, however i don’t know what changed now.
Consider checking the error log using command
tail -f /var/log/nginx/error.logto get a hint about exact issue.getting this
tail: cannot open ‘/var/log/error.log’ for reading: No such file or directory
tail: no files remaining
Désolé, il y avait une faute de frappe dans mon commentaire précédent. Essayez la commande suivante
tail -f /var/log/nginx/error.log