Pada artikel ini, Anda akan mempelajari proses instalasi WordPress secara manual di server Ubuntu 22.04 menggunakan NGINX, MariaDB, dan PHP 8.2. Stack ini akan menyediakan platform yang kuat dan efisien untuk menjalankan situs web WordPress Anda dengan kecepatan yang luar biasa.
Ikuti 3 langkah ini dan tonton videonya. Butuh bantuan? hubungi saya. 😊
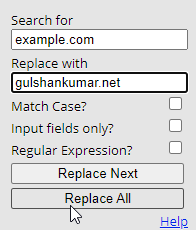
Sekarang sebelum Anda memulai, berikut tip singkatnya. Gunakan Search and Replace Extension untuk mengubah
Kiat hemat waktu bagi pengguna Google Chrome.example.comsecara massal ke domain Anda sendiri di halaman web ini.
Bagian A: Menjaga Nameserver Cloudflare tetap aktif
Kami akan menggunakan Cloudflare DNS untuk mendapatkan sertifikat Let’s Encrypt Wildcard SSL. Selesaikan langkah ini terlebih dahulu untuk menikmati migrasi zero-downtime.
Periksa Nameserver Saat Ini
- Temukan Nameserver aktif Anda di https://www.whatsmydns.net/#NS/example.com
- Jika Anda melihat menggunakan NS default Hosting atau Domain registrar Anda sebelumnya, maka Anda harus mengganti dengan Cloudflare.
- Belajar cara menggunakan DNS Cloudflare
Bagian B: Siapkan Server Ubuntu Server 22.04 LTS

1. Daftar Vultr untuk mendapatkan $100 Kredit gratis (Berlaku selama 30 hari)
Sebagai seseorang yang telah mencoba begitu banyak perusahaan server Cloud, pengalaman saya mengatakan bahwa Anda tidak bisa salah dengan Vultr. Orang-orang ini tulus dan peduli dalam hal dukungan dan layanan.
⚡ Kinerja
- NVME / SSD
- CPU 3,7 GHz
- Kecepatan Jaringan Hingga 5Gbps
- Pusat data di Amerika, Eropa, Asia, Austraillia
- IPV6 siap
💡 Fitur
- Dasbor Ramah Pemula
- Sekali klik ke Snapshot
- Pencadangan Otomatis (Berbayar)
- Firewall Awan Gratis
- Perlindungan DDoS (Berbayar)
- 100% Virtualisasi KVM
⚙ Dukungan
- PayPal/Kartu
- Dukungan Tiket 24/7
- Dokumentasi
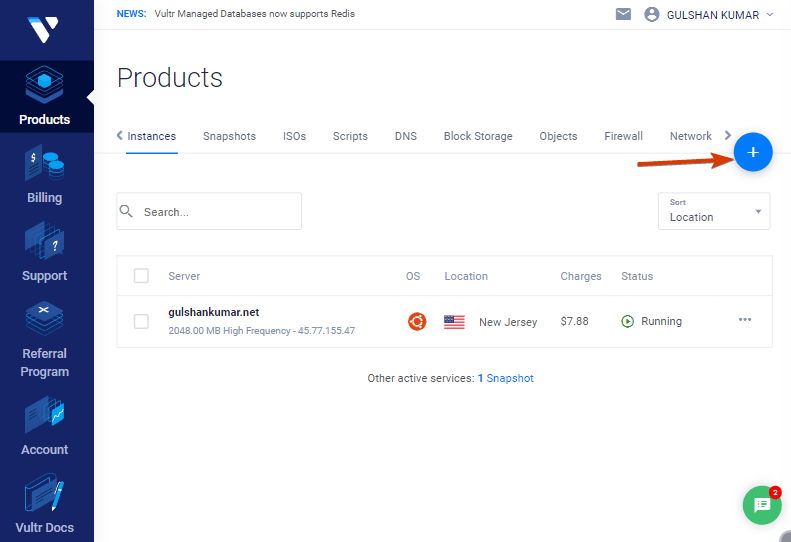
2. Buat Server VPS baru
Cukup klik pada tombol plus untuk memulai
3. Pilih Jenis Server
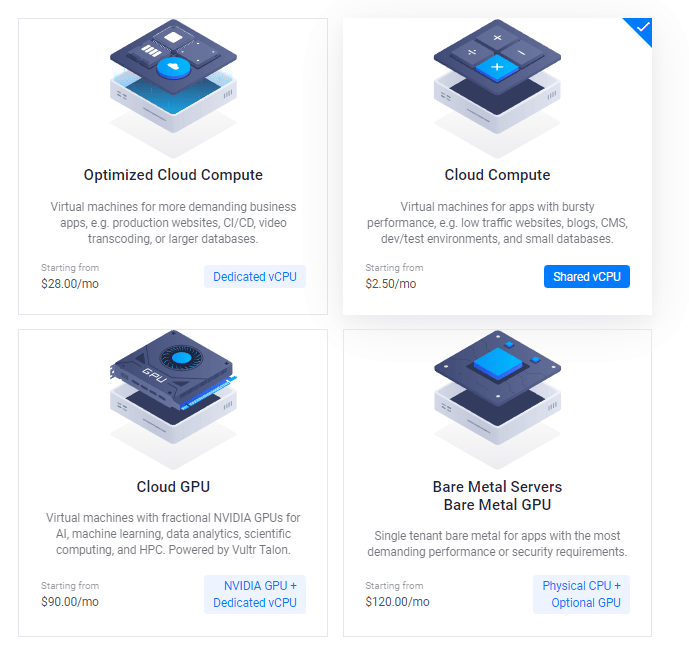
Selanjutnya, Anda perlu memilih CPU & Storage Technology, Anda dapat memilih “AMD High Performance”.

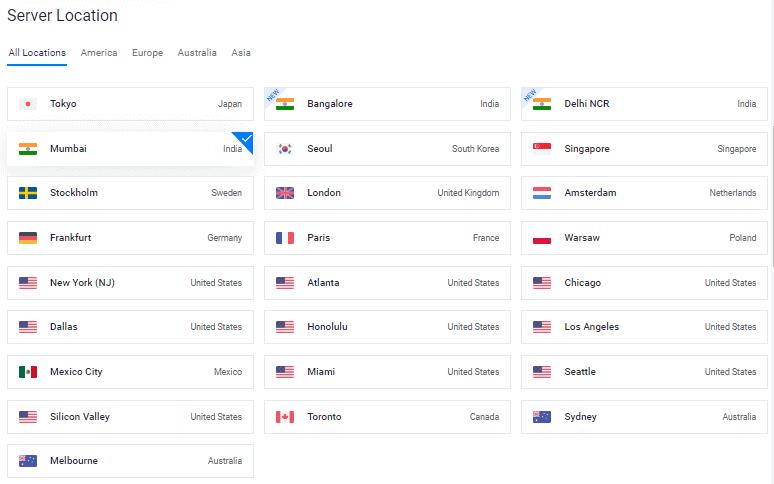
4. Pilih Lokasi Server
Pilih lokasi server yang dekat dengan target audiens Anda.
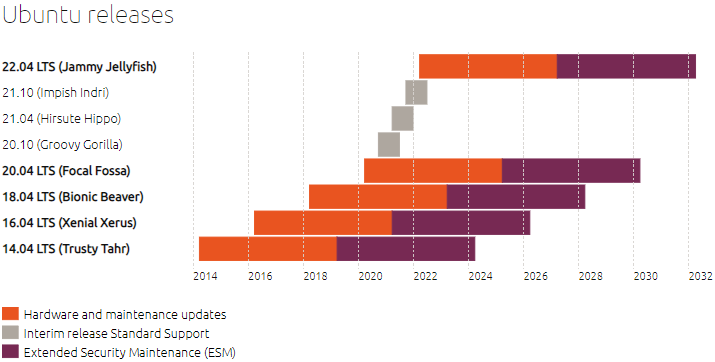
5. Pilih Ubuntu 22.04 x64 OS
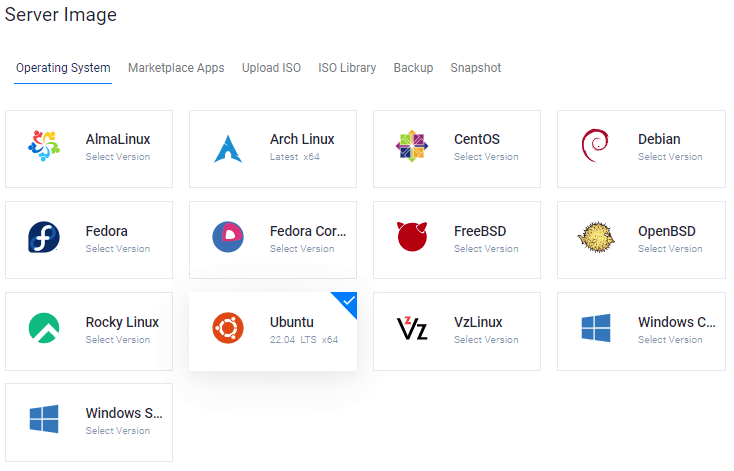
Saat ini, Ubuntu 20.04×64 dan 22.04×64 keduanya adalah versi LTS (Long Term Supported) yang kompatibel dengan sebagian besar paket yang akan kita instal.
6. Pilih Ukuran Server
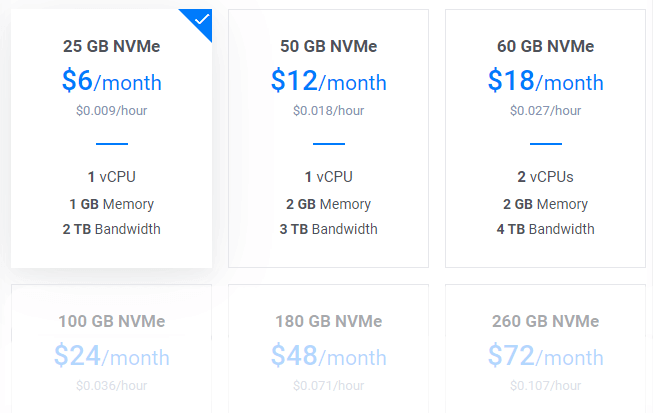
Paket $6/bulan akan menjadi titik awal yang bagus untuk blog baru. Anda dapat meningkatkan kapan saja sesuai kebutuhan.
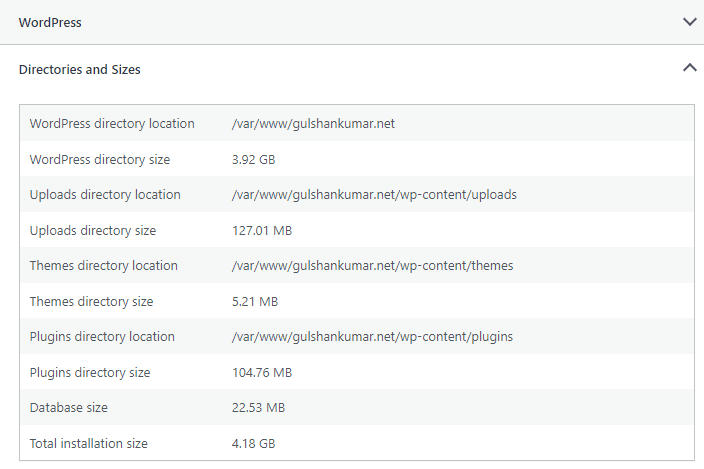
Tip: Jika Anda bermigrasi, periksa Total ukuran instalasi di Info kesehatan situs.
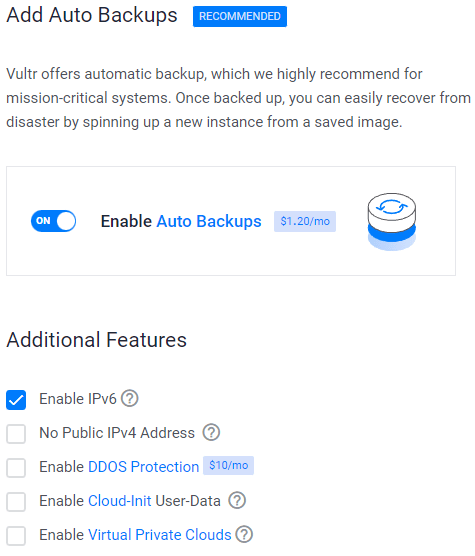
7. Aktifkan IPV6, Cadangan
8. Tambahkan kunci SSH
Ini adalah langkah opsional yang direkomendasikan untuk meningkatkan keamanan.
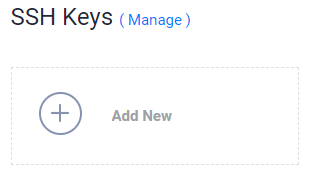
- Klik tombol Add New untuk menambahkan kunci SSH baru untuk mengirimkan 🔒Kunci Publik Anda.
- Hasilkan Kunci menggunakan metode di bawah ini sesuai OS Anda.

- Unduh aplikasi PuTTy.
- Cari PuTTygen di menu Start
- Klik pada tombol Generate dan arahkan pointer mouse
- Salin kunci publik dan berikan ke Vultr
- Masukkan kata sandi kunci
- Simpan 🔑Kunci Pribadi di lokasi teraman.
- Ini bisa digunakan untuk login ke SSH atau SFTP.

- Jalankan:
ssh-keygen -t rsa. Untuk kunci 4096-bit yang lebih aman, jalankan:ssh-keygen -t rsa -b 4096 - Tekan enter ketika ditanya di mana Anda ingin menyimpan kunci (ini akan menggunakan lokasi default).
- Masukkan frasa sandi untuk kunci Anda.
- Jalankan
cat ~/.ssh/id_rsa.pub– ini akan memberi Anda kunci dalam format yang tepat untuk ditempelkan ke panel kontrol. - Pastikan Anda membuat cadangan file
~/.ssh/id_rsa. Ini tidak dapat dipulihkan jika hilang.
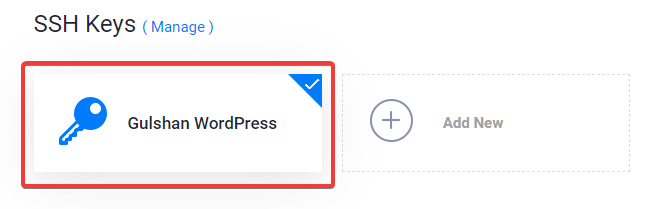
Pilih kunci SSH Anda
Mengikuti langkah-langkah ini akan melampirkan kunci publik Anda ke Instance baru Anda. Kemudian, Anda akan dapat masuk ke SSH menggunakan kata sandi Plain Text dan kunci SSH.
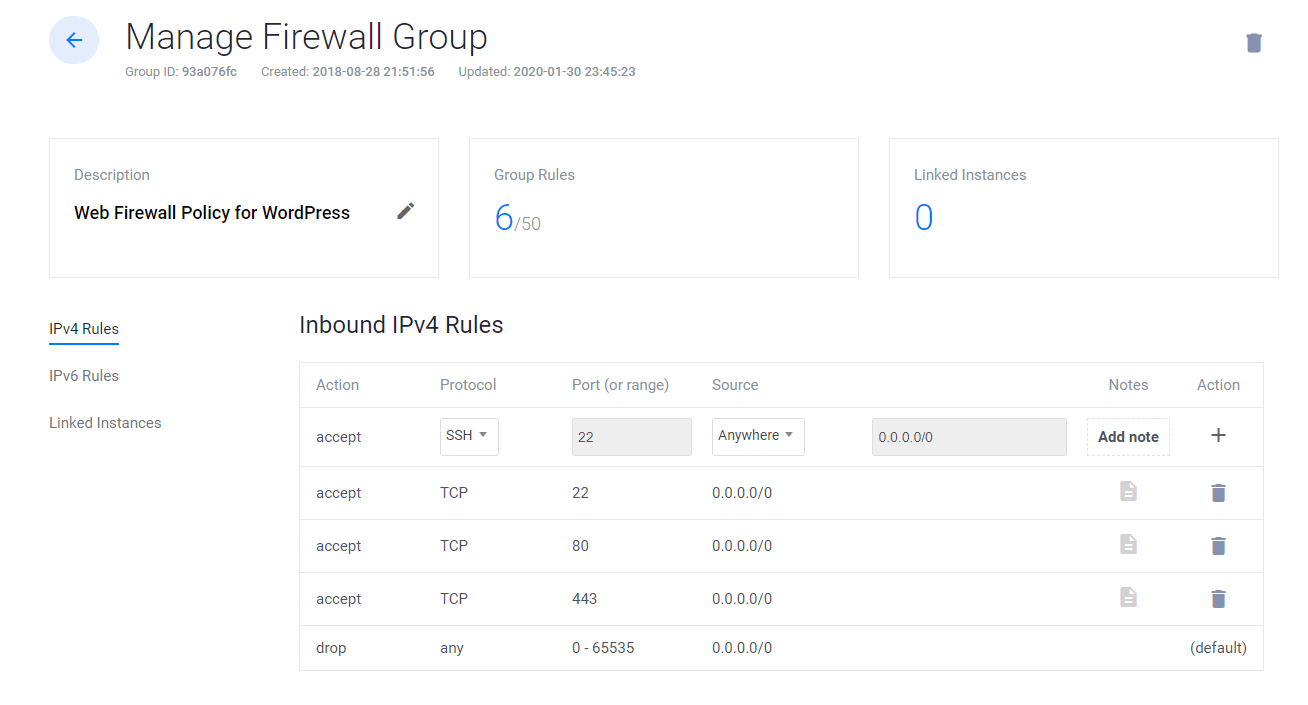
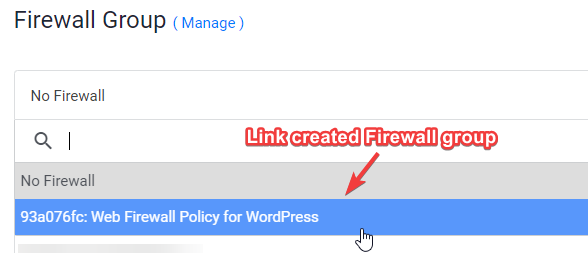
9. Tautkan aturan Firewall Web ke Instansi Server
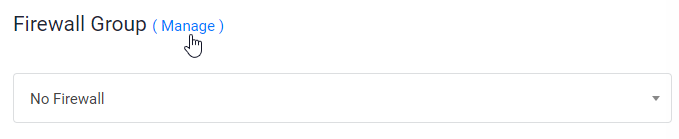
- Klik Manage dan buat Grup Firewall baru.
- Izinkan port TCP 22 untuk SSH. 80 untuk HTTP dan 443 HTTPS untuk aturan IPV4 dan IPV6 keduanya.
- Setelah selesai, tautkan grup Firewall ke Instance Anda.
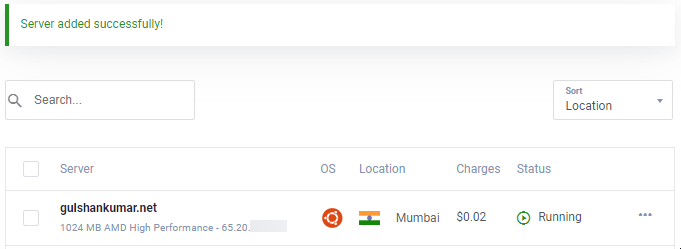
10. Masukkan Nama Host dan label klik Deploy Now
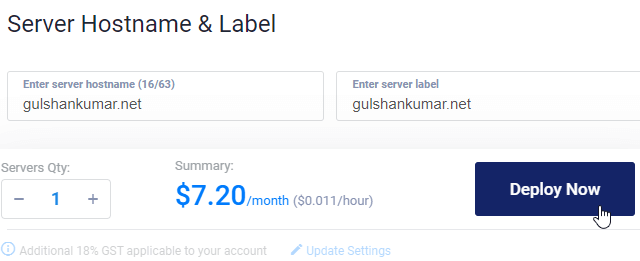
Sekarang, Anda akan melihat pemasangan dalam proses
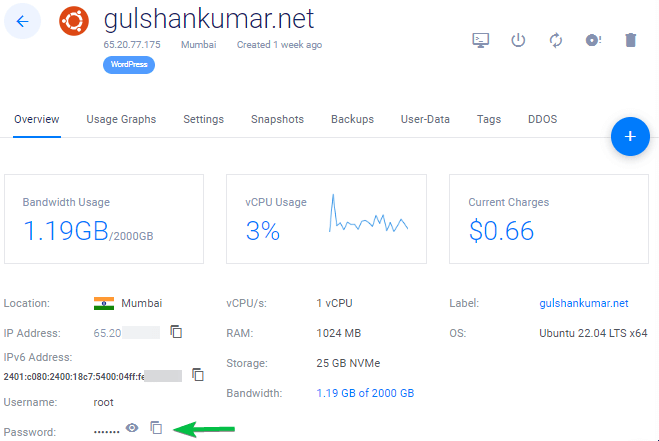
11. Buka halaman Instance Baru
Salin alamat IP, nama pengguna dan kata sandi. Port default Anda adalah 22.
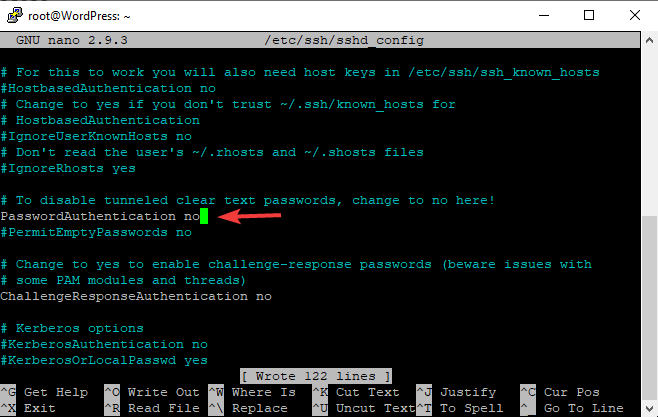
12. Nonaktifkan Login Kata Sandi
Untuk alasan keamanan, direkomendasikan untuk menonaktifkan autentikasi kata sandi dan hanya mengizinkan autentikasi berbasis kunci.
- Edit berkas konfigurasi
nano /etc/ssh/sshd_config - Temukan (CTRL + W) dan cari
PasswordAuthentication - Ubah nilai dari ya ke tidak
- Untuk menyimpan, ketik, CTRL + O
- Mulai ulang layanan SSH menggunakan perintah
sudo service ssh restart
Mulai waktu berikutnya, Anda dapat menggunakan SSH melalui key saja seperti yang ditunjukkan dalam video.
Untuk Linux atau Mac, gunakan Terminal dengan perintah seperti ini
ssh root@192.168.1.1 -p 22 -i id_rsa
Langkah 13. Nonaktifkan UFW
Ketika Anda menerapkan instance baru di VULTR, instance tersebut dilengkapi dengan UFW (Uncomplicated Firewall) yang diaktifkan yang membuat semua port diblokir kecuali port SSH 22. Ini dapat mengembalikan ERR_CONNECTION_REFUSED Error di browser. Untuk memperbaikinya, saya sarankan agar UFW dinonaktifkan.
ufw disableCukup penjelasan untuk hal-hal dasar. Sekarang, saya akan mempercepat proses awal untuk menerapkan WordPress pada tumpukan LEMP.
Bagian C. Menyebarkan WordPress pada LEMP Stack
1. Memperbarui repositori
Ketik perintah di bawah ini dan tekan tombol enter
sudo -sapt update && apt upgrade -y && apt dist-upgrade && apt autoclean && apt autoremove -y && rebootatau
wget -qO update https://dl.gulshankumar.net/update && chmod +x updateLain kali, selalu gunakan perintah pintasan di bawah ini untuk memperbarui.
./update2. Instal MariaDB dengan keamanan
Login lagi dan masukkan perintah berikut
sudo apt install mariadb-server -y && sudo mysql_secure_installationJawab pertanyaan di bawah ini
- Enter current password for root (enter for none): Нажмите клавишу Enter
- Switch to unix_socket authentication [Y/n]: Введите n и нажмите клавишу Enter.
- Set root password? [Y/n]: Нажмите клавишу Enter.
- New password: Скопируйте надежный пароль из генератора паролей Dashlane. Чтобы вставить пароль в консоль SSH, щелкните правой кнопкой мыши и нажмите клавишу Enter. Пароль не будет виден на экране.
- Re-enter new password: Щелкните правой кнопкой мыши и снова нажмите клавишу Enter.
Setelah kata sandi berhasil ditetapkan, Anda akan melihat
Password updated successfully!
Reloading privilege tables..
... Success!
Juga, Anda perlu menjawab pertanyaan-pertanyaan berikut.
- Remove anonymous users? [Y/n]: Снова нажмите клавишу Enter.
- Disallow root login remotely? [Y/n]: Снова нажмите клавишу Enter.
- Remove test database and access to it? [Y/n]: Снова нажмите клавишу Enter.
- Reload privilege tables now? [Y/n]: Снова нажмите клавишу Enter.
3. Buat Database baru untuk WordPress
Login ke MySQL, tekan tombol enter ketika meminta kata sandi.
mysql -u root -pBuat Database baru, dan berikan hak istimewa untuk menggunakan pengguna dengan kata sandi. Di sinilah WordPress menyimpan semua informasi posting, halaman, tema, plugin, dll.
create database wordpress;
grant all on wordpress.* to gulshan@localhost identified by '5pY8CKJxDRJEGQNkX7';
flush privileges;
exit;
Di mana Anda …
basis data adalah wordpress
nama pengguna adalah gulshan
kata sandi adalah 5pY8CKJxDRJEGQNkX7
Tip: Pertimbangkan untuk menggunakan kredensial login yang unik
4. Instal PHP 8.2, NGINX dan atur Izin
sudo add-apt-repository ppa:ondrej/php -y && apt update && apt install php8.2-fpm php8.2-common php8.2-mysql php8.2-xml php8.2-xmlrpc php8.2-curl php8.2-gd php8.2-imagick php8.2-cli php8.2-dev php8.2-imap php8.2-mbstring php8.2-soap php8.2-zip php8.2-bcmath -y && sed -i 's/;cgi.fix_pathinfo=1/cgi.fix_pathinfo=0/g' /etc/php/8.2/fpm/php.ini && service php8.2-fpm restart && apt install nginx -y && chown -R www-data:www-data /var/www/ && chmod -R 755 /var/wwwMengubah Konfigurasi PHP
Sebagian besar tema dan plugin mewah membutuhkan konfigurasi PHP kelas atas untuk dapat berjalan. Oleh karena itu, kita harus melakukan perubahan ini.
sed -i 's/memory_limit = 128M/memory_limit = 512M/g' /etc/php/8.2/fpm/php.ini
sed -i 's/post_max_size = 8M/post_max_size = 128M/g' /etc/php/8.2/fpm/php.ini
sed -i 's/max_file_uploads = 20/max_file_uploads = 30/g' /etc/php/8.2/fpm/php.ini
sed -i 's/max_execution_time = 30/max_execution_time = 900/g' /etc/php/8.2/fpm/php.ini
sed -i 's/max_input_time = 60/max_input_time = 3000/g' /etc/php/8.2/fpm/php.ini
sed -i 's/upload_max_filesize = 2M/upload_max_filesize = 128M/g' /etc/php/8.2/fpm/php.ini
service php8.2-fpm restart
5. Instal Sertifikat SSL Wildcard Let’s Encrypt
Buat file cloudflare.ini di dalam direktori /root/.secrets/.
mkdir -p /root/.secrets/ && cd /root/.secrets/ && nano cloudflare.iniTambahkan kode di bawah ini dan simpan menggunakan CTRL + O dan keluar menggunakan CTRL + X
dns_cloudflare_email = "your-cloudflare-email@example.com"
dns_cloudflare_api_key = "XXXXXXXXXXXXXXXXX"
Temukan email Cloudflare dan Global API key Anda di “Profil Saya” > Token API > Global API Key
chmod 0400 /root/.secrets/cloudflare.iniInstal Certbot dan DNS Authenticator sesuai dengan OS dan server web HTTP
snap install --beta --classic certbot
snap set certbot trust-plugin-with-root=ok
snap install --beta certbot-dns-cloudflare
snap connect certbot:plugin certbot-dns-cloudflare
Dapatkan Sertifikat SSL Wildcard
certbot certonly --dns-cloudflare --dns-cloudflare-credentials /root/.secrets/cloudflare.ini -d example.com,*.example.com --preferred-challenges dns-01Set Automatic Renewal using Cron Job
- Jenis
crontab -e - Ketik 1 untuk nano editor
- Masukkan perintah di bawah ini dan simpan
0 0 * * * /etc/init.d/nginx reload >/dev/null 2>&1Uji pembaruan
certbot renew --dry-run6. Mengkonfigurasi Blokir Server Nginx
Ini penting di mana Anda perlu mengkonfigurasi domain Anda, bagaimana NGINX harus menangani permintaan HTTP Anda.
Hapus blok server default.
rm /etc/nginx/sites-available/default && rm /etc/nginx/sites-enabled/defaultBuat blok server baru
cd /etc/nginx/sites-available/
nano example.com- Ganti
example.comdengan domain sendiri - Masukkan kode di bawah ini dan tekan ctrl+o untuk menyimpan dan ctrl+x untuk keluar.
Umum
server {
    listen         80;
    return 301 https://$host$request_uri;
}
server {
# Document Root
root /var/www/html;
index index.php index.html index.htm;
server_name .example.com;
client_max_body_size 0;

    listen [::]:443 ssl http2 ipv6only=on;
    listen 443 ssl http2;
        ssl_protocols TLSv1.1 TLSv1.2 TLSv1.3;
        ssl_certificate /etc/letsencrypt/live/example.com/fullchain.pem;
        ssl_certificate_key /etc/letsencrypt/live/example.com/privkey.pem;
        ssl_prefer_server_ciphers on;
        ssl_session_cache   shared:SSL:20m;
        ssl_session_timeout 20m;
        ssl_ciphers 'TLS13+AESGCM+AES128:EECDH+AES128';


error_page 404 /404.html;
error_page 500 502 503 504 /50x.html;

# Block XMLRPC
location = /xmlrpc.php {
    deny all;
}

location / {
    try_files $uri $uri/ /index.php$is_args$args;
}

location ~* \.php$ {
if ($uri !~ "^/uploads/") {
fastcgi_pass unix:/run/php/php8.2-fpm.sock;
}
include fastcgi_params;
fastcgi_param SCRIPT_FILENAME $document_root$fastcgi_script_name;
fastcgi_param SCRIPT_NAME $fastcgi_script_name;
}
location = /favicon.ico {
log_not_found off;
access_log off;
}

location = /robots.txt {
log_not_found off;
access_log off;
allow all;
}

location ~* .(css|gif|svg|ico|woff2|eot|jpeg|webp|jpg|js|png)$ {
expires 1y;
log_not_found off;
}

# Enable Gzip compression.
gzip on;

# Disable Gzip on IE6.
gzip_disable "msie6";

# Allow proxies to cache both compressed and regular version of file.
# Avoids clients that don't support Gzip outputting gibberish.
gzip_vary on;

# Compress data, even when the client connects through a proxy.
gzip_proxied any;

# The level of compression to apply to files. A higher compression level increases
# CPU usage. Level 5 is a happy medium resulting in roughly 75% compression.
gzip_comp_level 5;

# Compress the following MIME types.
gzip_types
 application/atom+xml
 application/javascript
 application/json
 application/ld+json
 application/manifest+json
 application/rss+xml
 application/vnd.geo+json
 application/vnd.ms-fontobject
 application/x-font-ttf
 application/x-web-app-manifest+json
 application/xhtml+xml
 application/xml
 font/opentype
 image/bmp
 image/svg+xml
 image/x-icon
 text/cache-manifest
 text/css
 text/plain
 text/vcard
 text/vnd.rim.location.xloc
 text/vtt
 text/x-component
 text/x-cross-domain-policy;
}
Untuk cache Enabler
server {
    listen         80;
    return 301 https://$host$request_uri;
}
server {
# Document Root
root /var/www/html;
index index.php index.html index.htm;
server_name .example.com;
client_max_body_size 0;

    listen [::]:443 ssl http2 ipv6only=on;
    listen 443 ssl http2;
        ssl_protocols TLSv1.1 TLSv1.2 TLSv1.3;
        ssl_certificate /etc/letsencrypt/live/example.com/fullchain.pem;
        ssl_certificate_key /etc/letsencrypt/live/example.com/privkey.pem;
        ssl_prefer_server_ciphers on;
        ssl_session_cache   shared:SSL:20m;
        ssl_session_timeout 20m;
        ssl_ciphers 'TLS13+AESGCM+AES128:EECDH+AES128';


error_page 404 /404.html;
error_page 500 502 503 504 /50x.html;


# Block XMLRPC
location = /xmlrpc.php {
    deny all;
}


# Rules for Cache Enabler Plugin - Static File Serving

    set $cache_uri $request_uri;

    # bypass cache if POST requests or URLs with a query string
    if ($request_method = POST) {
    set $cache_uri 'nullcache';
    }

    if ($query_string != '') {
    set $cache_uri 'nullcache';
    }

    # bypass cache if URLs containing the following strings
    if ($request_uri ~* '(/wp-admin/|/xmlrpc.php|/wp-(app|cron|login|register|mail).php|wp-.*.php|/feed/|index.php|wp-comments-popup.php|wp-links-opml.php|wp-locations.php|sitemap(index)?.xml|[a-z0-9-]+-sitemap([0-9]+)?.xml)') {
    set $cache_uri 'nullcache';
    }

    # bypass cache if cookies contain the following strings
    if ($http_cookie ~* '(wp-postpass|wordpress_logged_in|comment_author)_') {
    set $cache_uri 'nullcache';
    }

    # custom installation subdirectory
    set $custom_subdir '';

    # default HTML file
    set $cache_enabler_uri '${custom_subdir}/wp-content/cache/cache-enabler/${http_host}${cache_uri}${scheme}-index.html';

    # WebP HTML file
    if ($http_accept ~* 'image/webp') {
    set $cache_enabler_uri '${custom_subdir}/wp-content/cache/cache-enabler/${http_host}${cache_uri}${scheme}-index-webp.html';
    }

    location / {
    gzip_static on; # this directive is not required but recommended
    try_files $cache_enabler_uri $uri $uri/ $custom_subdir/index.php?$args;
    }

location ~* \.php$ {
if ($uri !~ "^/uploads/") {
fastcgi_pass unix:/run/php/php8.2-fpm.sock;
}
include fastcgi_params;
fastcgi_param SCRIPT_FILENAME $document_root$fastcgi_script_name;
fastcgi_param SCRIPT_NAME $fastcgi_script_name;
}
location = /favicon.ico {
log_not_found off;
access_log off;
}

location = /robots.txt {
log_not_found off;
access_log off;
allow all;
}

location ~* .(css|gif|svg|ico|jpeg|webp|woff2|eot|jpg|js|png)$ {
expires 1y;
log_not_found off;
}

# Enable Gzip compression.
gzip on;

# Disable Gzip on IE6.
gzip_disable "msie6";

# Allow proxies to cache both compressed and regular version of file.
# Avoids clients that don't support Gzip outputting gibberish.
gzip_vary on;

# Compress data, even when the client connects through a proxy.
gzip_proxied any;

# The level of compression to apply to files. A higher compression level increases
# CPU usage. Level 5 is a happy medium resulting in roughly 75% compression.
gzip_comp_level 5;

# Compress the following MIME types.
gzip_types
 application/atom+xml
 application/javascript
 application/json
 application/ld+json
 application/manifest+json
 application/rss+xml
 application/vnd.geo+json
 application/vnd.ms-fontobject
 application/x-font-ttf
 application/x-web-app-manifest+json
 application/xhtml+xml
 application/xml
 font/opentype
 image/bmp
 image/svg+xml
 image/x-icon
 text/cache-manifest
 text/css
 text/plain
 text/vcard
 text/vnd.rim.location.xloc
 text/vtt
 text/x-component
 text/x-cross-domain-policy;
}- Anda perlu menginstal plugin Cache Enabler untuk menikmati manfaat cache.
FastCGI
Jika Anda ingin menggunakan FastCGI Cache maka implementasikan Server Block di bawah ini sebagai gantinya.
# NGINX Cache path
fastcgi_cache_path /var/run/nginx-cache levels=1:2 keys_zone=WORDPRESS:100m inactive=6h;
fastcgi_cache_key "$scheme$request_method$host$request_uri";
fastcgi_cache_use_stale error timeout invalid_header http_500;
fastcgi_ignore_headers Cache-Control Expires Set-Cookie;

server {
    listen         80;
    return 301 https://$host$request_uri;
}
server {
root /var/www/html;
index index.php index.html index.htm;
server_name .example.com;
client_max_body_size 0;

    listen [::]:443 ssl http2 ipv6only=on;
    listen 443 ssl http2;
        ssl_protocols TLSv1.1 TLSv1.2 TLSv1.3;
        ssl_certificate /etc/letsencrypt/live/example.com/fullchain.pem;
        ssl_certificate_key /etc/letsencrypt/live/example.com/privkey.pem;
        ssl_prefer_server_ciphers on;
        ssl_session_cache   shared:SSL:20m;
        ssl_session_timeout 20m;
        ssl_ciphers 'TLS13+AESGCM+AES128:EECDH+AES128';

error_page 404 /404.html;
error_page 500 502 503 504 /50x.html;


set $skip_cache 0;
    if ($request_method = POST) {set $skip_cache 1;}
    if ($request_uri ~* "/wp-admin/|/xmlrpc.php|/wp-.*.php|index.php|sitemap") {set $skip_cache 1;}
    if ($http_cookie ~* "comment_author|wordpress_[a-f0-9]+|wp-postpass|wordpress_no_cache|wordpress_logged_in") {set $skip_cache 1;}
    if ($query_string = "unapproved*") {set $skip_cache 1;}
    if ($cookie_woocommerce_items_in_cart = "1" ){ set $skip_cache 1;}
    if ($request_uri ~* "/(cart|checkout|my-account)/*$") {set $skip_cache 1;}

# Block XMLRPC
location = /xmlrpc.php {
    deny all;
}

location / {
try_files $uri $uri/ /index.php$is_args$args;
}

location ~* \.php$ {

 if ($uri !~ "^/uploads/") {
        fastcgi_pass unix:/run/php/php8.2-fpm.sock;
        }

        try_files                       $uri =404;
        include                         /etc/nginx/fastcgi_params;
        fastcgi_param                   SCRIPT_FILENAME $document_root$fastcgi_script_name;
        fastcgi_pass                    unix:/run/php/php8.2-fpm.sock;
        fastcgi_index                   index.php;
                fastcgi_cache_bypass $skip_cache;
                fastcgi_no_cache $skip_cache;
                fastcgi_cache WORDPRESS;
                fastcgi_cache_valid 200 30d;
                fastcgi_cache_valid 301 302 303 307 308 404 410 451 1m;
                add_header X-Cache $upstream_cache_status;

}

location = /favicon.ico {
log_not_found off;
access_log off;
}

location = /robots.txt {
log_not_found off;
access_log off;
allow all;
}

location ~* .(css|gif|ico|svg|webp|woff2|eot|jpeg|jpg|js|png)$ {
expires 1y;
log_not_found off;
}

# Enable Gzip compression.
gzip on;

# Disable Gzip on IE6.
gzip_disable "msie6";

# Allow proxies to cache both compressed and regular version of file.
# Avoids clients that don't support Gzip outputting gibberish.
gzip_vary on;

# Compress data, even when the client connects through a proxy.
gzip_proxied any;

# The level of compression to apply to files. A higher compression level increases
# CPU usage. Level 5 is a happy medium resulting in roughly 75% compression.
gzip_comp_level 5;

# Compress the following MIME types.
gzip_types
 application/atom+xml
 application/javascript
 application/json
 application/ld+json
 application/manifest+json
 application/rss+xml
 application/vnd.geo+json
 application/vnd.ms-fontobject
 application/x-font-ttf
 application/x-web-app-manifest+json
 application/xhtml+xml
 application/xml
 font/opentype
 image/bmp
 image/svg+xml
 image/x-icon
 text/cache-manifest
 text/css
 text/plain
 text/vcard
 text/vnd.rim.location.xloc
 text/vtt
 text/x-component
 text/x-cross-domain-policy;
}
To save, press CTRL+O and Enter key. Then, exit nano editor using command CTRL+X.
Dalam kasus FastCGI, Anda perlu menggunakan plugin NGINX Helper. Plugin ini juga berfungsi dengan URL yang dikodekan Hindi. Perlu diingat, plugin ini tidak akan mendukung AMP. Saya pribadi tidak menggunakan AMP. (Direkomendasikan)
Sebagai alternatif, cache NGINX berfungsi untuk membersihkan URL AMP tetapi tidak mendukung URL yang dikodekan Hindi. Dalam pengaturan, Anda harus menyimpan jalur cache /var/run/nginx-cache/
Perhatian!
- Sebagai contoh, Jika Anda menggunakan tema Koran dan menyajikan tema Mobile terpisah, silakan tetap tanpa metode FastCGI dan gunakan plugin WP Rocket karena dapat melayani cache seluler terpisah di luar kotak.
7. Membuat Tautan simbolis antara dua direktori
Jika Anda melewatkan langkah ini, Anda mungkin mendapatkan ERR_CONNECTION_REFUSED
Untuk mengaktifkan blok server, buat tautan simbolik file Blok Server NGINX Anda dari direktori /etc/nginx/sites-available/ ke /etc/nginx/sites-enabled
Sebelum menjalankan perintah di bawah ini, harap ganti example.com ke domain sendiri.
ln -s /etc/nginx/sites-available/example.com /etc/nginx/sites-enabled/Konfigurasi pengujian
nginx -tMulai ulang dan perbarui
service nginx restart && service php8.2-fpm restart && service mysql restart && apt-get update && apt upgrade -y8. Instal WordPress
Unduh file WordPress di direktori /var/www/html dan atur izinnya.
cd /var/www/html && wget https://id.wordpress.org/latest-id_ID.tar.gz && tar -xvzf latest-id_ID.tar.gz && mv -v wordpress/* /var/www/html && rm -rf latest-id_ID.tar.gz wordpress && chown -R www-data:www-data /var/www/html && sudo chmod -R 755 /var/www/htmlUntuk memperbarui izin di masa mendatang, gunakan perintah di bawah ini
chown -R www-data:www-data /var/www/ && sudo chmod -R 755 /var/www9. Memperbarui DNS
Jika Anda meng-hosting WordPress secara lokal, ingin mem-bypass proxy atau ingin melakukan migrasi zero downtime, langkah ini berguna. Saya biasanya lebih suka jika area Dev WordPress statis. 😉
- Ada dua cara untuk mengarahkan DNS. Jika Anda memigrasikan situs ke Vultr dan ingin mengujinya terlebih dahulu secara lokal, maka edit file host Anda dan arahkan ke sana.
Untuk Windows
- Pergi ke properti C:\Windows\System32\drivers\etc\hosts
- Ubah izin “Keamanan” menjadi kontrol penuh untuk Nama Pengguna Anda saat ini
- Sekarang Anda dapat dengan bebas mengedit file host di bawah pengguna Sistem Anda dan menyimpannya.
# For same machine you can have localhost address else public IP
127.0.0.1 example.com
127.0.0.1 www.example.com
Beginilah seharusnya tampilannya.
Untuk Mac atau Linux
Anda dapat mengedit file host menggunakan perintah di bawah ini
sudo nano /etc/hostsMemperbarui DNS dengan Cloudflare
- Jika semuanya sempurna dan Anda ingin membuat situs Anda hidup, Login ke Cloudflare DNS dan perbarui IP baru
| A | @ | IPV4 address |
| AAAA | @ | IPV6 address |
| CNAME | www | example.com |
di mana @ menunjukkan naked domain example.com
9. Kunjungi nama domain Anda untuk menyiapkan WordPress
Jika Anda ingin menyimpan domain versi non-www untuk WordPress Anda maka kunjungi versi non-www selain www.
https://example.com- Berikan kredensial login Basis Data untuk memulai Penyiapan WordPress
- Jalankan Instalasi
- Isi detail dasar Situs baru Anda dan Instal WordPress.
- Masuk ke WordPress
- Jika Anda menggunakan blok server FastCGI maka hal pertama yang harus Anda lakukan adalah menginstal plugin NGINX Cache dan mengkonfigurasi
/var/www/cachesebagai jalur cache.
Hal-hal lain yang diperlukan
Gunakan Layanan plugin SMTP untuk mengirim email keluar WordPress jika tidak, Anda tidak akan dapat menerima tautan reset kata sandi, formulir kontak 7 pesan.
Akhirnya, instalasi WordPress telah selesai. Selalu simpan cadangan.
Saya sangat menghargai waktu berharga Anda dalam membaca artikel ini. Sampai jumpa di tutorial berikutnya!
Successfully install wordpres for a single site and do the same i mean for another domain on the same instance but after creating server blocks get “nginx: (emerg) duplicate listen options for (::):443 in /etc/nginx/sites-enabled” on nginx -t
How Can i solve this?
Exactly followed the same steps, but at the end i am getting 502 bad gateway. I built some sites with the same steps before, however i don’t know what changed now.
Consider checking the error log using command
tail -f /var/log/nginx/error.logto get a hint about exact issue.getting this
tail: cannot open ‘/var/log/error.log’ for reading: No such file or directory
tail: no files remaining
Sorry, there was a typo in my previous comment. Try below command
tail -f /var/log/nginx/error.logCan you explain me what is the difference between inactive and fastcgi_cache_valid values? Can you explain them please? Thanks
location ~* .(css|gif|ico|svg|jpeg|jpg|js|png)$ {
expires 1y;
log_not_found off;
}
is this code for page caching?
I use cloudflare so it has page cache too.
If i use that can i remove it from codes?
Can you please explain what is this code for?
Thanks
That code is for setting up 1 year browser caching for static files. You may use Cloudflare Page caching as normally you do. There shouldn’t be any problem.
For Nginx cache helper (I take this info from offical site
There’s a ‘purge all’ button? Does it purge the whole site?
Yes, it does. It physically empties the cache directory. It is set by default to /var/run/nginx-cache/.
So the default is /var/run/nginx-cache/
can we change fastcgi_cache_path /var/www/cache to /var/run/nginx-cache/ ?
Thanks
Jika direktori cache Anda berbeda, Anda dapat menimpa ini di
wp-config.phpAnda dengan menambahkan.define('RT_WP_NGINX_HELPER_CACHE_PATH','/var/www/nginx-cache/')I finally installed wordpress with this guide. But I see only www version but not the non-www version. Is there any changes that I need to do.
Redirects to www version even If I enter non-www version.
You need to point DNS records for both hostnames. Second, make sure dot is not missing from the beginning of example.com in this code –
server_name .example.com;in the NGINX connfig at step 6. Another thing, Redirect from www to non-www or vice-versa (as neccessary) is taken care automatically from WordPress. You do not need to put any extra code for it.which is the best & compatible server side cache plugin If I use FastCGI server block code along with Nginx Cache plugin..
W3 Total Cache or WP Rocket
I have 2 questions
1) What if i have 2 domains on different cloudflare accounts?
Create a cloudflare.ini file inside /root/.secrets/ directory.
mkdir -p /root/.secrets/ && cd /root/.secrets/ && nano cloudflare.ini
Add below code and save using CTRL+O and exit using CTRL+X
dns_cloudflare_email = “your-cloudflare-email@example.com”
dns_cloudflare_api_key = “XXXXXXXXXXXXXXXXX”
/root/.secrets/1domaincloudfare.ini
/root/.secrets/2domaincloudfare.ini
certbot certonly –dns-cloudflare –dns-cloudflare-credentials 1domaincloudfare.ini -d example.com,*.1domain.com –preferred-challenges dns-01
certbot certonly –dns-cloudflare –dns-cloudflare-credentials 2domaincloudfare.ini -d example.com,*.2domain.com –preferred-challenges dns-01
Do this work?
2) If we have 2 domains in the same account on cloudflare can we use 1 cloudflare.ini
certbot certonly –dns-cloudflare –dns-cloudflare-credentials /root/.secrets/cloudflare.ini -d 1domain.com,*.example.com –preferred-challenges dns-01
certbot certonly –dns-cloudflare –dns-cloudflare-credentials /root/.secrets/cloudflare.ini -d 2domain.com,*.example.com –preferred-challenges
dns-01
3) If we dont use cloudflare what will our ns for domain?
CLoud VPNs IP?
ns1= 68.28.65.84
ns2= 68.28.65.84
Is this right?
thanks for your replies
1. True
2. True
3. I have no idea about it. I prefer using CF DNS.
Can we create multi wordpress sites on different domain in the same machine with this
method?
I think only changement is in the FastCGI?
server {
root /var/www/aaa.com/wordpress;
index index.php index.html index.htm;
server_name .aaa.com;
client_max_body_size 0;
server {
root /var/www/bbb.com/wordpress;
index index.php index.html index.htm;
server_name .bbb.com;
client_max_body_size 0;
server {
root /var/www/ccc.com/wordpress;
index index.php index.html index.htm;
server_name .ccc.com;
client_max_body_size 0;
is this make a problem cache path is the same path for 3 web site? /var/www/cache
Is this method works?
1 machine 3 different domain and wordpress?
Thanks
Not for multiple sites.
What do you think about Plesk Panel?
It is easy to install plesk and create a wordpress site.
Easy to find trial keys and we can use it unlimited.
If it expires sites goes on ftp works and only plesk panel does not work but there are too much trial keys
It has nginx cache.
Do you recommend why and why not?
Thanks
I do not trust 3rd-parties installers.
Do all commands work for Centos 8?
Sorry, this is for Ubuntu OS only not for Centos 8.
hello gulshanji i wanted to use cloudflare ssl direct from thier website and not thru api with fast cgi then what would the config
Hey bro what is your thoughts on EasyEngine and SlickStack etc or one click app instead to automate? what is your favorite and will you make any tut bro
Sure, there is one. I will post about it. Thanks for your feedback.
The FastCGI server block config throws 404 Errors.
fastcgi_pass unix:/run/php/php7.4-fpm-example.sock;
should be:
fastcgi_pass unix:/run/php/php7.4-fpm.sock;
And it is missing config for location /
This config must be defined:
location / {
try_files $uri $uri/ /index.php$is_args$args;
}
I see, it was intended for seperate user. But, to keep generic I have corrected. Thanks for pointing out.
Without the location / block only the home page was accessible.
When I added the below block i was able to access the post and pages.
location / {
try_files $uri $uri/ /index.php$is_args$args;
}
Hello Alpesh, Corrected. Thanks again for your tip.
It was a good article
Thanks for your comment.
Nice tutorial. Does it come with email hosting? Looking to make a small site in Singapore using VultrHF
E-mail is a different thing. G Suite by Google services is specialized in this segment.
What are the differences if any between doing this method and using the vultr 1 click install? I have also read about centminmod. Is that somrthing u will recommend for having a fast LEMP stack? Tnx
I alwyas keep this guide bookmarket to my web browser! You never know when I would need to setup a new LEMP server ! Thanks Gulshan
Thanks for your comment.
hi, Gulshan thanks for sharing.
can u please share how to install wp on subfoler?
This article is like Life-Saver for one of my website. I was about to move from Google Cloud to Digital Ocean because the trial was expired and I also wanted to use DigitaOcean because it is in-expensive yet powerful and gives great experience.
Previously, I used webinoly stack which was straightforward for installing WordPress but later on I got to know from Gulshan that there are so many issues with that stack so, this time I was going to do it manually. I checked the official guide by Digital ocean but end up with many confusion and issues. Then, I fortunately asked Gulshan for help and he recommended this article for me.
I installed WordPress easily and very fast even fast that Webinoly stack. Thanks a lot Gulshan for writing this amazing article. Hats off to you bro!!🎩
Hi Gulshan, I am also receiving the test failed error on step 7. I have tried several times now on different setup and still stuck here. Please could you help?
Please carefully read the post and then copy-paste code in Terminal. Sometime you need to replace with your own domain. Doing mistake can return error. Else, no wise. I use this guide everyday for myself. I am not aware about any problem.
In case of trouble
1. Run test using
nginx -t2. Check logs to get proper hint
tail -f /var/log/nginx/error.log3. Delete existing or earlier created virtualhost
rm /etc/nginx/sites-available/default && rm /etc/nginx/sites-enabled/default4. Make sure to replace example.com at all places, a) when you create conf file, its naming. b) when you add conf file and c) when you create symlink, check your command its conf file name must match with first process.
I feel in most cases, chances are you did not replaced
server_name .example.com;to own domain, or you did not obtained SSL. All steps are written in serial order as it should be.I am facing problem of infinite loop redirects. I had use fastcache code. how to fix it
Please try Full SSL mode of Cloudflare. Then check again!
How to check if fastcgi cache is working or not? while running sudo
curl -I https://example.comit is not showing x-cache parameterHey Gulshan,
In the 7th step while texting ngnix I got
nginx: [emerg] open() “/etc/nginx/sites-enabled/example.com” failed (2: No such file or directory) in /etc/nginx/nginx.conf:62
nginx: configuration file /etc/nginx/nginx.conf test failed
This error. How I can solve it? also what the error.
Please delete your existing server block and create again at sites-available and symlink at sites-enabled directory. The step 6 and 7 cover that clearly. Consider following patiently without any error. If you still face any problem, do let me know. Thanks for taking to leave your valuable comment.
Hi would like to know after configuring Fastcgi do we still need other caching plugin to speed up WordPress site?
Wonderful tutorial just complete solution for Nginx Fast CGI
Thanks Wasim for your kind feedback.
How Can I setup FastCGI on my ngnix server guided by you….
I have updated my article.
i want redirect too www plz help me urgent
If your WordPress General Settings has www version, server will do automatically. No additional action is required. In case you started WordPress installation at non-www version, then you need to migrate by changing at Database level.
You may use Better Search Replce plugin to perform this changes.
It Really Works Gulshan Bro. Thanks Really dear You are awesome…
Hello Gulshan Bro, First i want to say you that this is very beautiful and required post. I am really appreciating your work. but i have a problem can you please tell me
i have a droplet with digitalocean ($5/month plan) and i want to host multiple wordpress sites only with nginx(lemp ubuntu 18.04).
In simple i mean that this tutorial is complete to install a single wordpress and i did it but tell host it in some other sites
Hey Rohit,
Assuming, second site is example2.org
You need to follow steps this way.
1. create a new directory and add WordPress (Ref: steps 31)
cd /var/www/mkdir example2
wget https://wordpress.org/latest.tar.gz
tar -xvzf latest.tar.gz
mv -v wordpress/* /var/www/example2
rm -rf index.nginx-debian.html latest.tar.gz wordpress
chown -R www-data:www-data /var/www/
sudo chmod -R 755 /var/www
2. Create a new Server block with root path located to new directory as created in step 1.
cd /etc/nginx/sites-available/

nano gulshankumar-org
server {listen 80;
root /var/www/example2;
index index.php index.html index.htm;
server_name example2.org www.example2.org;
...
3. Point your example2.org domain to DNS, then install SSL
certbot --nginx -d example2.org -d www.example2.org4. Create new MySQL database
sudo mysql -u root -pcreate database example2;
grant all on example2.* to example2@localhost identified by 'TYPE HERE PASSWORD';
flush privileges;
exit;
5. Proceed to Installation by visiting your site
https://example2.orgLet me know if you have any additional question. You can always visit our forum for quick assistance.
Thanks & Regards,
Gulshan
It Really Works Gulshan Bro. Thanks Really dear You are awesome…
Hello Gulshan you written a comprehensive guide i highly appreciate your work. Can you help me with an error? Actually i have two websites the first website i have already hosted on Vultr following the above guide.
But when try to host a another WordPress website iam getting error. I followed the above steps you mentioned in comments. But still not able to fix it. The error is my website not working after hosting another WordPress website.
If possible please guide me step by step instructions. It will help me alot. Thanks in advance.
Consider checking log available at
/var/log/nginx/directory. Usenginx -tcommand to see what mistake causing issue.Very well. thank you so much
How to auto-renew SSL?
Add below cron job
crontab -eAdd below command and save.
15 3 * * 7 certbot renew --post-hook "service nginx restart"Thanks sos un groso, very well tutorial
Thank you for your tutorial, its the first one that actually showed me the wordpress setup page.
When I went to upload a plugin I received this message. “The uploaded file exceeds the upload_max_filesize directive in php.ini”
How do I increase the max filesize?
Please see the step 33.5
Thanks Gulshan, Finally I moved to NGINX server. You have created a great tutorial for beginners.
You’re welcome bro 🙂
Hi,
Thank you for this awesome guide.
How can I install WordPress multisite on Ubuntu 18.04 with Nginx?
Finally I loved this step by step tutorial with proper images.
Thanks Bhaiya you are awesome
Thanks a lot Gulshan. You save my breath
I search everywhere but not find any good article
You explained very well along with security concern
well done