In this article, you are going to learn through the process of installing WordPress manually on an Ubuntu 22.04 server using NGINX, MariaDB, and PHP 8.2. These stack will provide a powerful and efficient platform for running your WordPress website with an amazing speed.
Follow these 3 steps written in this article or watch the video. Need help? contact me. 🙂
Part A: Keep Cloudflare Nameservers active
We will be using Cloudflare DNS for getting Let’s Encrypt Wildcard SSL certificate. Complete this step first to enjoy zero-downtime migration.
Check Current Nameservers
- Find your active Nameservers at https://www.whatsmydns.net/#NS/example.com
- If you see using your previous Hosting or Domain registrar default NS, then you must replace with Cloudflare.
- Learn how to use Cloudflare DNS
Part B: Get a Ubuntu Server 22.04 LTS Server ready

1. Sign up Vultr to grab $100 Free credits (Valid for 30 days)
As someone who have tried so many Cloud server company, my experience says you can’t go wrong with Vultr. These guys are genuine and caring when it comes to support and services.
⚡ Performance
- NVME / SSD
- 3.7 GHz CPU
- Up to 5Gbps Network Speed
- Datacenter in America, Europe, Asia, Austraillia
- IPV6 ready
💡 Features
- Beginner-Friendly Dashboard
- One-click to Snapshot
- Automtatic Backup (Paid)
- Free Cloud Firewall
- DDoS protection (Paid)
- 100% KVM Virtualization
⚙ Support
- PayPal/Card
- 24/7 Ticket Support
- Documentation
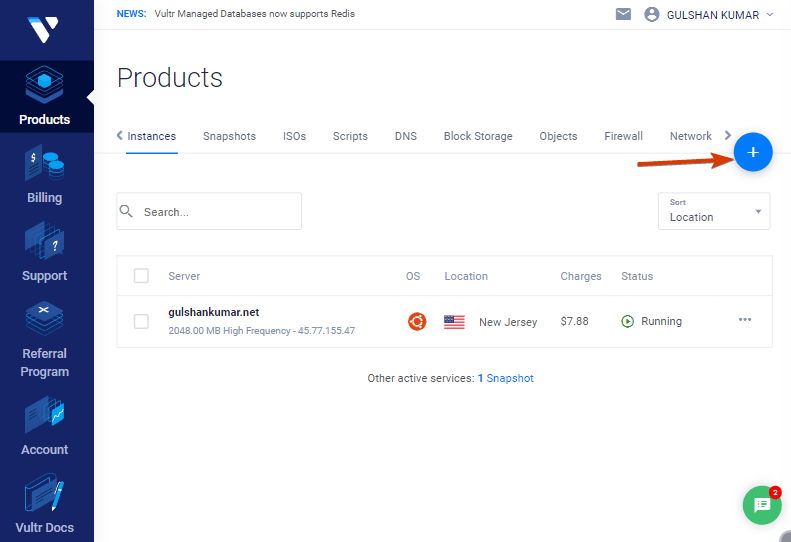
2. Create a new VPS Server
Simply click on the plus button to get started
3. Choose the Cloud Compute Server
Select Cloud Compute for shared CPU in affordable pricing.
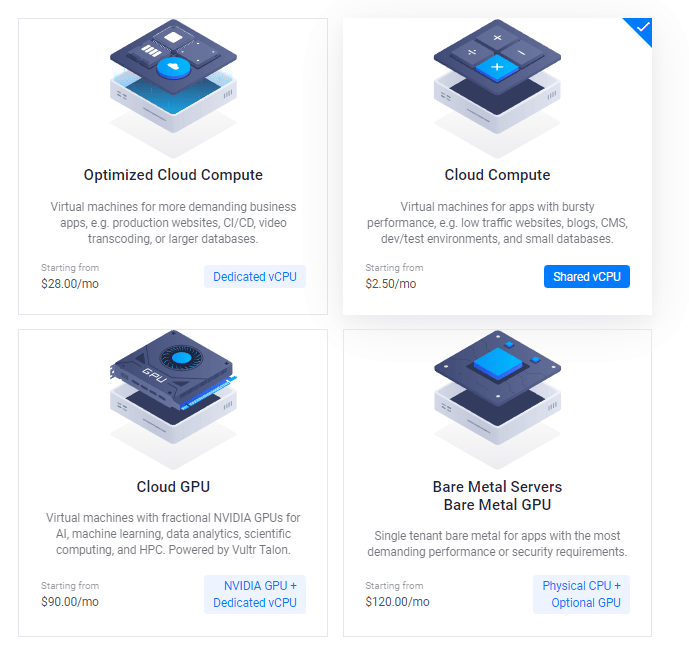
After this, you may select the AMD High Performance or Intel High Frequency option in CPU & Storage Technology. It has the fastest CPU and NVMe Disk ever. If the budget is less then go with the Regular plan with Intel CPU in which you will get SSD disk.

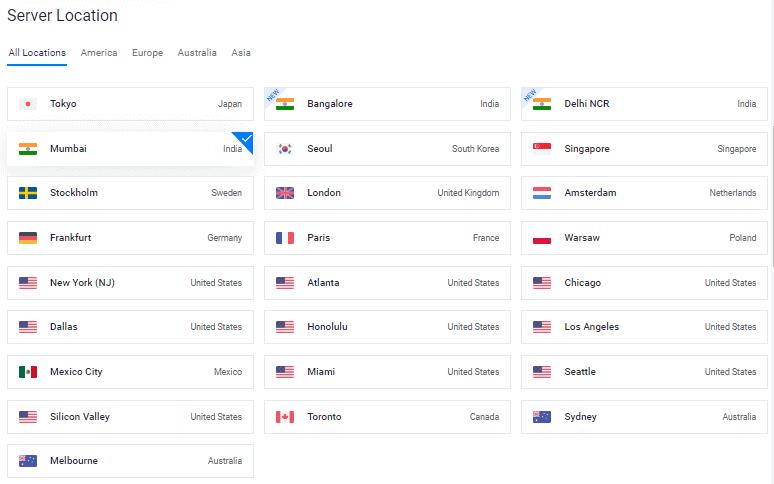
4. Choose a Server Location
Choose a server location that is close to your target audience.
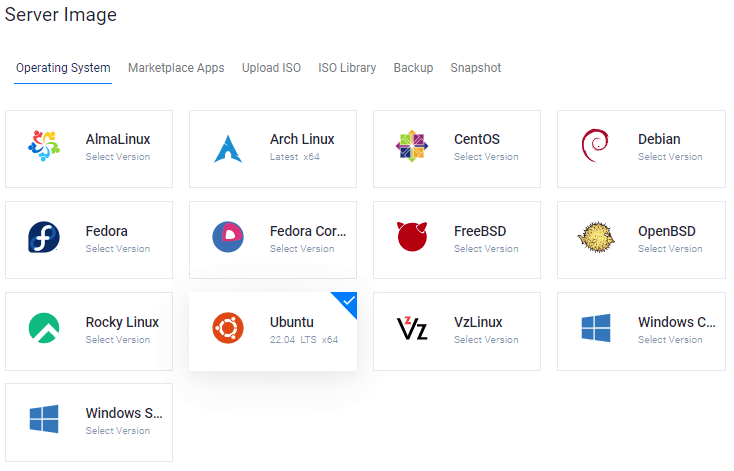
5. Select the Ubuntu 22.04 x64 OS
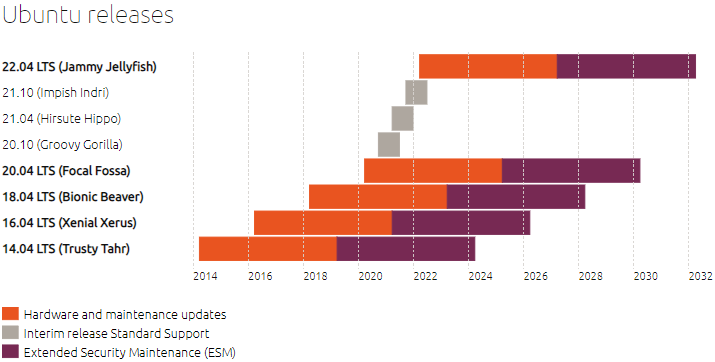
Currently, Ubuntu 20.04×64 and 22.04×64 both are LTS (Long Term Supported) version compatible with most packages that we are going to install.
Long-term support (LTS) is a product lifecycle management policy in which a stable release of computer software is maintained for a longer period of time than the standard edition.
6. Choose a Server Size
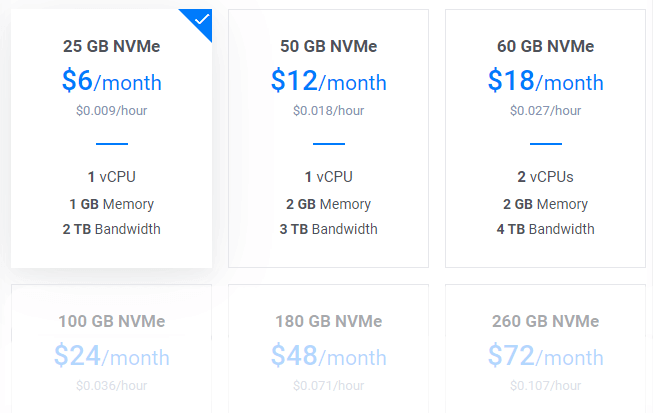
$6/mo plan would be a great starting point for a new blog. You can upgrade anytime as per requirement.
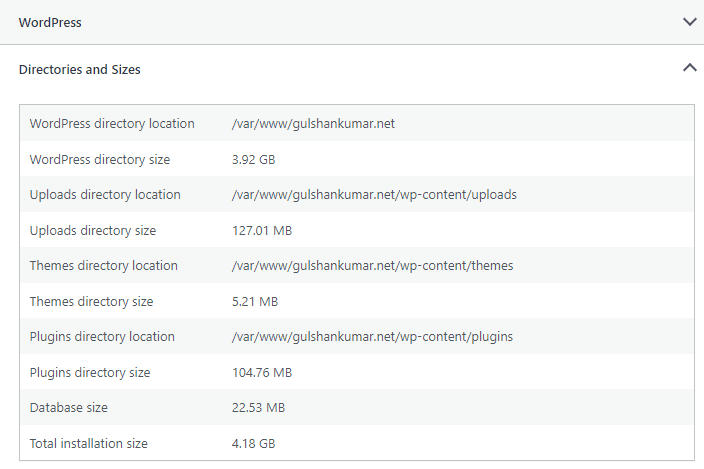
Tip: If you are migrating, check Total installation size in Site health info.
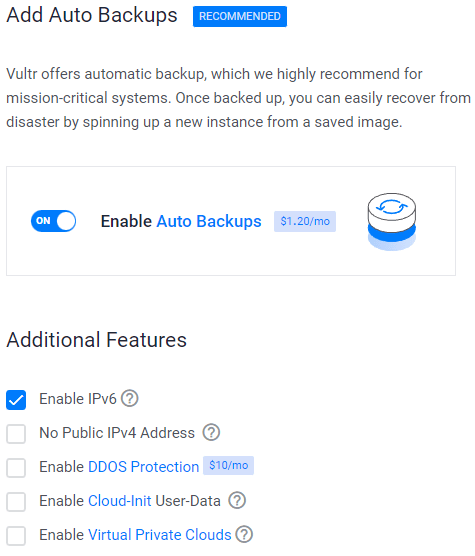
7. Enable IPV6, Backup
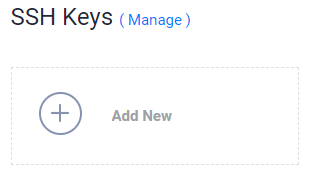
8. Add a SSH key
This is a recommended, optional step for the enhanced security.
- Click on Add New button to add a new SSH key to submit your 🔒Public key.
- Generate Keys using below method as per your OS.

- Download PuTTy
- Search for PuTTygen in the Start menu
- Click on Generate button and hover mouse pointer
- Copy Public key and provide to Vultr
- Enter key passphrase
- Save 🔑Private Key at the safest location.
- This can be used for login to SSH or SFTP.

- Run:
ssh-keygen -t rsa. For a more secure 4096-bit key, run:ssh-keygen -t rsa -b 4096 - Press enter when asked where you want to save the key (this will use the default location).
- Enter a passphrase for your key.
- Run
cat ~/.ssh/id_rsa.pub– this will give you the key in the proper format to paste into the control panel. - Make sure you backup the
~/.ssh/id_rsafile. This cannot be recovered if it is lost.
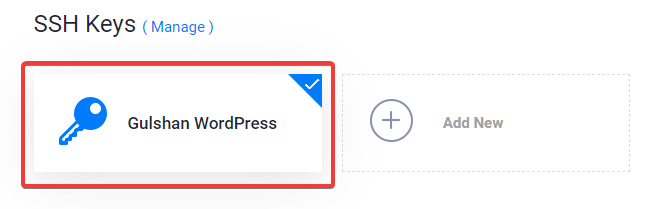
Select your SSH key
Following these steps will attach your public key to your new Instance. Then, you will be able to login to SSH using Plain Text password and SSH key both.
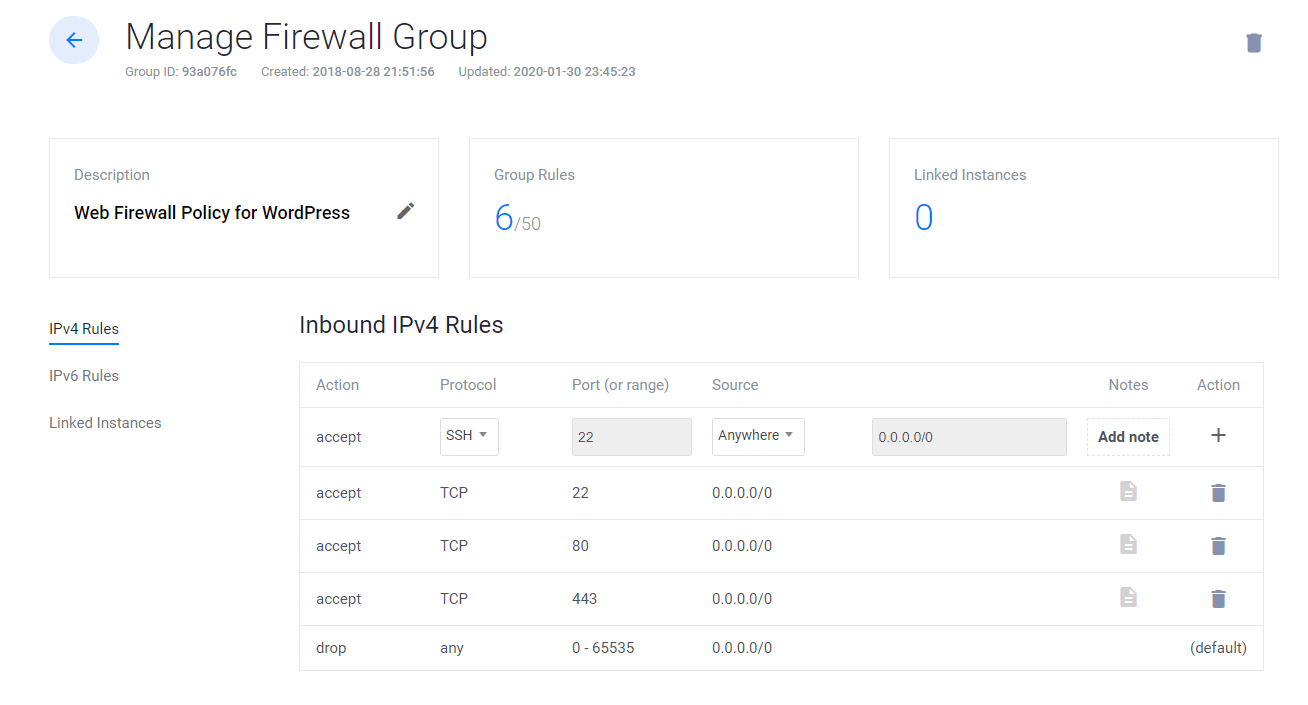
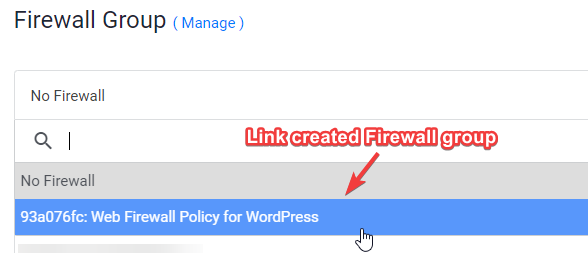
9. Link Web Firewall rule to Server Instance
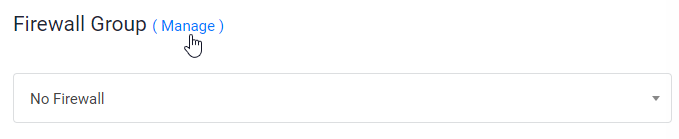
- Click on Manage and create a new Firewall Group.
- Allow TCP port 22 for SSH. 80 for HTTP and 443 HTTPS for IPV4 and IPV6 rules both.
- Once done, link the Firewall group to your Instance.
10. Enter Hostname and label click Deploy Now
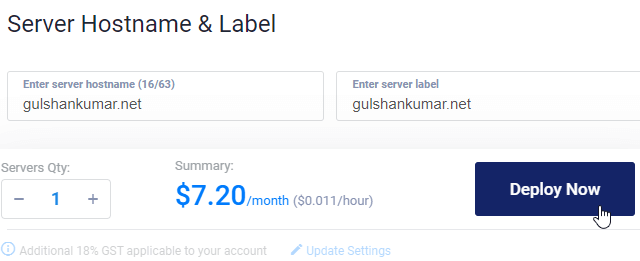
Now, you will see installing in the progress
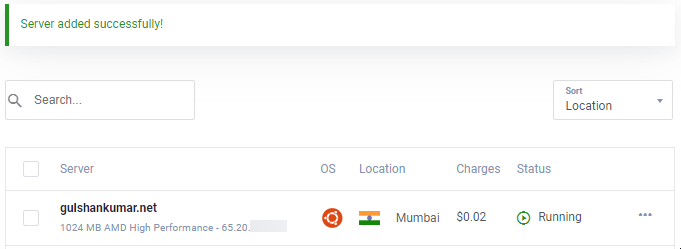
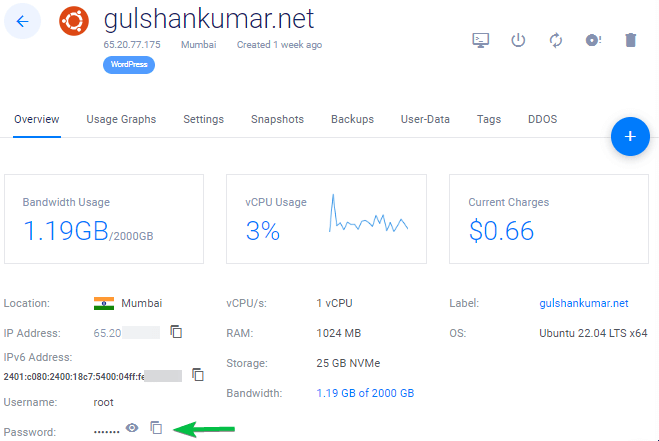
11. Go to New Instance page
Copy IP address, username and password. Your default port is 22.
12. Disable Password Login
For security reasons, it’s recommended to disable password authentication and allow only key based authentication.
- Edit the configuration file
/etc/ssh/sshd_config.d/50-cloud-init.conf - Change value for
PasswordAuthenticationfrom yes to no - To save type, CTRL + O
- Restart the SSH service using command
sudo service ssh restart
From the next time, you can use SSH via key only as shown in the video.
For Linux or Mac, use Terminal with command like this
ssh [email protected] -p 22 -i id_rsa
By default, the private key file (id_rsa) is often stored in the .ssh directory within the user’s home directory.
Step 13. Disable UFW
When you deploy a new instance at VULTR it comes with UFW (Uncomplicated Firewall) enabled that keeps all ports blocked except the SSH port 22. This can return ERR_CONNECTION_REFUSED Error in the browser. To fix this, I would suggest keeping UFW disabled.
ufw disableEnough explanation for basic things. Now, I’ll speed up the original process for deploying WordPress on the LEMP stack.
Part C. Deploy WordPress on LEMP Stack
1. Update repositories
wget -qO update https://dl.gulshankumar.net/update && chmod +x updateNext time, always use below shortcut command to update.
./update2. Install MariaDB with security
Login again and enter following command
sudo apt install mariadb-server -y && sudo mysql_secure_installationAnswer below questions
- Enter current password for root (enter for none): Press the Enter key
- Switch to unix_socket authentication [Y/n]: Type n and Press the Enter key.
- Set root password? [Y/n]: Press the Enter key.
- New password: Copy a strong password from Dashlane Password Generator. To paste a password in the SSH console, right-click and press the Enter key. The password will not be visible on the screen.
- Re-enter new password: Right-click and press the Enter key again.
After successful password set, you will see
Password updated successfully!
Reloading privilege tables..
... Success!
Also, you need answer the following questions.
- Remove anonymous users? [Y/n]: Press the Enter key
- Disallow root login remotely? [Y/n]: Press the Enter key
- Remove test database and access to it? [Y/n]: Press the Enter key
- Reload privilege tables now? [Y/n]: Press the Enter key
3. Create a new Database for WordPress
Login to MySQL, press the Enter key when it asks for password.
mysql -u root -pCreate a new Database, and Grant Privileges to use its user with password. This is where WordPress store all post, pages, themes, plugin, etc information.
create database wordpress;
grant all on wordpress.* to gulshan@localhost identified by '5pY8CKJxDRJEGQNkX7';
flush privileges;
exit;
Where your …
database is wordpress
username is gulshan
password is 5pY8CKJxDRJEGQNkX7
Tip: Consider using unique login credential
4. Install PHP 8.2, NGINX and set Permission
As of now, PHP 8.2 is the latest stable version. If you need a different PHP version must keep the same version in all the below commands.
sudo add-apt-repository ppa:ondrej/php -y && apt update && apt install php8.2-fpm php8.2-common php8.2-mysql php8.2-xml php8.2-xmlrpc php8.2-curl php8.2-gd php8.2-imagick php8.2-cli php8.2-dev php8.2-imap php8.2-mbstring php8.2-soap php8.2-zip php8.2-bcmath -y && sed -i 's/;cgi.fix_pathinfo=1/cgi.fix_pathinfo=0/g' /etc/php/8.2/fpm/php.ini && service php8.2-fpm restart && apt install nginx -y && chown -R www-data:www-data /var/www/ && chmod -R 755 /var/wwwTweak PHP Configuration
Most fancy theme and plugin requires high-end PHP configuration to run. Therefore, we should make this changes.
sed -i 's/memory_limit = .*/memory_limit = 512M/g' /etc/php/8.2/fpm/php.ini
sed -i 's/post_max_size = .*/post_max_size = 128M/g' /etc/php/8.2/fpm/php.ini
sed -i 's/max_file_uploads = .*/max_file_uploads = 30/g' /etc/php/8.2/fpm/php.ini
sed -i 's/max_execution_time = .*/max_execution_time = 900/g' /etc/php/8.2/fpm/php.ini
sed -i 's/max_input_time = .*/max_input_time = 3000/g' /etc/php/8.2/fpm/php.ini
sed -i 's/upload_max_filesize = .*/upload_max_filesize = 128M/g' /etc/php/8.2/fpm/php.ini
service php8.2-fpm restart
5. Install Wildcard Let’s Encrypt SSL Certificate
Create a cloudflare.ini file inside /root/.secrets/ directory.
mkdir -p /root/.secrets/ && cd /root/.secrets/ && nano cloudflare.iniAdd below code and save using CTRL+O and exit using CTRL+X
dns_cloudflare_email = "[email protected]"
dns_cloudflare_api_key = "XXXXXXXXXXXXXXXXX"
Find your Cloudflare e-mail and Global API key at “My Profile” > API Tokens > Global API Key
chmod 0400 /root/.secrets/cloudflare.iniInstall Certbot and DNS Authenticator according to OS and HTTP web server
snap install --beta --classic certbot
snap set certbot trust-plugin-with-root=ok
snap install --beta certbot-dns-cloudflare
snap connect certbot:plugin certbot-dns-cloudflare
Get Wildcard SSL Certificate
certbot certonly --dns-cloudflare --dns-cloudflare-credentials /root/.secrets/cloudflare.ini -d example.com,*.example.com --preferred-challenges dns-01 --dns-cloudflare-propagation-seconds 30Set Automatic Renewal using Cron Job
- Type
crontab -e - Type 1 for nano editor
- Enter below command and save
0 0 * * * /etc/init.d/nginx reload >/dev/null 2>&1Test renewal
certbot renew --dry-run6. Configure Nginx Server Block
This is important where you need configure your domain, how NGINX should handle your HTTP requests.
Delete default server blocks.
rm /etc/nginx/sites-available/default && rm /etc/nginx/sites-enabled/defaultCreate a new server block
cd /etc/nginx/sites-available/
nano example.com- Replace
example.comwith own domain - Enter below code and Press ctrl+o to save and ctrl+x to exit.
General
server {
    listen         80;
    server_name .example.com;
    return 301 https://$host$request_uri;
}
server {
# Document Root
root /var/www/html;
index index.php index.html index.htm;
server_name .example.com;
client_max_body_size 0;

set_real_ip_from 0.0.0.0/0;
set_real_ip_from ::/0;
real_ip_header X-Forwarded-For;

    listen [::]:443 ssl http2 ipv6only=on;
    listen 443 ssl http2;
        ssl_protocols TLSv1.1 TLSv1.2 TLSv1.3;
        ssl_certificate /etc/letsencrypt/live/example.com/fullchain.pem;
        ssl_certificate_key /etc/letsencrypt/live/example.com/privkey.pem;
        ssl_prefer_server_ciphers on;
        ssl_session_cache   shared:SSL:20m;
        ssl_session_timeout 20m;
        ssl_ciphers 'TLS13+AESGCM+AES128:EECDH+AES128';


error_page 404 /404.html;
error_page 500 502 503 504 /50x.html;

# Block XMLRPC
location = /xmlrpc.php {
    deny all;
}

location / {
    try_files $uri $uri/ /index.php$is_args$args;
}

location ~* \.php$ {
if ($uri !~ "^/uploads/") {
fastcgi_pass unix:/run/php/php8.2-fpm.sock;
}
include fastcgi_params;
fastcgi_param SCRIPT_FILENAME $document_root$fastcgi_script_name;
fastcgi_param SCRIPT_NAME $fastcgi_script_name;
}
location = /favicon.ico {
log_not_found off;
access_log off;
}

location = /robots.txt {
log_not_found off;
access_log off;
allow all;
}

location ~* \.(css|js|gif|svg|ico|jpe?g|png|webp|woff2|eot)$ {
add_header  Cache-Control "public, max-age=31536000, immutable";
log_not_found off;
access_log off;
}

# Enable Gzip compression.
gzip on;

# Disable Gzip on IE6.
gzip_disable "msie6";

# Allow proxies to cache both compressed and regular version of file.
# Avoids clients that don't support Gzip outputting gibberish.
gzip_vary on;

# Compress data, even when the client connects through a proxy.
gzip_proxied any;

# The level of compression to apply to files. A higher compression level increases
# CPU usage. Level 5 is a happy medium resulting in roughly 75% compression.
gzip_comp_level 5;

# Compress the following MIME types.
gzip_types
 application/atom+xml
 application/javascript
 application/json
 application/ld+json
 application/manifest+json
 application/rss+xml
 application/vnd.geo+json
 application/vnd.ms-fontobject
 application/x-font-ttf
 application/x-web-app-manifest+json
 application/xhtml+xml
 application/xml
 font/opentype
 image/bmp
 image/svg+xml
 image/x-icon
 text/cache-manifest
 text/css
 text/plain
 text/vcard
 text/vnd.rim.location.xloc
 text/vtt
 text/x-component
 text/x-cross-domain-policy;
}
For cache Enabler
server {
    listen         80;
    server_name .example.com;
    return 301 https://$host$request_uri;
}
server {
# Document Root
root /var/www/html;
index index.php index.html index.htm;
server_name .example.com;
client_max_body_size 0;

set_real_ip_from 0.0.0.0/0;
set_real_ip_from ::/0;
real_ip_header X-Forwarded-For;

    listen [::]:443 ssl http2 ipv6only=on;
    listen 443 ssl http2;
        ssl_protocols TLSv1.1 TLSv1.2 TLSv1.3;
        ssl_certificate /etc/letsencrypt/live/example.com/fullchain.pem;
        ssl_certificate_key /etc/letsencrypt/live/example.com/privkey.pem;
        ssl_prefer_server_ciphers on;
        ssl_session_cache   shared:SSL:20m;
        ssl_session_timeout 20m;
        ssl_ciphers 'TLS13+AESGCM+AES128:EECDH+AES128';


error_page 404 /404.html;
error_page 500 502 503 504 /50x.html;


# Block XMLRPC
location = /xmlrpc.php {
    deny all;
}


# Rules for Cache Enabler Plugin - Static File Serving

    set $cache_uri $request_uri;

    # bypass cache if POST requests or URLs with a query string
    if ($request_method = POST) {
    set $cache_uri 'nullcache';
    }

    if ($query_string != '') {
    set $cache_uri 'nullcache';
    }

    # bypass cache if URLs containing the following strings
    if ($request_uri ~* '(/wp-admin/|/xmlrpc.php|/wp-(app|cron|login|register|mail).php|wp-.*.php|/feed/|index.php|wp-comments-popup.php|wp-links-opml.php|wp-locations.php|sitemap(index)?.xml|[a-z0-9-]+-sitemap([0-9]+)?.xml)') {
    set $cache_uri 'nullcache';
    }

    # bypass cache if cookies contain the following strings
    if ($http_cookie ~* '(wp-postpass|wordpress_logged_in|comment_author)_') {
    set $cache_uri 'nullcache';
    }

    # custom installation subdirectory
    set $custom_subdir '';

    # default HTML file
    set $cache_enabler_uri '${custom_subdir}/wp-content/cache/cache-enabler/${http_host}${cache_uri}${scheme}-index.html';

    # WebP HTML file
    if ($http_accept ~* 'image/webp') {
    set $cache_enabler_uri '${custom_subdir}/wp-content/cache/cache-enabler/${http_host}${cache_uri}${scheme}-index-webp.html';
    }

    location / {
    gzip_static on; # this directive is not required but recommended
    try_files $cache_enabler_uri $uri $uri/ $custom_subdir/index.php?$args;
    }

location ~* \.php$ {
if ($uri !~ "^/uploads/") {
fastcgi_pass unix:/run/php/php8.2-fpm.sock;
}
include fastcgi_params;
fastcgi_param SCRIPT_FILENAME $document_root$fastcgi_script_name;
fastcgi_param SCRIPT_NAME $fastcgi_script_name;
}
location = /favicon.ico {
log_not_found off;
access_log off;
}

location = /robots.txt {
log_not_found off;
access_log off;
allow all;
}

location ~* \.(css|js|gif|svg|ico|jpe?g|png|webp|woff2|eot)$ {
add_header  Cache-Control "public, max-age=31536000, immutable";
log_not_found off;
access_log off;
}

# Enable Gzip compression.
gzip on;

# Disable Gzip on IE6.
gzip_disable "msie6";

# Allow proxies to cache both compressed and regular version of file.
# Avoids clients that don't support Gzip outputting gibberish.
gzip_vary on;

# Compress data, even when the client connects through a proxy.
gzip_proxied any;

# The level of compression to apply to files. A higher compression level increases
# CPU usage. Level 5 is a happy medium resulting in roughly 75% compression.
gzip_comp_level 5;

# Compress the following MIME types.
gzip_types
 application/atom+xml
 application/javascript
 application/json
 application/ld+json
 application/manifest+json
 application/rss+xml
 application/vnd.geo+json
 application/vnd.ms-fontobject
 application/x-font-ttf
 application/x-web-app-manifest+json
 application/xhtml+xml
 application/xml
 font/opentype
 image/bmp
 image/svg+xml
 image/x-icon
 text/cache-manifest
 text/css
 text/plain
 text/vcard
 text/vnd.rim.location.xloc
 text/vtt
 text/x-component
 text/x-cross-domain-policy;
}- You need to install Cache Enabler plugin to enjoy cache benefit.
FastCGI
If you want to use FastCGI Cache then implement below Server Block instead.
# NGINX Cache path
fastcgi_cache_path /var/run/nginx-cache levels=1:2 keys_zone=WORDPRESS:100m inactive=6h;
fastcgi_cache_key "$scheme$request_method$host$request_uri";
fastcgi_cache_use_stale error timeout invalid_header http_500;
fastcgi_ignore_headers Cache-Control Expires Set-Cookie;

server {
    listen         80;
    server_name .example.com;
    return 301 https://$host$request_uri;
}
server {
root /var/www/html;
index index.php index.html index.htm;
server_name .example.com;
client_max_body_size 0;

set_real_ip_from 0.0.0.0/0;
set_real_ip_from ::/0;
real_ip_header X-Forwarded-For;

    listen [::]:443 ssl http2 ipv6only=on;
    listen 443 ssl http2;
        ssl_protocols TLSv1.1 TLSv1.2 TLSv1.3;
        ssl_certificate /etc/letsencrypt/live/example.com/fullchain.pem;
        ssl_certificate_key /etc/letsencrypt/live/example.com/privkey.pem;
        ssl_prefer_server_ciphers on;
        ssl_session_cache   shared:SSL:20m;
        ssl_session_timeout 20m;
        ssl_ciphers 'TLS13+AESGCM+AES128:EECDH+AES128';


error_page 404 /404.html;
error_page 500 502 503 504 /50x.html;


set $skip_cache 0;
    if ($request_method = POST) {set $skip_cache 1;}
    if ($request_uri ~* "/wp-admin/|/xmlrpc.php|/wp-.*.php|index.php|sitemap") {set $skip_cache 1;}
    if ($http_cookie ~* "comment_author|wordpress_[a-f0-9]+|wp-postpass|wordpress_no_cache|wordpress_logged_in") {set $skip_cache 1;}
    if ($query_string = "unapproved*") {set $skip_cache 1;}
    if ($cookie_woocommerce_items_in_cart = "1" ){ set $skip_cache 1;}
    if ($request_uri ~* "/(cart|checkout|my-account)/*$") {set $skip_cache 1;}

# Block XMLRPC
location = /xmlrpc.php {
    deny all;
}

location / {
try_files $uri $uri/ /index.php$is_args$args;
}

location ~* \.php$ {

 if ($uri !~ "^/uploads/") {
        fastcgi_pass unix:/run/php/php8.2-fpm.sock;
        }

        try_files                       $uri =404;
        include                         /etc/nginx/fastcgi_params;
        fastcgi_param                   SCRIPT_FILENAME $document_root$fastcgi_script_name;
        fastcgi_pass                    unix:/run/php/php8.2-fpm.sock;
        fastcgi_index                   index.php;
                fastcgi_cache_bypass $skip_cache;
                fastcgi_no_cache $skip_cache;
                fastcgi_cache WORDPRESS;
                fastcgi_cache_valid 200 30d;
                fastcgi_cache_valid 301 302 303 307 308 404 410 451 1m;
                add_header X-Cache $upstream_cache_status;

}

location = /favicon.ico {
log_not_found off;
access_log off;
}

location = /robots.txt {
log_not_found off;
access_log off;
allow all;
}

location ~* \.(css|js|gif|svg|ico|jpe?g|png|webp|woff2|eot)$ {
add_header  Cache-Control "public, max-age=31536000, immutable";
log_not_found off;
access_log off;
}

# Enable Gzip compression.
gzip on;

# Disable Gzip on IE6.
gzip_disable "msie6";

# Allow proxies to cache both compressed and regular version of file.
# Avoids clients that don't support Gzip outputting gibberish.
gzip_vary on;

# Compress data, even when the client connects through a proxy.
gzip_proxied any;

# The level of compression to apply to files. A higher compression level increases
# CPU usage. Level 5 is a happy medium resulting in roughly 75% compression.
gzip_comp_level 5;

# Compress the following MIME types.
gzip_types
 application/atom+xml
 application/javascript
 application/json
 application/ld+json
 application/manifest+json
 application/rss+xml
 application/vnd.geo+json
 application/vnd.ms-fontobject
 application/x-font-ttf
 application/x-web-app-manifest+json
 application/xhtml+xml
 application/xml
 font/opentype
 image/bmp
 image/svg+xml
 image/x-icon
 text/cache-manifest
 text/css
 text/plain
 text/vcard
 text/vnd.rim.location.xloc
 text/vtt
 text/x-component
 text/x-cross-domain-policy;
}
To save, press CTRL+O and Enter key. Then, exit nano editor using command CTRL+X.
In case of FastCGI, you need to use NGINX Helper plugin. It works with Hindi encoded URL as well. Keep in mind, it won’t support AMP. I personally don’t use AMP. (Recommended)
Alternatively, NGINX cache works for purging AMP URL but it doesn’t support Hindi encoded URL. In settings, you should keep cache path /var/run/nginx-cache/
Caution!
- For example, If you’re using Newspaper theme and serve seperate Mobile theme, please stick without FastCGI method and use a plugin WP Rocket because it can serve seperate mobile cache out of the box.
7. Create Symbolic links between two directories
If you miss this step, you may get ERR_CONNECTION_REFUSED
To activate server block, create a symbolic link of your NGINX Server Block file from directory /etc/nginx/sites-available/ to /etc/nginx/sites-enabled
Before running below command, please replace example.com to own domain.
ln -s /etc/nginx/sites-available/example.com /etc/nginx/sites-enabled/Test configuration
nginx -tRestart and update
service nginx restart && service php8.2-fpm restart && service mysql restart && apt-get update && apt upgrade -y8. Install WordPress
Download WordPress files in /var/www/html directory and set permission.
cd /var/www/html && wget https://wordpress.org/latest.tar.gz && tar -xvzf latest.tar.gz && mv -v wordpress/* /var/www/html && rm -rf index.nginx-debian.html latest.tar.gz wordpress && chown -R www-data:www-data /var/www/ && sudo chmod -R 755 /var/wwwTo update permission in future, use below command
chown -R www-data:www-data /var/www/ && sudo chmod -R 755 /var/www9. Updating DNS
If you’re hosting WordPress locally, want to bypass proxy or want to perform zero downtime migration, this step is useful. I generally prefer in case of Static WordPress Dev area. 😉
- There are two ways to point DNS. If you are migrating site to Vultr and want to test first locally then edit your hosts file and point there.
For Windows
- Go to properties of C:\Windows\System32\drivers\etc\hosts
- Change “Security” permission to full control for your current Username
- Now you can freely edit the hosts file under your System user and save it.
# For same machine you can have localhost address else public IP
127.0.0.1 example.com
127.0.0.1 www.example.com
This is how it should look.
For Mac or Linux
You can edit the hosts file using below command
sudo nano /etc/hostsUpdating DNS with Cloudflare
- If everything is perfect and you want to make your site live, Login to Cloudflare DNS and update new IP
| A | @ | IPV4 address |
| AAAA | @ | IPV6 address |
| CNAME | www | example.com |
where @ denotes naked domain example.com
9. Visit your domain name to setup WordPress
If you want to keep non-www version domain for your WordPress then visit non-www version else www.
https://example.com- Provide Database login credential to begin WordPress Setup
- Run Installation
- Fill up Basic details of your new Site and Install WordPress.
- Login to WordPress
- If you used FastCGI server block then first thing you should do is installing NGINX Cache plugin and configuring
/var/www/cacheas cache path.
Other neccessary things
Use SMTP plugin Services for sending outgoing email of WordPress otherwise you will not be able to receive password reset link, contact form 7 messages.
Finally, the WordPress installation has been completed. Always keep backup.
I greatly appreciate your valuable time in reading this article. See you in the next tutorial!
Can I simply skip step 5 (SSL) and continue with the remaining procedure?
If you choose to skip the steps for installing an SSL certificate, please keep in mind that you may need to adjust the NGINX configuration accordingly. I would highly recommend opting for HTTPS by following the article in its entirety.
I tried with this NGINX FastCGI config, but the problem I am getting the “No input file specified.” error while accessing WordPress.
# NGINX Cache path
fastcgi_cache_path /var/run/nginx-cache levels=1:2 keys_zone=WORDPRESS:100m inactive=6h;
fastcgi_cache_key “$scheme$request_method$host$request_uri”;
fastcgi_cache_use_stale error timeout invalid_header http_500;
fastcgi_ignore_headers Cache-Control Expires Set-Cookie;
server {
listen 80;
server_name .example.com;
set $skip_cache 0;
if ($request_method = POST) { set $skip_cache 1; }
if ($request_uri ~* “/wp-admin/|/xmlrpc.php|/wp-.*.php|index.php|sitemap”) { set $skip_cache 1; }
if ($http_cookie ~* “comment_author|wordpress_[a-f0-9]+|wp-postpass|wordpress_no_cache|wordpress_logged_in”) { set $skip_cache 1; }
if ($query_string = “unapproved*”) { set $skip_cache 1; }
if ($cookie_woocommerce_items_in_cart = “1” ){ set $skip_cache 1; }
if ($request_uri ~* “/(cart|checkout|my-account)/*$”) { set $skip_cache 1; }
# Block XMLRPC
location = /xmlrpc.php {
deny all;
}
location / {
#try_files $uri $uri/ /index.php$is_args$args;
try_files $uri $uri/ /index.html?$query_string;
}
location ~* \.php$ {
if ($uri !~ “^/uploads/”) {
fastcgi_pass unix:/run/php/php8.2-fpm.sock;
}
try_files $uri =404;
include /etc/nginx/fastcgi_params;
fastcgi_param SCRIPT_FILENAME $document_root$fastcgi_script_name;
fastcgi_pass unix:/run/php/php8.2-fpm.sock;
fastcgi_index index.php;
fastcgi_cache_bypass $skip_cache;
fastcgi_no_cache $skip_cache;
fastcgi_cache WORDPRESS;
fastcgi_cache_valid 200 30d;
fastcgi_cache_valid 301 302 303 307 308 404 410 451 1m;
add_header X-Cache $upstream_cache_status;
}
location = /favicon.ico {
log_not_found off;
access_log off;
}
location = /robots.txt {
log_not_found off;
access_log off;
allow all;
}
location ~* \.(css|js|gif|svg|ico|jpe?g|png|webp|woff2|eot)$ {
add_header Cache-Control “public, max-age=31536000, immutable”;
log_not_found off;
access_log off;
}
# Enable Gzip compression.
gzip on;
# Disable Gzip on IE6.
gzip_disable “msie6”;
# Allow proxies to cache both compressed and regular version of file.
# Avoids clients that don’t support Gzip outputting gibberish.
gzip_vary on;
# Compress data, even when the client connects through a proxy.
gzip_proxied any;
# The level of compression to apply to files. A higher compression level increases
# CPU usage. Level 5 is a happy medium resulting in roughly 75% compression.
gzip_comp_level 5;
# Compress the following MIME types.
gzip_types
application/atom+xml
application/javascript
application/json
application/ld+json
application/manifest+json
application/rss+xml
application/vnd.geo+json
application/vnd.ms-fontobject
application/x-font-ttf
application/x-web-app-manifest+json
application/xhtml+xml
application/xml
font/opentype
image/bmp
image/svg+xml
image/x-icon
text/cache-manifest
text/css
text/plain
text/vcard
text/vnd.rim.location.xloc
text/vtt
text/x-component
text/x-cross-domain-policy;
}
Is there anything I need to add/remove to make it work?
Please email me your server details to check it.
One thing about doing manual set up on VPS is a good experience, but experience shown that we won’t see any performance benefits on a 1 core VPS compare to a modern shared hosting who are running on beefier VPS that has the best performance ratio, mean those with cPanel using LiteSpeed Enterprise are on par.
They are equally impact by heavyweight plugins and likely need beefier server at a higher costs and more carbon footprint.
Is it better than WordOps?
I am getting this error when I use command- certbot renew –dry-run
Simulating renewal of an existing certificate for example.com and *.example.com
Waiting 10 seconds for DNS changes to propagate
Certbot failed to authenticate some domains (authenticator: dns-cloudflare). The Certificate Authority reported these problems:
Domain: example.com
Type: unauthorized
Detail: Incorrect TXT record “I44aRVZwBKM_wfoiNdhdfgdsfD5WQ0k1hJ1fsGfcQ” found at _acme-challenge.example.com
Hint: The Certificate Authority failed to verify the DNS TXT records created by –dns-cloudflare. Ensure the above domains are hosted by this DNS provider, or try increasing –dns-cloudflare-propagation-seconds (currently 10 seconds).
Failed to renew certificate example.com with error: Some challenges have failed.
– – – – – – – – – – – – – – – – – – – – – – – – – – – – – – – – – – – – – – – –
All simulated renewals failed. The following certificates could not be renewed:
/etc/letsencrypt/live/example.com/fullchain.pem (failure)
– – – – – – – – – – – – – – – – – – – – – – – – – – – – – – – – – – – – – – – –
1 renew failure(s), 0 parse failure(s)
Ask for help or search for solutions at https://community.letsencrypt.org. See the logfile /var/log/letsencrypt/letsencrypt.log or re-run Certbot with -v for more details
Is this installation better than WordOps?
WordOps vs Cloudpanel vs CyberPanel, which is better and faster?
hey gulshan could you add brotli compression in this tutorial ? would be 110%!!! congratulations for this great tutorial!!!
Successfully install wordpres for a single site and do the same i mean for another domain on the same instance but after creating server blocks get “nginx: (emerg) duplicate listen options for (::):443 in /etc/nginx/sites-enabled” on nginx -t
How Can i solve this?
I solved it removing ipv6only=on of listen [::]:443 ssl http2 ipv6only=on;
Exactly followed the same steps, but at the end i am getting 502 bad gateway. I built some sites with the same steps before, however i don’t know what changed now.
Consider checking the error log using command
tail -f /var/log/nginx/error.logto get a hint about exact issue.getting this
tail: cannot open ‘/var/log/error.log’ for reading: No such file or directory
tail: no files remaining
Sorry, there was a typo in my previous comment. Try below command
tail -f /var/log/nginx/error.logCan you explain me what is the difference between inactive and fastcgi_cache_valid values? Can you explain them please? Thanks
location ~* .(css|gif|ico|svg|jpeg|jpg|js|png)$ {
expires 1y;
log_not_found off;
}
is this code for page caching?
I use cloudflare so it has page cache too.
If i use that can i remove it from codes?
Can you please explain what is this code for?
Thanks
That code is for setting up 1 year browser caching for static files. You may use Cloudflare Page caching as normally you do. There shouldn’t be any problem.
For Nginx cache helper (I take this info from offical site
There’s a ‘purge all’ button? Does it purge the whole site?
Yes, it does. It physically empties the cache directory. It is set by default to /var/run/nginx-cache/.
So the default is /var/run/nginx-cache/
can we change fastcgi_cache_path /var/www/cache to /var/run/nginx-cache/ ?
Thanks
Put this code in wp-config.php file just after PHP opening tag.
define('RT_WP_NGINX_HELPER_CACHE_PATH','/var/www/nginx-cache/');I finally installed wordpress with this guide. But I see only www version but not the non-www version. Is there any changes that I need to do.
Redirects to www version even If I enter non-www version.
You need to point DNS records for both hostnames. Second, make sure dot is not missing from the beginning of example.com in this code –
server_name .example.com;in the NGINX connfig at step 6. Another thing, Redirect from www to non-www or vice-versa (as neccessary) is taken care automatically from WordPress. You do not need to put any extra code for it.which is the best & compatible server side cache plugin If I use FastCGI server block code along with Nginx Cache plugin..
W3 Total Cache or WP Rocket
I have 2 questions
1) What if i have 2 domains on different cloudflare accounts?
Create a cloudflare.ini file inside /root/.secrets/ directory.
mkdir -p /root/.secrets/ && cd /root/.secrets/ && nano cloudflare.ini
Add below code and save using CTRL+O and exit using CTRL+X
dns_cloudflare_email = “[email protected]”
dns_cloudflare_api_key = “XXXXXXXXXXXXXXXXX”
/root/.secrets/1domaincloudfare.ini
/root/.secrets/2domaincloudfare.ini
certbot certonly –dns-cloudflare –dns-cloudflare-credentials 1domaincloudfare.ini -d example.com,*.1domain.com –preferred-challenges dns-01
certbot certonly –dns-cloudflare –dns-cloudflare-credentials 2domaincloudfare.ini -d example.com,*.2domain.com –preferred-challenges dns-01
Do this work?
2) If we have 2 domains in the same account on cloudflare can we use 1 cloudflare.ini
certbot certonly –dns-cloudflare –dns-cloudflare-credentials /root/.secrets/cloudflare.ini -d 1domain.com,*.example.com –preferred-challenges dns-01
certbot certonly –dns-cloudflare –dns-cloudflare-credentials /root/.secrets/cloudflare.ini -d 2domain.com,*.example.com –preferred-challenges
dns-01
3) If we dont use cloudflare what will our ns for domain?
CLoud VPNs IP?
ns1= 68.28.65.84
ns2= 68.28.65.84
Is this right?
thanks for your replies
1. True
2. True
3. I have no idea about it. I prefer using CF DNS.
Can we create multi wordpress sites on different domain in the same machine with this
method?
I think only changement is in the FastCGI?
server {
root /var/www/aaa.com/wordpress;
index index.php index.html index.htm;
server_name .aaa.com;
client_max_body_size 0;
server {
root /var/www/bbb.com/wordpress;
index index.php index.html index.htm;
server_name .bbb.com;
client_max_body_size 0;
server {
root /var/www/ccc.com/wordpress;
index index.php index.html index.htm;
server_name .ccc.com;
client_max_body_size 0;
is this make a problem cache path is the same path for 3 web site? /var/www/cache
Is this method works?
1 machine 3 different domain and wordpress?
Thanks
Not for multiple sites.
What do you think about Plesk Panel?
It is easy to install plesk and create a wordpress site.
Easy to find trial keys and we can use it unlimited.
If it expires sites goes on ftp works and only plesk panel does not work but there are too much trial keys
It has nginx cache.
Do you recommend why and why not?
Thanks
I do not trust 3rd-parties installers.
Do all commands work for Centos 8?
Sorry, this is for Ubuntu OS only not for Centos 8.
hello gulshanji i wanted to use cloudflare ssl direct from thier website and not thru api with fast cgi then what would the config
Hey bro what is your thoughts on EasyEngine and SlickStack etc or one click app instead to automate? what is your favorite and will you make any tut bro
Sure, there is one. I will post about it. Thanks for your feedback.
The FastCGI server block config throws 404 Errors.
fastcgi_pass unix:/run/php/php7.4-fpm-example.sock;
should be:
fastcgi_pass unix:/run/php/php7.4-fpm.sock;
And it is missing config for location /
This config must be defined:
location / {
try_files $uri $uri/ /index.php$is_args$args;
}
I see, it was intended for seperate user. But, to keep generic I have corrected. Thanks for pointing out.
Without the location / block only the home page was accessible.
When I added the below block i was able to access the post and pages.
location / {
try_files $uri $uri/ /index.php$is_args$args;
}
Hello Alpesh, Corrected. Thanks again for your tip.
It was a good article
Thanks for your comment.
Nice tutorial. Does it come with email hosting? Looking to make a small site in Singapore using VultrHF
E-mail is a different thing. G Suite by Google services is specialized in this segment.
What are the differences if any between doing this method and using the vultr 1 click install? I have also read about centminmod. Is that somrthing u will recommend for having a fast LEMP stack? Tnx
I alwyas keep this guide bookmarket to my web browser! You never know when I would need to setup a new LEMP server ! Thanks Gulshan
Thanks for your comment.
hi, Gulshan thanks for sharing.
can u please share how to install wp on subfoler?
This article is like Life-Saver for one of my website. I was about to move from Google Cloud to Digital Ocean because the trial was expired and I also wanted to use DigitaOcean because it is in-expensive yet powerful and gives great experience.
Previously, I used webinoly stack which was straightforward for installing WordPress but later on I got to know from Gulshan that there are so many issues with that stack so, this time I was going to do it manually. I checked the official guide by Digital ocean but end up with many confusion and issues. Then, I fortunately asked Gulshan for help and he recommended this article for me.
I installed WordPress easily and very fast even fast that Webinoly stack. Thanks a lot Gulshan for writing this amazing article. Hats off to you bro!!🎩
Hi Gulshan, I am also receiving the test failed error on step 7. I have tried several times now on different setup and still stuck here. Please could you help?
Please carefully read the post and then copy-paste code in Terminal. Sometime you need to replace with your own domain. Doing mistake can return error. Else, no wise. I use this guide everyday for myself. I am not aware about any problem.
In case of trouble
1. Run test using
nginx -t2. Check logs to get proper hint
tail -f /var/log/nginx/error.log3. Delete existing or earlier created virtualhost
rm /etc/nginx/sites-available/default && rm /etc/nginx/sites-enabled/default4. Make sure to replace example.com at all places, a) when you create conf file, its naming. b) when you add conf file and c) when you create symlink, check your command its conf file name must match with first process.
I feel in most cases, chances are you did not replaced
server_name .example.com;to own domain, or you did not obtained SSL. All steps are written in serial order as it should be.I am facing problem of infinite loop redirects. I had use fastcache code. how to fix it
Please try Full SSL mode of Cloudflare. Then check again!
How to check if fastcgi cache is working or not? while running sudo
curl -I https://example.comit is not showing x-cache parameterHey Gulshan,
In the 7th step while texting ngnix I got
nginx: [emerg] open() “/etc/nginx/sites-enabled/example.com” failed (2: No such file or directory) in /etc/nginx/nginx.conf:62
nginx: configuration file /etc/nginx/nginx.conf test failed
This error. How I can solve it? also what the error.
Please delete your existing server block and create again at sites-available and symlink at sites-enabled directory. The step 6 and 7 cover that clearly. Consider following patiently without any error. If you still face any problem, do let me know. Thanks for taking to leave your valuable comment.
Hi would like to know after configuring Fastcgi do we still need other caching plugin to speed up WordPress site?
Wonderful tutorial just complete solution for Nginx Fast CGI
Thanks Wasim for your kind feedback.
How Can I setup FastCGI on my ngnix server guided by you….
I have updated my article.
i want redirect too www plz help me urgent
If your WordPress General Settings has www version, server will do automatically. No additional action is required. In case you started WordPress installation at non-www version, then you need to migrate by changing at Database level.
You may use Better Search Replce plugin to perform this changes.
It Really Works Gulshan Bro. Thanks Really dear You are awesome…
Hello Gulshan Bro, First i want to say you that this is very beautiful and required post. I am really appreciating your work. but i have a problem can you please tell me
i have a droplet with digitalocean ($5/month plan) and i want to host multiple wordpress sites only with nginx(lemp ubuntu 18.04).
In simple i mean that this tutorial is complete to install a single wordpress and i did it but tell host it in some other sites
Hey Rohit,
Assuming, second site is example2.org
You need to follow steps this way.
1. create a new directory and add WordPress (Ref: steps 31)
cd /var/www/mkdir example2
wget https://wordpress.org/latest.tar.gz
tar -xvzf latest.tar.gz
mv -v wordpress/* /var/www/example2
rm -rf index.nginx-debian.html latest.tar.gz wordpress
chown -R www-data:www-data /var/www/
sudo chmod -R 755 /var/www
2. Create a new Server block with root path located to new directory as created in step 1.
cd /etc/nginx/sites-available/

nano gulshankumar-org
server {listen 80;
root /var/www/example2;
index index.php index.html index.htm;
server_name example2.org www.example2.org;
...
3. Point your example2.org domain to DNS, then install SSL
certbot --nginx -d example2.org -d www.example2.org4. Create new MySQL database
sudo mysql -u root -pcreate database example2;
grant all on example2.* to example2@localhost identified by 'TYPE HERE PASSWORD';
flush privileges;
exit;
5. Proceed to Installation by visiting your site
https://example2.orgLet me know if you have any additional question. You can always visit our forum for quick assistance.
Thanks & Regards,
Gulshan
It Really Works Gulshan Bro. Thanks Really dear You are awesome…
Hello Gulshan you written a comprehensive guide i highly appreciate your work. Can you help me with an error? Actually i have two websites the first website i have already hosted on Vultr following the above guide.
But when try to host a another WordPress website iam getting error. I followed the above steps you mentioned in comments. But still not able to fix it. The error is my website not working after hosting another WordPress website.
If possible please guide me step by step instructions. It will help me alot. Thanks in advance.
Consider checking log available at
/var/log/nginx/directory. Usenginx -tcommand to see what mistake causing issue.Very well. thank you so much
How to auto-renew SSL?
Add below cron job
crontab -eAdd below command and save.
15 3 * * 7 certbot renew --post-hook "service nginx restart"Thanks sos un groso, very well tutorial
Thank you for your tutorial, its the first one that actually showed me the wordpress setup page.
When I went to upload a plugin I received this message. “The uploaded file exceeds the upload_max_filesize directive in php.ini”
How do I increase the max filesize?
Please see the step 33.5
Thanks Gulshan, Finally I moved to NGINX server. You have created a great tutorial for beginners.
You’re welcome bro 🙂
Hi,
Thank you for this awesome guide.
How can I install WordPress multisite on Ubuntu 18.04 with Nginx?
Finally I loved this step by step tutorial with proper images.
Thanks Bhaiya you are awesome
Thanks a lot Gulshan. You save my breath
I search everywhere but not find any good article
You explained very well along with security concern
well done