W tym artykule dowiesz się jak ręcznie zainstalować WordPressa na Ubuntu 22.04 używając NGINX, MariaDB i PHP 8.2. Te stosy zapewniają potężną i wydajną platformę do uruchamiania witryny WordPress z niesamowitą prędkością.
Wykonaj te 3 kroki i obejrzyj film. Potrzebujesz pomocy? Skontaktuj się ze mną. 😊
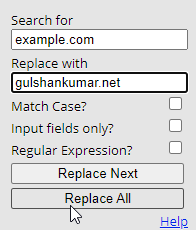
Teraz zanim zaczniesz, oto szybka wskazówka. Użyj Search and Replace Extension, aby hurtowo zmienić
Wskazówka oszczędzająca czas dla użytkowników Google Chrome.example.comna swoją własną domenę na tej stronie.
Część A: Utrzymuj aktywny Cloudflare Nameservers
Będziemy używać Cloudflare DNS do uzyskania certyfikatu Let’s Encrypt Wildcard SSL. Wykonaj ten krok jako pierwszy, aby cieszyć się migracją bez przestojów.
Sprawdź aktualne nameservers
- Znajdź swoje aktywne nameservers na stronie https://www.whatsmydns.net/#NS/example.com
- Jeśli widzisz, że używasz swojego poprzedniego hostingu lub rejestratora domen domyślnego NS, to musisz zastąpić go Cloudflare.
- Dowiedz się jak korzystać z Cloudflare DNS.
Część B: Przygotuj serwer Ubuntu 22.04 LTS

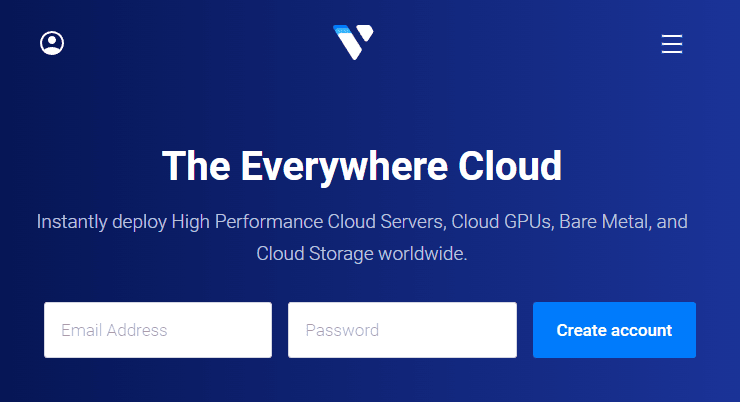
1. Zarejestruj się w Vultr, aby otrzymać 100$ darmowych kredytów (ważne przez 30 dni)
Jako ktoś, kto wypróbował tak wiele firm oferujących serwery w chmurze, moje doświadczenie mówi, że nie można się pomylić z Vultr. Ci ludzie są autentyczni i troskliwi, jeśli chodzi o wsparcie i usługi.
⚡ Wydajność
- NVME / SSD
- 3.7 GHz CPU
- Up to 5Gbps Network Speed
- Datacenter in America, Europe, Asia, Austraillia
- IPV6 ready
💡 Cechy
- Deska rozdzielcza przyjazna dla początkujących
- Jedno kliknięcie, aby wykonać migawkę
- Automtatic Backup (płatny)
- Darmowy Cloud Firewall
- Ochrona przed DDoS (płatna)
- 100% wirtualizacji KVM
⚙ Wsparcie
- PayPal/Card
- Obsługa biletów 24/7
- Dokumentacja
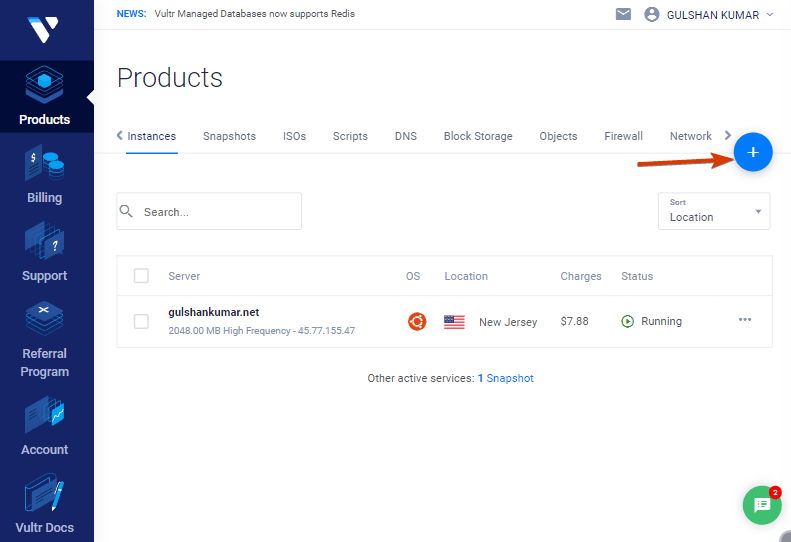
2. Utwórz nowy serwer VPS
Wystarczy kliknąć na przycisk plus, aby rozpocząć pracę
3. Wybierz Cloud Compute
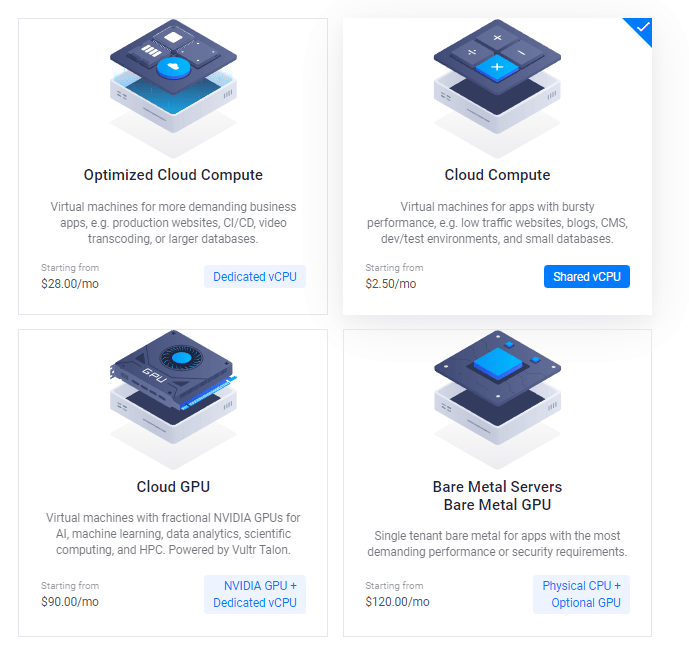
Po tym można wybrać opcję AMD High Performance lub Intel High Frequency w CPU & Storage Technology. Posiada on najszybszy procesor i dysk NVMe w historii. Jeśli budżet jest mniejszy, wybierz plan Regular z procesorem Intel, w którym otrzymasz dysk SSD.

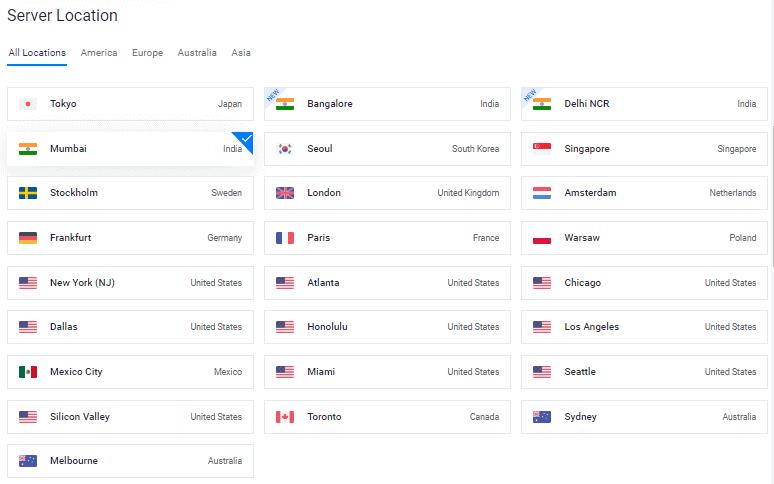
4. Wybierz lokalizację serwera.
Wybierz lokalizację serwera, która znajduje się blisko Twojej grupy docelowej.
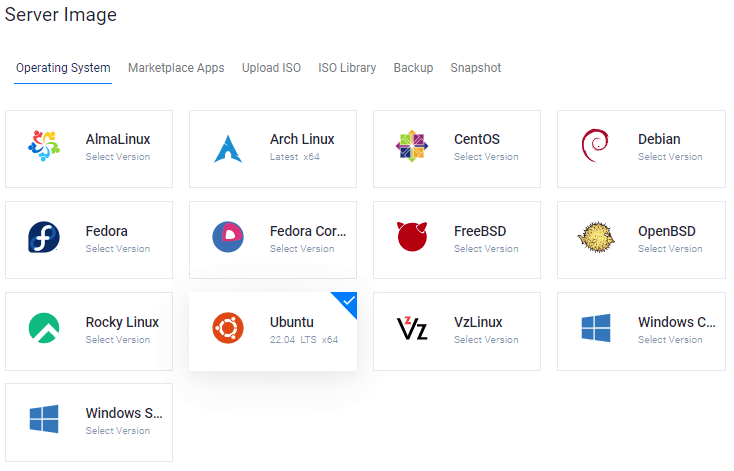
5. Wybierz system operacyjny Ubuntu 22.04 x64
Obecnie Ubuntu 20.04×64 i 22.04×64 oba są wersjami LTS (Long Term Supported) kompatybilnymi z większością pakietów, które zamierzamy zainstalować.
Po tym można wybrać opcję AMD High Performance lub Intel High Frequency w CPU & Storage Technology. Posiada on najszybszy procesor i dysk NVMe w historii. Jeśli budżet jest mniejszy, wybierz plan Regular z procesorem Intel, w którym otrzymasz dysk SSD.
6. Wybierz rozmiar serwera
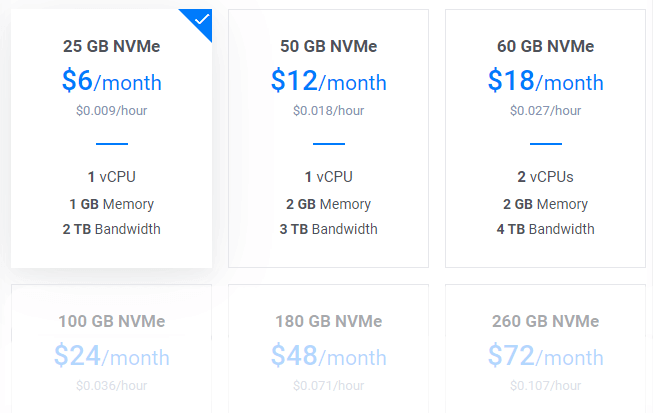
Plan $6/mo byłby świetnym punktem wyjścia dla nowego bloga. Możesz uaktualnić w dowolnym momencie, jak na wymagania.
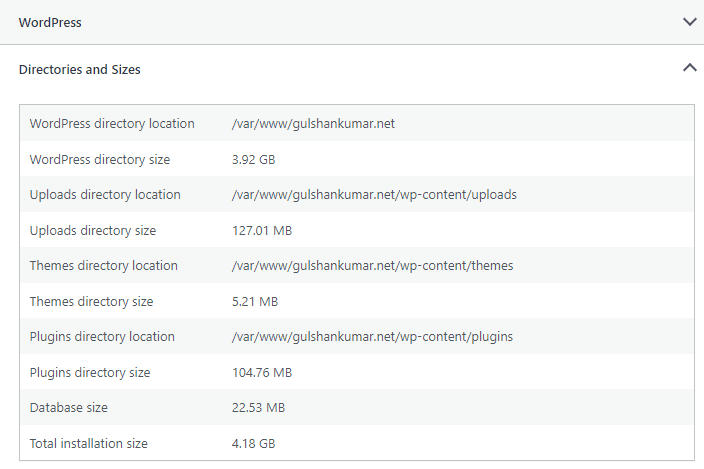
Wskazówka: Jeśli przeprowadzasz migrację, sprawdź Całkowity rozmiar instalacji w informacji o stanie witryny.
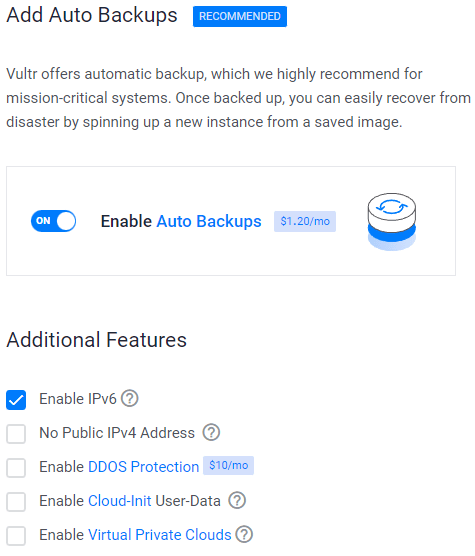
7. Włącz IPV6, Kopia zapasowa
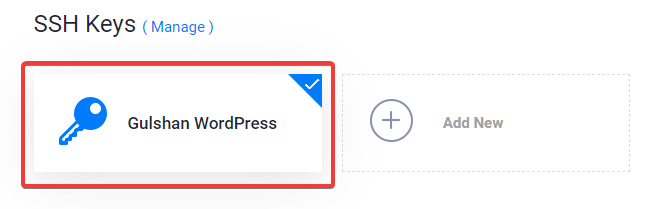
8. Dodaj klucz SSH
Jest to krok zalecany, opcjonalny dla zwiększonego bezpieczeństwa.
- Kliknij na przycisk Add New, aby dodać nowy SSH key, aby przesłać swój 🔒Public key.
- Wygeneruj klucze za pomocą poniższej metody, zgodnie z systemem operacyjnym.

- Pobierz aplikację PuTTy.
- Wyszukaj PuTTygen w menu Start
- Kliknij na przycisk Generuj i przesuń wskaźnik myszy
- Skopiuj klucz publiczny i przekaż do Vultr
- Wprowadź frazę klucza
- Zapisz 🔑Private Key w najbezpieczniejszym miejscu.
- Może być użyty do logowania do SSH lub SFTP.

- Uruchom:
ssh-keygen -t rsa. Aby uzyskać bardziej bezpieczny klucz 4096-bitowy, uruchom:ssh-keygen -t rsa -b 4096 - Naciśnij enter, gdy zostaniesz zapytany, gdzie chcesz zapisać klucz (użyje to domyślnej lokalizacji).
- Wprowadź hasło dla swojego klucza.
- Uruchom
cat ~/.ssh/id_rsa.pub– dzięki temu otrzymasz klucz w odpowiednim formacie do wklejenia do panelu sterowania. - Upewnij się, że wykonałeś kopię zapasową pliku
~/.ssh/id_rsa. Nie można go odzyskać, jeśli zostanie utracony.
Wybierz swój klucz SSH
Wykonanie tych kroków spowoduje dołączenie klucza publicznego do nowej instancji. Następnie będziesz mógł się zalogować do SSH używając hasła Plain Text i klucza SSH.
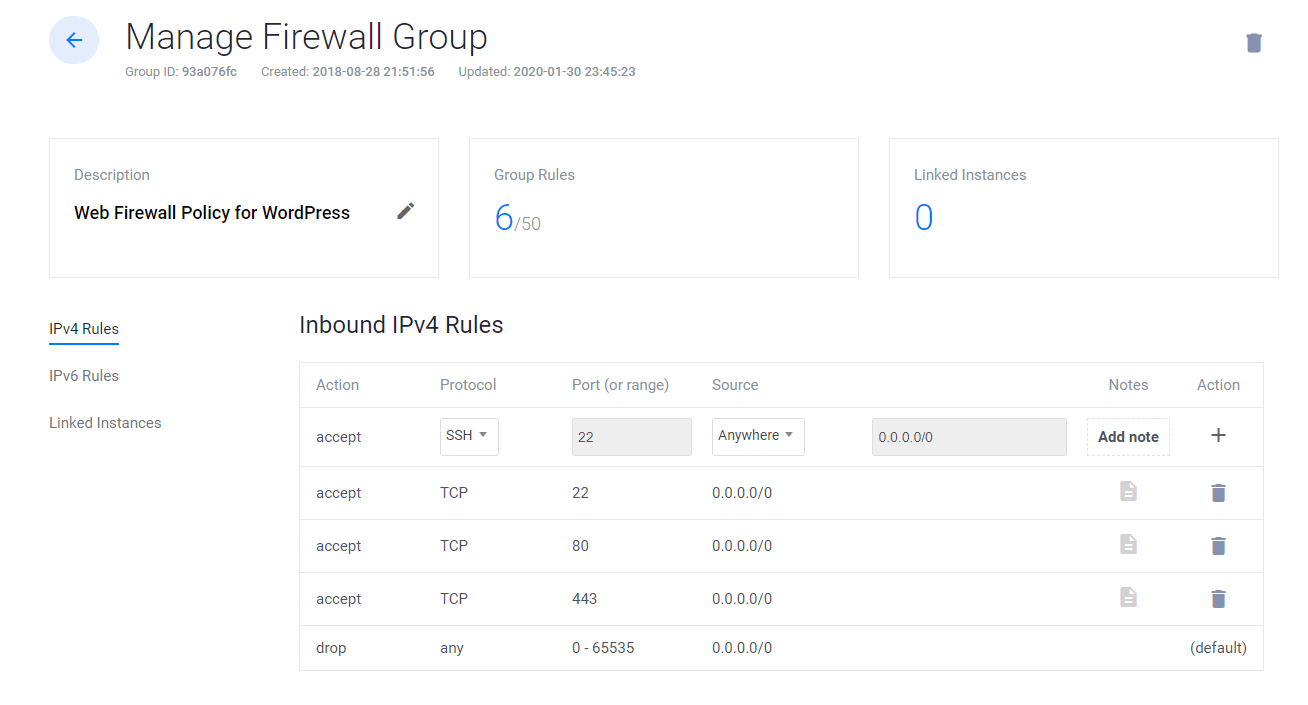
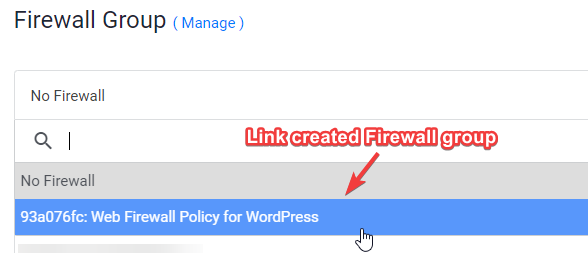
9. Powiązanie reguły Web Firewall z instancją serwera
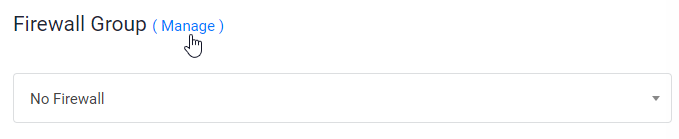
- Kliknij na Manage i utwórz nową Firewall Group.
- Zezwól na port TCP 22 dla SSH. 80 dla HTTP i 443 HTTPS zarówno dla reguł IPV4 jak i IPV6.
- Po wykonaniu tych czynności, połącz grupę Firewall z Twoją instancją.
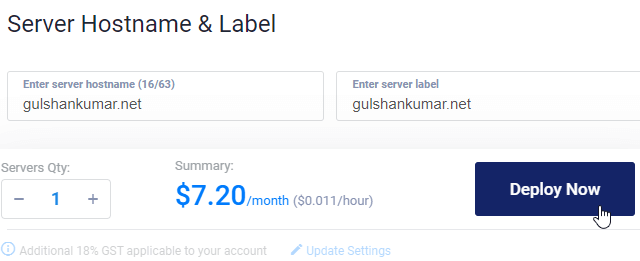
10. Wpisz nazwę hosta i etykietę kliknij Deploy Now
Teraz zobaczysz instalację w postępie
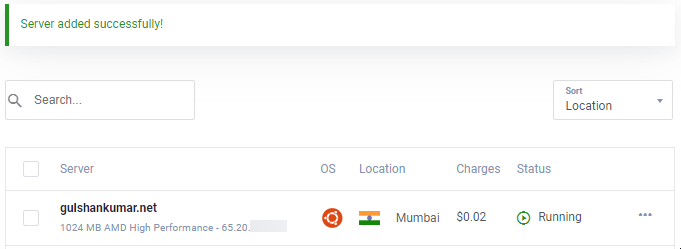
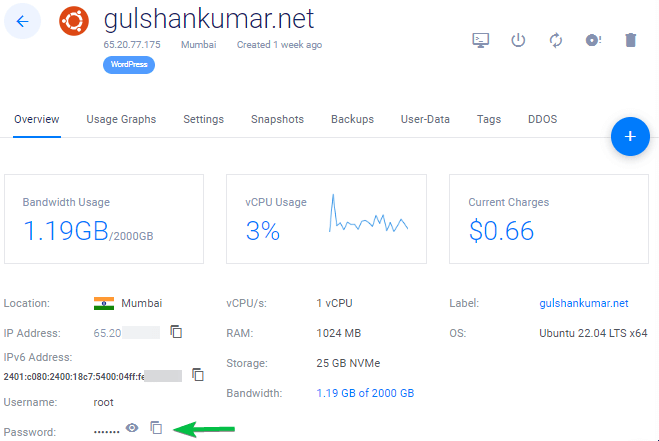
11. Przejdź do strony Nowa instancja
Skopiuj adres IP, nazwę użytkownika i hasło. Twój domyślny port to 22.
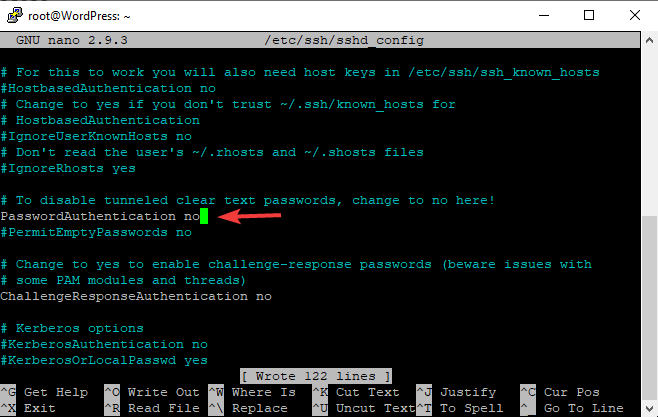
12. Wyłączenie logowania na hasło
Ze względów bezpieczeństwa zaleca się wyłączenie uwierzytelniania za pomocą hasła i zezwolenie na uwierzytelnianie oparte na kluczach.
- Edytuj plik konfiguracyjny
nano /etc/ssh/sshd_config - Znajdź (CTRL + W) i wyszukaj
PasswordAuthentication - Zmiana wartości z tak na nie
- Aby zapisać typ, CTRL + O
- Uruchom ponownie usługę SSH za pomocą polecenia
sudo service ssh restart
Od następnego razu możesz używać SSH tylko przez klucz, jak pokazano na filmie.
Dla Linuxa lub Maca, użyj Terminala z poleceniem jak poniżej
ssh root@192.168.1.1 -p 22 -i id_rsa
Krok 13. Wyłączenie UFW
Kiedy wdrażasz nową instancję w VULTR, jest ona dostarczana z włączonym UFW (Uncomplicated Firewall), który blokuje wszystkie porty oprócz portu SSH 22. To może zwrócić ERR_CONNECTION_REFUSED Error w przeglądarce. Aby to naprawić, sugerowałbym utrzymanie UFW w stanie wyłączonym.
ufw disableWystarczające wyjaśnienie dla podstawowych rzeczy. Teraz przyspieszę oryginalny proces wdrażania WordPress na stosie LEMP.
Część C. Wdrożenie WordPress na stosie LEMP.
1. Aktualizacja repozytoriów
Wpisz poniższe polecenie i naciśnij klawisz Enter
sudo -sapt update && apt upgrade -y && apt dist-upgrade && apt autoclean && apt autoremove -y && rebootlub
wget -qO update https://dl.gulshankumar.net/update && chmod +x updateNastępnym razem zawsze używaj poniższego polecenia skrótu do aktualizacji.
./update2. Zainstaluj MariaDB z zabezpieczeniami
Zaloguj się ponownie i wprowadź następujące polecenie
sudo apt install mariadb-server -y && sudo mysql_secure_installationOdpowiedz na poniższe pytania
- Enter current password for root (enter for none): Naciśnij klawisz Enter
- Switch to unix_socket authentication [Y/n]: Wpisz n i naciśnij klawisz Enter.
- Set root password? [Y/n]: Naciśnij klawisz Enter.
- New password: Skopiuj silne hasło z Generatora haseł Dashlane. Aby wkleić hasło w konsoli SSH, kliknij prawym przyciskiem myszy i naciśnij klawisz Enter. Hasło nie będzie widoczne na ekranie.
- Re-enter new password: Kliknij prawym przyciskiem myszy i ponownie naciśnij klawisz Enter.
Po pomyślnym ustawieniu hasła, zobaczysz
Password updated successfully!
Reloading privilege tables..
... Success!
Należy również odpowiedzieć na następujące pytania.
- Remove anonymous users? [Y/n]: Naciśnij klawisz Enter
- Disallow root login remotely? [Y/n]: Naciśnij klawisz Enter
- Remove test database and access to it? [Y/n]: Naciśnij klawisz Enter
- Reload privilege tables now? [Y/n]: Naciśnij klawisz Enter
3. Utwórz nową bazę danych dla WordPress
Zaloguj się do MySQL, naciśnij klawisz enter, gdy zapyta o hasło.
mysql -u root -pUtwórz nową bazę danych i przyznaj uprawnienia do korzystania z jej użytkownika z hasłem. To tutaj WordPress przechowuje wszystkie posty, strony, motywy, wtyczki itp. informacje.
create database wordpress;
grant all on wordpress.* to gulshan@localhost identified by '5pY8CKJxDRJEGQNkX7';
flush privileges;
exit;
Gdzie twój…
baza danych to wordpress
nazwa użytkownika to gulshan
hasło to 5pY8CKJxDRJEGQNkX7
Wskazówka: Rozważ użycie unikalnego poświadczenia logowania
4. Zainstaluj PHP 8.2, NGINX i ustaw uprawnienia
sudo add-apt-repository ppa:ondrej/php -y && apt update && apt install php8.2-fpm php8.2-common php8.2-mysql php8.2-xml php8.2-xmlrpc php8.2-curl php8.2-gd php8.2-imagick php8.2-cli php8.2-dev php8.2-imap php8.2-mbstring php8.2-soap php8.2-zip php8.2-bcmath -y && sed -i 's/;cgi.fix_pathinfo=1/cgi.fix_pathinfo=0/g' /etc/php/8.2/fpm/php.ini && service php8.2-fpm restart && apt install nginx -y && chown -R www-data:www-data /var/www/ && chmod -R 755 /var/wwwPoprawić konfigurację PHP
Większość wymyślnych motywów i pluginów wymaga wysokiej klasy konfiguracji PHP do uruchomienia. Dlatego powinniśmy wprowadzić te zmiany.
sed -i 's/memory_limit = 128M/memory_limit = 512M/g' /etc/php/8.2/fpm/php.ini
sed -i 's/post_max_size = 8M/post_max_size = 128M/g' /etc/php/8.2/fpm/php.ini
sed -i 's/max_file_uploads = 20/max_file_uploads = 30/g' /etc/php/8.2/fpm/php.ini
sed -i 's/max_execution_time = 30/max_execution_time = 900/g' /etc/php/8.2/fpm/php.ini
sed -i 's/max_input_time = 60/max_input_time = 3000/g' /etc/php/8.2/fpm/php.ini
sed -i 's/upload_max_filesize = 2M/upload_max_filesize = 128M/g' /etc/php/8.2/fpm/php.ini
service php8.2-fpm restart
5. Zainstaluj certyfikat Wildcard Let’s Encrypt SSL
Utwórz plik cloudflare.ini wewnątrz katalogu /root/.secrets/
mkdir -p /root/.secrets/ && cd /root/.secrets/ && nano cloudflare.iniDodaj poniższy kod i zapisz go używając CTRL+O i wyjdź używając CTRL+X
dns_cloudflare_email = "your-cloudflare-email@example.com"
dns_cloudflare_api_key = "XXXXXXXXXXXXXXXXX"
Znajdź swój e-mail Cloudflare i globalny klucz API w „Mój profil” > Tokeny API > Globalny klucz API
chmod 0400 /root/.secrets/cloudflare.iniZainstaluj Certbot i DNS Authenticator zgodnie z systemem operacyjnym i serwerem internetowym HTTP
snap install --beta --classic certbot
snap set certbot trust-plugin-with-root=ok
snap install --beta certbot-dns-cloudflare
snap connect certbot:plugin certbot-dns-cloudflare
Uzyskaj certyfikat Wildcard SSL
certbot certonly --dns-cloudflare --dns-cloudflare-credentials /root/.secrets/cloudflare.ini -d example.com,*.example.com --preferred-challenges dns-01Ustaw automatyczne odnawianie przy użyciu zadania Cron
- Typ
crontab -e - Typ 1 dla edytora nano
- Wpisz poniższe polecenie i zapisz
0 0 * * * /etc/init.d/nginx reload >/dev/null 2>&1Odnowienie badania
certbot renew --dry-run6. Konfiguracja bloku serwera Nginx
Jest to ważne, gdzie musisz skonfigurować swoją domenę, jak NGINX powinien obsługiwać żądania HTTP.
Usuń domyślne bloki serwera.
rm /etc/nginx/sites-available/default && rm /etc/nginx/sites-enabled/defaultUtwórz nowy blok serwera
cd /etc/nginx/sites-available/
nano example.com- Zastąpić
example.comwłasną domeną - Wprowadź poniższy kod i Naciśnij ctrl+o aby zapisać i ctrl+x aby wyjść.
Ogólne
server {
    listen         80;
    return 301 https://$host$request_uri;
}
server {
# Document Root
root /var/www/html;
index index.php index.html index.htm;
server_name .example.com;
client_max_body_size 0;

    listen [::]:443 ssl http2 ipv6only=on;
    listen 443 ssl http2;
        ssl_protocols TLSv1.1 TLSv1.2 TLSv1.3;
        ssl_certificate /etc/letsencrypt/live/example.com/fullchain.pem;
        ssl_certificate_key /etc/letsencrypt/live/example.com/privkey.pem;
        ssl_prefer_server_ciphers on;
        ssl_session_cache   shared:SSL:20m;
        ssl_session_timeout 20m;
        ssl_ciphers 'TLS13+AESGCM+AES128:EECDH+AES128';


error_page 404 /404.html;
error_page 500 502 503 504 /50x.html;

# Block XMLRPC
location = /xmlrpc.php {
    deny all;
}

location / {
    try_files $uri $uri/ /index.php$is_args$args;
}

location ~* \.php$ {
if ($uri !~ "^/uploads/") {
fastcgi_pass unix:/run/php/php8.2-fpm.sock;
}
include fastcgi_params;
fastcgi_param SCRIPT_FILENAME $document_root$fastcgi_script_name;
fastcgi_param SCRIPT_NAME $fastcgi_script_name;
}
location = /favicon.ico {
log_not_found off;
access_log off;
}

location = /robots.txt {
log_not_found off;
access_log off;
allow all;
}

location ~* .(css|gif|svg|ico|woff2|eot|jpeg|webp|jpg|js|png)$ {
expires 1y;
log_not_found off;
}

# Enable Gzip compression.
gzip on;

# Disable Gzip on IE6.
gzip_disable "msie6";

# Allow proxies to cache both compressed and regular version of file.
# Avoids clients that don't support Gzip outputting gibberish.
gzip_vary on;

# Compress data, even when the client connects through a proxy.
gzip_proxied any;

# The level of compression to apply to files. A higher compression level increases
# CPU usage. Level 5 is a happy medium resulting in roughly 75% compression.
gzip_comp_level 5;

# Compress the following MIME types.
gzip_types
 application/atom+xml
 application/javascript
 application/json
 application/ld+json
 application/manifest+json
 application/rss+xml
 application/vnd.geo+json
 application/vnd.ms-fontobject
 application/x-font-ttf
 application/x-web-app-manifest+json
 application/xhtml+xml
 application/xml
 font/opentype
 image/bmp
 image/svg+xml
 image/x-icon
 text/cache-manifest
 text/css
 text/plain
 text/vcard
 text/vnd.rim.location.xloc
 text/vtt
 text/x-component
 text/x-cross-domain-policy;
}
W przypadku pamięci podręcznej Enabler
server {
    listen         80;
    return 301 https://$host$request_uri;
}
server {
# Document Root
root /var/www/html;
index index.php index.html index.htm;
server_name .example.com;
client_max_body_size 0;

    listen [::]:443 ssl http2 ipv6only=on;
    listen 443 ssl http2;
        ssl_protocols TLSv1.1 TLSv1.2 TLSv1.3;
        ssl_certificate /etc/letsencrypt/live/example.com/fullchain.pem;
        ssl_certificate_key /etc/letsencrypt/live/example.com/privkey.pem;
        ssl_prefer_server_ciphers on;
        ssl_session_cache   shared:SSL:20m;
        ssl_session_timeout 20m;
        ssl_ciphers 'TLS13+AESGCM+AES128:EECDH+AES128';


error_page 404 /404.html;
error_page 500 502 503 504 /50x.html;


# Block XMLRPC
location = /xmlrpc.php {
    deny all;
}


# Rules for Cache Enabler Plugin - Static File Serving

    set $cache_uri $request_uri;

    # bypass cache if POST requests or URLs with a query string
    if ($request_method = POST) {
    set $cache_uri 'nullcache';
    }

    if ($query_string != '') {
    set $cache_uri 'nullcache';
    }

    # bypass cache if URLs containing the following strings
    if ($request_uri ~* '(/wp-admin/|/xmlrpc.php|/wp-(app|cron|login|register|mail).php|wp-.*.php|/feed/|index.php|wp-comments-popup.php|wp-links-opml.php|wp-locations.php|sitemap(index)?.xml|[a-z0-9-]+-sitemap([0-9]+)?.xml)') {
    set $cache_uri 'nullcache';
    }

    # bypass cache if cookies contain the following strings
    if ($http_cookie ~* '(wp-postpass|wordpress_logged_in|comment_author)_') {
    set $cache_uri 'nullcache';
    }

    # custom installation subdirectory
    set $custom_subdir '';

    # default HTML file
    set $cache_enabler_uri '${custom_subdir}/wp-content/cache/cache-enabler/${http_host}${cache_uri}${scheme}-index.html';

    # WebP HTML file
    if ($http_accept ~* 'image/webp') {
    set $cache_enabler_uri '${custom_subdir}/wp-content/cache/cache-enabler/${http_host}${cache_uri}${scheme}-index-webp.html';
    }

    location / {
    gzip_static on; # this directive is not required but recommended
    try_files $cache_enabler_uri $uri $uri/ $custom_subdir/index.php?$args;
    }

location ~* \.php$ {
if ($uri !~ "^/uploads/") {
fastcgi_pass unix:/run/php/php8.2-fpm.sock;
}
include fastcgi_params;
fastcgi_param SCRIPT_FILENAME $document_root$fastcgi_script_name;
fastcgi_param SCRIPT_NAME $fastcgi_script_name;
}
location = /favicon.ico {
log_not_found off;
access_log off;
}

location = /robots.txt {
log_not_found off;
access_log off;
allow all;
}

location ~* .(css|gif|svg|ico|jpeg|webp|woff2|eot|jpg|js|png)$ {
expires 1y;
log_not_found off;
}

# Enable Gzip compression.
gzip on;

# Disable Gzip on IE6.
gzip_disable "msie6";

# Allow proxies to cache both compressed and regular version of file.
# Avoids clients that don't support Gzip outputting gibberish.
gzip_vary on;

# Compress data, even when the client connects through a proxy.
gzip_proxied any;

# The level of compression to apply to files. A higher compression level increases
# CPU usage. Level 5 is a happy medium resulting in roughly 75% compression.
gzip_comp_level 5;

# Compress the following MIME types.
gzip_types
 application/atom+xml
 application/javascript
 application/json
 application/ld+json
 application/manifest+json
 application/rss+xml
 application/vnd.geo+json
 application/vnd.ms-fontobject
 application/x-font-ttf
 application/x-web-app-manifest+json
 application/xhtml+xml
 application/xml
 font/opentype
 image/bmp
 image/svg+xml
 image/x-icon
 text/cache-manifest
 text/css
 text/plain
 text/vcard
 text/vnd.rim.location.xloc
 text/vtt
 text/x-component
 text/x-cross-domain-policy;
}- Musisz zainstalować wtyczkę Cache Enabler, aby cieszyć się korzyściami z pamięci podręcznej.
FastCGI
Jeśli chcesz używać FastCGI Cache, to zaimplementuj poniższy blok serwera.
# NGINX Cache path
fastcgi_cache_path /var/run/nginx-cache levels=1:2 keys_zone=WORDPRESS:100m inactive=6h;
fastcgi_cache_key "$scheme$request_method$host$request_uri";
fastcgi_cache_use_stale error timeout invalid_header http_500;
fastcgi_ignore_headers Cache-Control Expires Set-Cookie;

server {
    listen         80;
    return 301 https://$host$request_uri;
}
server {
root /var/www/html;
index index.php index.html index.htm;
server_name .example.com;
client_max_body_size 0;

    listen [::]:443 ssl http2 ipv6only=on;
    listen 443 ssl http2;
        ssl_protocols TLSv1.1 TLSv1.2 TLSv1.3;
        ssl_certificate /etc/letsencrypt/live/example.com/fullchain.pem;
        ssl_certificate_key /etc/letsencrypt/live/example.com/privkey.pem;
        ssl_prefer_server_ciphers on;
        ssl_session_cache   shared:SSL:20m;
        ssl_session_timeout 20m;
        ssl_ciphers 'TLS13+AESGCM+AES128:EECDH+AES128';

error_page 404 /404.html;
error_page 500 502 503 504 /50x.html;


set $skip_cache 0;
    if ($request_method = POST) {set $skip_cache 1;}
    if ($request_uri ~* "/wp-admin/|/xmlrpc.php|/wp-.*.php|index.php|sitemap") {set $skip_cache 1;}
    if ($http_cookie ~* "comment_author|wordpress_[a-f0-9]+|wp-postpass|wordpress_no_cache|wordpress_logged_in") {set $skip_cache 1;}
    if ($query_string = "unapproved*") {set $skip_cache 1;}
    if ($cookie_woocommerce_items_in_cart = "1" ){ set $skip_cache 1;}
    if ($request_uri ~* "/(cart|checkout|my-account)/*$") {set $skip_cache 1;}

# Block XMLRPC
location = /xmlrpc.php {
    deny all;
}

location / {
try_files $uri $uri/ /index.php$is_args$args;
}

location ~* \.php$ {

 if ($uri !~ "^/uploads/") {
        fastcgi_pass unix:/run/php/php8.2-fpm.sock;
        }

        try_files                       $uri =404;
        include                         /etc/nginx/fastcgi_params;
        fastcgi_param                   SCRIPT_FILENAME $document_root$fastcgi_script_name;
        fastcgi_pass                    unix:/run/php/php8.2-fpm.sock;
        fastcgi_index                   index.php;
                fastcgi_cache_bypass $skip_cache;
                fastcgi_no_cache $skip_cache;
                fastcgi_cache WORDPRESS;
                fastcgi_cache_valid 200 30d;
                fastcgi_cache_valid 301 302 303 307 308 404 410 451 1m;
                add_header X-Cache $upstream_cache_status;

}

location = /favicon.ico {
log_not_found off;
access_log off;
}

location = /robots.txt {
log_not_found off;
access_log off;
allow all;
}

location ~* .(css|gif|ico|svg|webp|woff2|eot|jpeg|jpg|js|png)$ {
expires 1y;
log_not_found off;
}

# Enable Gzip compression.
gzip on;

# Disable Gzip on IE6.
gzip_disable "msie6";

# Allow proxies to cache both compressed and regular version of file.
# Avoids clients that don't support Gzip outputting gibberish.
gzip_vary on;

# Compress data, even when the client connects through a proxy.
gzip_proxied any;

# The level of compression to apply to files. A higher compression level increases
# CPU usage. Level 5 is a happy medium resulting in roughly 75% compression.
gzip_comp_level 5;

# Compress the following MIME types.
gzip_types
 application/atom+xml
 application/javascript
 application/json
 application/ld+json
 application/manifest+json
 application/rss+xml
 application/vnd.geo+json
 application/vnd.ms-fontobject
 application/x-font-ttf
 application/x-web-app-manifest+json
 application/xhtml+xml
 application/xml
 font/opentype
 image/bmp
 image/svg+xml
 image/x-icon
 text/cache-manifest
 text/css
 text/plain
 text/vcard
 text/vnd.rim.location.xloc
 text/vtt
 text/x-component
 text/x-cross-domain-policy;
}
To save, press CTRL+O and Enter key. Then, exit nano editor using command CTRL+X.
W przypadku FastCGI musisz użyć wtyczki NGINX Helper. Działa również z adresem URL zakodowanym w języku hindi. Należy pamiętać, że nie będzie obsługiwał AMP. Ja osobiście nie używam AMP. (Zalecane)
Alternatywnie, cache NGINX działa dla oczyszczania AMP URL, ale nie obsługuje URL kodowanego w Hindi. W ustawieniach powinieneś zachować ścieżkę cache /var/run/nginx-cache/
Uwaga!
- Na przykład, jeśli używasz motywu gazety i obsługujesz oddzielny motyw mobilny, trzymaj się bez metody FastCGI i użyj wtyczki WP Rocket, ponieważ może ona obsługiwać oddzielny cache mobilny po wyjęciu z pudełka.
7. Tworzenie symbolicznych linków pomiędzy dwoma katalogami
Jeśli pominiesz ten krok, możesz otrzymać ERR_CONNECTION_REFUSED
Aby aktywować blok serwera, utwórz symboliczny link do pliku NGINX Server Block z katalogu /etc/nginx/sites-available/ do /etc/nginx/sites-enabled
Przed uruchomieniem poniższej komendy, proszę zamienić example.com na własną domenę.
ln -s /etc/nginx/sites-available/example.com /etc/nginx/sites-enabled/Konfiguracja badania
nginx -tPonowne uruchomienie i aktualizacja
service nginx restart && service php8.2-fpm restart && service mysql restart && apt-get update && apt upgrade -y8. Zainstaluj WordPress
Pobierz pliki WordPress w katalogu /var/www/html i ustaw uprawnienia.
cd /var/www/html && wget https://pl.wordpress.org/latest-pl_PL.tar.gz && tar -xvzf latest-pl_PL.tar.gz && mv -v wordpress/* /var/www/html && rm -rf index.nginx-debian.html latest-pl_PL.tar.gz wordpress && chown -R www-data:www-data /var/www/ && sudo chmod -R 755 /var/wwwAby zaktualizować uprawnienia w przyszłości, użyj poniższej komendy
chown -R www-data:www-data /var/www/ && sudo chmod -R 755 /var/www9. Aktualizacja DNS
Jeśli hostujesz WordPress lokalnie, chcesz ominąć proxy lub chcesz wykonać migrację z zerowym przestojem, ten krok jest przydatny. Generalnie preferuję w przypadku Static WordPress Dev area. 😉
- Istnieją dwa sposoby na wskazanie DNS. Jeśli migrujesz stronę do Vultr i chcesz najpierw przetestować ją lokalnie, wtedy edytuj swój plik hosts i wskaż go tam.
Dla Windows
- Przejdź do właściwości C:\Windows\System32\drivers\etc\hosts
- Zmień uprawnienia „Security” na pełną kontrolę dla obecnej nazwy użytkownika
- Teraz możesz swobodnie edytować plik hosts pod swoim użytkownikiem System i zapisać go.
# For same machine you can have localhost address else public IP
127.0.0.1 example.com
127.0.0.1 www.example.com
Tak to powinno wyglądać.
Dla komputerów Mac lub Linux
Możesz edytować plik hosts używając poniższej komendy
sudo nano /etc/hostsAktualizacja DNS za pomocą Cloudflare
- Jeśli wszystko jest idealne i chcesz, aby Twoja witryna żyła, Zaloguj się do Cloudflare DNS i zaktualizuj nowe IP
| A | @ | IPV4 address |
| AAAA | @ | IPV6 address |
| CNAME | www | example.com |
gdzie @ oznacza nagą domenę example.com
9. Odwiedź swoją nazwę domeny, aby skonfigurować WordPress
Jeśli chcesz zachować domenę wersji non-www dla swojego WordPress to odwiedź wersję non-www inaczej www.
https://example.com- Podaj poświadczenie logowania do bazy danych, aby rozpocząć konfigurację WordPress
- Uruchomić instalację
- Wypełnij Podstawowe dane swojej nowej Witryny i Zainstaluj WordPress.
- Zaloguj się do WordPress
- Jeśli użyłeś bloku serwera FastCGI to pierwszą rzeczą jaką powinieneś zrobić jest instalacja pluginu NGINX Cache i skonfigurowanie
/var/www/cachejako ścieżki cache.
Inne niezbędne rzeczy
Użyj wtyczki SMTP Usługi do wysyłania wychodzących wiadomości e-mail WordPress w przeciwnym razie nie będziesz w stanie odbierać linku resetowania hasła, formularza kontaktowego 7 wiadomości.
Wreszcie instalacja WordPress została zakończona. Zawsze zachowaj kopię zapasową.
Bardzo doceniam Twój cenny czas poświęcony na przeczytanie tego artykułu. Do zobaczenia w kolejnym tutorialu!
Successfully install wordpres for a single site and do the same i mean for another domain on the same instance but after creating server blocks get „nginx: (emerg) duplicate listen options for (::):443 in /etc/nginx/sites-enabled” on nginx -t
How Can i solve this?
Exactly followed the same steps, but at the end i am getting 502 bad gateway. I built some sites with the same steps before, however i don’t know what changed now.
Consider checking the error log using command
tail -f /var/log/nginx/error.logto get a hint about exact issue.getting this
tail: cannot open '/var/log/error.log’ for reading: No such file or directory
tail: no files remaining
Sorry, there was a typo in my previous comment. Try below command
tail -f /var/log/nginx/error.logCan you explain me what is the difference between inactive and fastcgi_cache_valid values? Can you explain them please? Thanks
location ~* .(css|gif|ico|svg|jpeg|jpg|js|png)$ {
expires 1y;
log_not_found off;
}
is this code for page caching?
I use cloudflare so it has page cache too.
If i use that can i remove it from codes?
Can you please explain what is this code for?
Thanks
That code is for setting up 1 year browser caching for static files. You may use Cloudflare Page caching as normally you do. There shouldn’t be any problem.
For Nginx cache helper (I take this info from offical site
There’s a ‘purge all’ button? Does it purge the whole site?
Yes, it does. It physically empties the cache directory. It is set by default to /var/run/nginx-cache/.
So the default is /var/run/nginx-cache/
can we change fastcgi_cache_path /var/www/cache to /var/run/nginx-cache/ ?
Thanks
Jeśli twój katalog pamięci podręcznej jest inny, możesz nadpisać to w swoim
wp-config.php, dodając.define('RT_WP_NGINX_HELPER_CACHE_PATH','/var/www/nginx-cache/')I finally installed wordpress with this guide. But I see only www version but not the non-www version. Is there any changes that I need to do.
Redirects to www version even If I enter non-www version.
You need to point DNS records for both hostnames. Second, make sure dot is not missing from the beginning of example.com in this code –
server_name .example.com;in the NGINX connfig at step 6. Another thing, Redirect from www to non-www or vice-versa (as neccessary) is taken care automatically from WordPress. You do not need to put any extra code for it.which is the best & compatible server side cache plugin If I use FastCGI server block code along with Nginx Cache plugin..
W3 Total Cache or WP Rocket
I have 2 questions
1) What if i have 2 domains on different cloudflare accounts?
Create a cloudflare.ini file inside /root/.secrets/ directory.
mkdir -p /root/.secrets/ && cd /root/.secrets/ && nano cloudflare.ini
Add below code and save using CTRL+O and exit using CTRL+X
dns_cloudflare_email = „your-cloudflare-email@example.com”
dns_cloudflare_api_key = „XXXXXXXXXXXXXXXXX”
/root/.secrets/1domaincloudfare.ini
/root/.secrets/2domaincloudfare.ini
certbot certonly –dns-cloudflare –dns-cloudflare-credentials 1domaincloudfare.ini -d example.com,*.1domain.com –preferred-challenges dns-01
certbot certonly –dns-cloudflare –dns-cloudflare-credentials 2domaincloudfare.ini -d example.com,*.2domain.com –preferred-challenges dns-01
Do this work?
2) If we have 2 domains in the same account on cloudflare can we use 1 cloudflare.ini
certbot certonly –dns-cloudflare –dns-cloudflare-credentials /root/.secrets/cloudflare.ini -d 1domain.com,*.example.com –preferred-challenges dns-01
certbot certonly –dns-cloudflare –dns-cloudflare-credentials /root/.secrets/cloudflare.ini -d 2domain.com,*.example.com –preferred-challenges
dns-01
3) If we dont use cloudflare what will our ns for domain?
CLoud VPNs IP?
ns1= 68.28.65.84
ns2= 68.28.65.84
Is this right?
thanks for your replies
1. True
2. True
3. I have no idea about it. I prefer using CF DNS.
Can we create multi wordpress sites on different domain in the same machine with this
method?
I think only changement is in the FastCGI?
server {
root /var/www/aaa.com/wordpress;
index index.php index.html index.htm;
server_name .aaa.com;
client_max_body_size 0;
server {
root /var/www/bbb.com/wordpress;
index index.php index.html index.htm;
server_name .bbb.com;
client_max_body_size 0;
server {
root /var/www/ccc.com/wordpress;
index index.php index.html index.htm;
server_name .ccc.com;
client_max_body_size 0;
is this make a problem cache path is the same path for 3 web site? /var/www/cache
Is this method works?
1 machine 3 different domain and wordpress?
Thanks
Not for multiple sites.
What do you think about Plesk Panel?
It is easy to install plesk and create a wordpress site.
Easy to find trial keys and we can use it unlimited.
If it expires sites goes on ftp works and only plesk panel does not work but there are too much trial keys
It has nginx cache.
Do you recommend why and why not?
Thanks
I do not trust 3rd-parties installers.
Do all commands work for Centos 8?
Sorry, this is for Ubuntu OS only not for Centos 8.
hello gulshanji i wanted to use cloudflare ssl direct from thier website and not thru api with fast cgi then what would the config
Hey bro what is your thoughts on EasyEngine and SlickStack etc or one click app instead to automate? what is your favorite and will you make any tut bro
Sure, there is one. I will post about it. Thanks for your feedback.
The FastCGI server block config throws 404 Errors.
fastcgi_pass unix:/run/php/php7.4-fpm-example.sock;
should be:
fastcgi_pass unix:/run/php/php7.4-fpm.sock;
And it is missing config for location /
This config must be defined:
location / {
try_files $uri $uri/ /index.php$is_args$args;
}
I see, it was intended for seperate user. But, to keep generic I have corrected. Thanks for pointing out.
Without the location / block only the home page was accessible.
When I added the below block i was able to access the post and pages.
location / {
try_files $uri $uri/ /index.php$is_args$args;
}
Hello Alpesh, Corrected. Thanks again for your tip.
It was a good article
Thanks for your comment.
Nice tutorial. Does it come with email hosting? Looking to make a small site in Singapore using VultrHF
E-mail is a different thing. G Suite by Google services is specialized in this segment.
What are the differences if any between doing this method and using the vultr 1 click install? I have also read about centminmod. Is that somrthing u will recommend for having a fast LEMP stack? Tnx
I alwyas keep this guide bookmarket to my web browser! You never know when I would need to setup a new LEMP server ! Thanks Gulshan
Thanks for your comment.
hi, Gulshan thanks for sharing.
can u please share how to install wp on subfoler?
This article is like Life-Saver for one of my website. I was about to move from Google Cloud to Digital Ocean because the trial was expired and I also wanted to use DigitaOcean because it is in-expensive yet powerful and gives great experience.
Previously, I used webinoly stack which was straightforward for installing WordPress but later on I got to know from Gulshan that there are so many issues with that stack so, this time I was going to do it manually. I checked the official guide by Digital ocean but end up with many confusion and issues. Then, I fortunately asked Gulshan for help and he recommended this article for me.
I installed WordPress easily and very fast even fast that Webinoly stack. Thanks a lot Gulshan for writing this amazing article. Hats off to you bro!!🎩
Hi Gulshan, I am also receiving the test failed error on step 7. I have tried several times now on different setup and still stuck here. Please could you help?
Please carefully read the post and then copy-paste code in Terminal. Sometime you need to replace with your own domain. Doing mistake can return error. Else, no wise. I use this guide everyday for myself. I am not aware about any problem.
In case of trouble
1. Run test using
nginx -t2. Check logs to get proper hint
tail -f /var/log/nginx/error.log3. Delete existing or earlier created virtualhost
rm /etc/nginx/sites-available/default && rm /etc/nginx/sites-enabled/default4. Make sure to replace example.com at all places, a) when you create conf file, its naming. b) when you add conf file and c) when you create symlink, check your command its conf file name must match with first process.
I feel in most cases, chances are you did not replaced
server_name .example.com;to own domain, or you did not obtained SSL. All steps are written in serial order as it should be.I am facing problem of infinite loop redirects. I had use fastcache code. how to fix it
Please try Full SSL mode of Cloudflare. Then check again!
How to check if fastcgi cache is working or not? while running sudo
curl -I https://example.comit is not showing x-cache parameterHey Gulshan,
In the 7th step while texting ngnix I got
nginx: [emerg] open() „/etc/nginx/sites-enabled/example.com” failed (2: No such file or directory) in /etc/nginx/nginx.conf:62
nginx: configuration file /etc/nginx/nginx.conf test failed
This error. How I can solve it? also what the error.
Please delete your existing server block and create again at sites-available and symlink at sites-enabled directory. The step 6 and 7 cover that clearly. Consider following patiently without any error. If you still face any problem, do let me know. Thanks for taking to leave your valuable comment.
Hi would like to know after configuring Fastcgi do we still need other caching plugin to speed up WordPress site?
Wonderful tutorial just complete solution for Nginx Fast CGI
Thanks Wasim for your kind feedback.
How Can I setup FastCGI on my ngnix server guided by you….
I have updated my article.
i want redirect too www plz help me urgent
If your WordPress General Settings has www version, server will do automatically. No additional action is required. In case you started WordPress installation at non-www version, then you need to migrate by changing at Database level.
You may use Better Search Replce plugin to perform this changes.
It Really Works Gulshan Bro. Thanks Really dear You are awesome…
Hello Gulshan Bro, First i want to say you that this is very beautiful and required post. I am really appreciating your work. but i have a problem can you please tell me
i have a droplet with digitalocean ($5/month plan) and i want to host multiple wordpress sites only with nginx(lemp ubuntu 18.04).
In simple i mean that this tutorial is complete to install a single wordpress and i did it but tell host it in some other sites
Hey Rohit,
Assuming, second site is example2.org
You need to follow steps this way.
1. create a new directory and add WordPress (Ref: steps 31)
cd /var/www/mkdir example2
wget https://wordpress.org/latest.tar.gz
tar -xvzf latest.tar.gz
mv -v wordpress/* /var/www/example2
rm -rf index.nginx-debian.html latest.tar.gz wordpress
chown -R www-data:www-data /var/www/
sudo chmod -R 755 /var/www
2. Create a new Server block with root path located to new directory as created in step 1.
cd /etc/nginx/sites-available/

nano gulshankumar-org
server {listen 80;
root /var/www/example2;
index index.php index.html index.htm;
server_name example2.org www.example2.org;
...
3. Point your example2.org domain to DNS, then install SSL
certbot --nginx -d example2.org -d www.example2.org4. Create new MySQL database
sudo mysql -u root -pcreate database example2;
grant all on example2.* to example2@localhost identified by 'TYPE HERE PASSWORD';
flush privileges;
exit;
5. Proceed to Installation by visiting your site
https://example2.orgLet me know if you have any additional question. You can always visit our forum for quick assistance.
Thanks & Regards,
Gulshan
It Really Works Gulshan Bro. Thanks Really dear You are awesome…
Hello Gulshan you written a comprehensive guide i highly appreciate your work. Can you help me with an error? Actually i have two websites the first website i have already hosted on Vultr following the above guide.
But when try to host a another WordPress website iam getting error. I followed the above steps you mentioned in comments. But still not able to fix it. The error is my website not working after hosting another WordPress website.
If possible please guide me step by step instructions. It will help me alot. Thanks in advance.
Consider checking log available at
/var/log/nginx/directory. Usenginx -tcommand to see what mistake causing issue.Very well. thank you so much
How to auto-renew SSL?
Add below cron job
crontab -eAdd below command and save.
15 3 * * 7 certbot renew --post-hook "service nginx restart"Thanks sos un groso, very well tutorial
Thank you for your tutorial, its the first one that actually showed me the wordpress setup page.
When I went to upload a plugin I received this message. „The uploaded file exceeds the upload_max_filesize directive in php.ini”
How do I increase the max filesize?
Please see the step 33.5
Thanks Gulshan, Finally I moved to NGINX server. You have created a great tutorial for beginners.
You’re welcome bro 🙂
Hi,
Thank you for this awesome guide.
How can I install WordPress multisite on Ubuntu 18.04 with Nginx?
Finally I loved this step by step tutorial with proper images.
Thanks Bhaiya you are awesome
Thanks a lot Gulshan. You save my breath
I search everywhere but not find any good article
You explained very well along with security concern
well done