Что такое WebP?
WebP — это современный формат, позволяющий передавать изображения быстрее, чем когда-либо. Если вы используете WordPress, вы можете легко передавать все изображения в WebP с помощью некоторых основных настроек.
Узнайте о
Большинство браузеров поддерживают WebP
- По данным Caniuse, WebP в настоящее время поддерживается в 94% браузеров, включая Apple Safari, Google Chrome, Opera, Mozilla Firefox, Microsoft Edge и браузеры для Android.
- Вы все еще можете использовать JPEG/PNG в качестве запасного варианта для неподдерживаемых браузеров.
Основные преимущества использования изображений в формате WebP
- По сравнению с размером обычного изображения JPG или PNG, изображение WebP того же размера может храниться в небольших байтах. Следовательно, изображения будут загружаться быстрее. Это будет полезно особенно для мобильных пользователей.
- Передача качественных изображений в нескольких байтах, что значительно экономит полосу пропускания.
- Обновляйте свой сайт в соответствии с последними тенденциями. Не теряйте общение из-за медленной загрузки сайта.
- WebP рекомендован разработчиками Google. Поможет вам пройти рекомендацию Google PageSpeed Insight «обслуживать изображения в формате нового поколения«.
Вот как можно использовать WebP для сайта WordPress.
Использование плагина WebP Express Plugin в NGINX
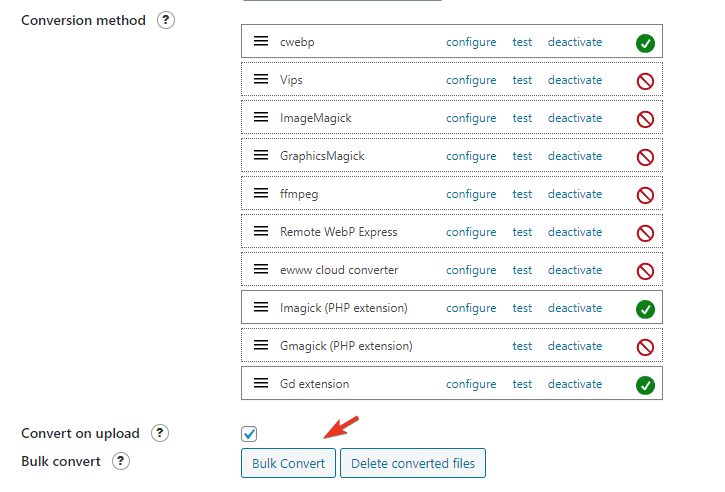
- Установите и активируйте WebP Express, бесплатный плагин. Огромная благодарность Dev.
- Режим работы: Разнообразные реакции на изображение.
- Область применения: Только загрузка.
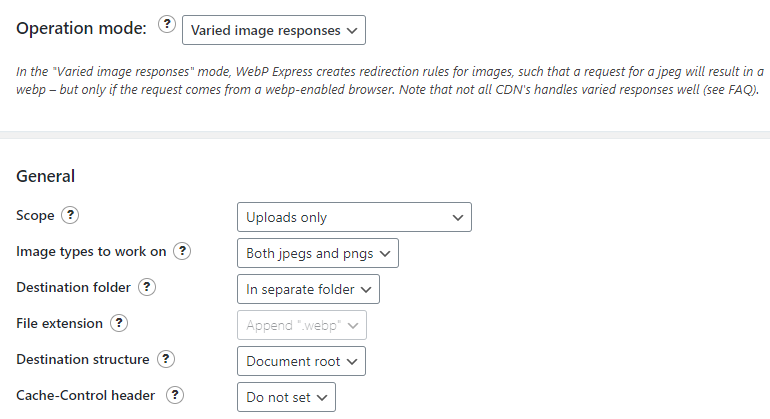
- Выполнить массовое преобразование
- Для пользователей Apache конфигурация не требуется, поскольку .htaccess делает все волшебство.
- Пользователю сервера NGINX необходимо изменить конфигурационный файл с доступом root.
Для лучшей организации кода я бы рекомендовал сначала поместить его в каталог /etc/nginx/ с именем webp.conf, а затем включить в основной блок сервера.
Введите следующую команду
cd /etc/nginx/ && nano webp.conf- Вставьте приведенный ниже код с помощью правой кнопки мыши в редактор nano в терминале SSH.
# WebP Express rules
# --------------------
location ~* ^/?wp-content/.*\.(png|jpe?g)$ {
  add_header Vary Accept;
  expires 365d;
  if ($http_accept !~* "webp"){
    break;
  }
  try_files
    /wp-content/webp-express/webp-images/doc-root/$uri.webp
    $uri.webp
    /wp-content/plugins/webp-express/wod/webp-on-demand.php?xsource=x$request_filename&wp-content=wp-content
    ;
}

# Route requests for non-existing webps to the converter
location ~* ^/?wp-content/.*\.(png|jpe?g)\.webp$ {
    try_files
      $uri
      /wp-content/plugins/webp-express/wod/webp-realizer.php?wp-content=wp-content
      ;
}
# ------------------- (WebP Express rules ends here)
- Нажмите CTRL+O и клавишу Enter для сохранения.
Теперь посетите главный блок сервера.
cd /etc/nginx/sites-available && lsОчень рекомендую: Узнайте, как установить WordPress на NGINX (в три простых шага)
Отредактируйте свой файл конфигурации и поместите include webp.conf; как показано ниже.
# General
server {
    listen         80;
    server_tokens off;
    return 301 https://$host$request_uri;
}
server {
server_tokens off;
root /var/www/html;
index index.php index.html index.htm;
server_name .gulshankumar.net;
client_max_body_size 0;

    listen [::]:443 ssl http2 ipv6only=on;
    listen 443 ssl http2;
        ssl_protocols TLSv1.1 TLSv1.2 TLSv1.3;
        ssl_certificate /etc/comodo/cert.pem;
        ssl_certificate_key /etc/comodo/private.pem;
        ssl_prefer_server_ciphers on;
        ssl_session_cache   shared:SSL:20m;
        ssl_session_timeout 20m;
        ssl_ciphers 'TLS13+AESGCM+AES128:EECDH+AES128';

error_page 404 /404.html;
error_page 500 502 503 504 /50x.html;


# WebP Express rule goes here

include webp.conf;

# WebP Rule end

location / {
    try_files $uri $uri/ /index.php$is_args$args;
}
Перезагрузите или перезапустите NGINX.
service nginx reloadНа что обратить внимание
- Если вы используете BunnyCDN, необходимо включить Vary Cache.
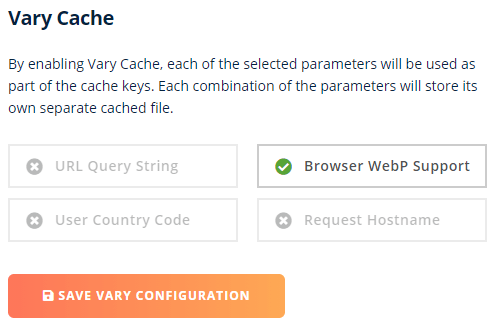
- Cloudflare не поддерживает Vary Cache. Попробуйте использовать альтернативный подход.
Использование WebP с помощью Cloudflare CDN (без плагина)
Если вы являетесь пользователем Cloudflare Pro, вы можете просто включить WebP в один клик на вкладке Speed.
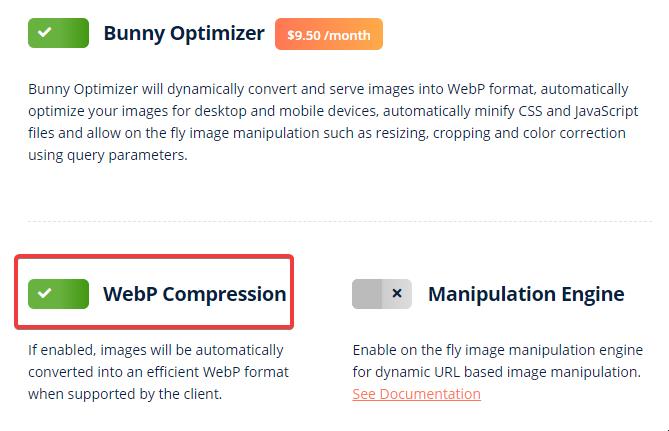
Передача WebP с помощью оптимизатора BunnyCDN (без плагина)
BunnyCDN предлагает услугу Optimizer, которая включает в себя решение для WebP-обслуживания «на лету». Это решение в один клик за $9,5/мес за дополнительную плату.
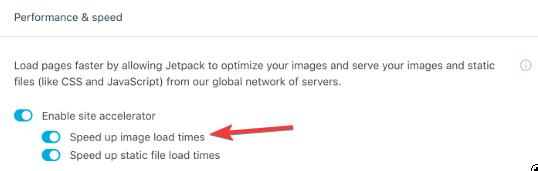
Serve WebP using JetPack Plugin
- Просто установите и активируйте плагин JetPack
- Включите ускоритель сайта.
Вы можете заметить ухудшение качества изображения, которое можно исправить с помощью нижеприведенного фильтра.
add_filter('jetpack_photon_pre_args', 'jetpackme_custom_photon_compression' );
function jetpackme_custom_photon_compression( $args ) {
    $args['quality'] = 100;
    $args['strip'] = 'all';
    return $args;
}
Передача WebP в NGINX с помощью ShortPixel Plugin
Плагин ShortPixel может помочь в массовой оптимизации изображений с преобразованием в WebP и обслуживанием в соответствии с поддержкой браузеров. Самое приятное, что этот плагин выполняет обработку на своем сервере, поэтому он не замедлит работу вашего сайта.
- Если вы являетесь пользователем веб-сервера Apache, вы можете использовать переписывание .htaccess. Это очень просто.
- В случае с NGINX вы можете использовать следующее правило переписывания с помощью службы поддержки хостинга
- Этот плагин также поддерживается плагином кэширования WP Rocket.
Сначала добавьте этот блок перед директивой server:
map $http_accept $webp_suffix {
    default "";
    "~*webp" ".webp";
}
Добавьте этот блок внутрь директивы server:
location ~* ^(/wp-content/.+)\.(png|jpe?g)$ {
    set $base $1;
    set $webp_uri $base$webp_suffix;
    set $webp_old_uri $base.$2$webp_suffix;
    set $root "<<FULL PATH OF wp-content PARENT>>";
    root $root;
    add_header Vary Accept;
    if ( !-f $root$webp_uri ) {
        add_header X_WebP_SP_Miss $root$webp_uri;
    }
    try_files $webp_uri $webp_old_uri $uri =404;
}
Размещение имеет значение. Поэтому добавляйте его тщательно.
Подача WebP с помощью Imagify
Imagify — это плагин для оптимизации изображений, предлагаемый компанией WP Media, которая стоит за WP Rocket.
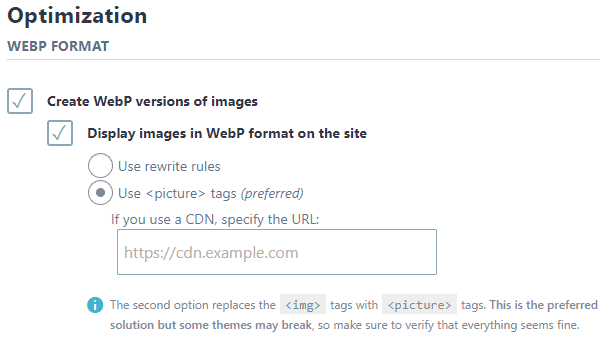
- Установите и активируйте плагин Imagify
- Введите ключ API
- В настройках выберите режим Picture tags для быстрой настройки.
- В качестве альтернативы вы можете использовать правило перезаписи с некоторой конфигурацией сервера, как описано здесь. В Apache процесс добавления кода .htaccess будет автоматическим, а в NGINX вам придется делать это вручную.
WebP в JPG
В некоторых случаях WebP может немного ухудшить качество изображения. Если вы хотите вернуться от WebP к JPG, просто выполните следующие действия.
- Деактивируйте и удалите плагин, связанный с WebP.
- Удалите связанные с ним настройки из файла конфигурации (.htaccess)
- Массовое удаление файлов .webp и экономия дискового пространства.
find . -type f -name "*.webp*" -deleteЕсли вы хотите конвертировать файл WebP в JPG, вы можете воспользоваться инструментом, доступным на CloudConvert.
Ручной метод без плагина
Данный раздел предназначен только для информационных целей.
Шаг 1: Добавление формата WebP в HTML-документ
Во-первых, вам нужно конвертировать все изображения в WebP и вместе с предыдущим форматом изображения в качестве резервного. Есть некоторые плагины, например Optimus, которые могут сделать эту работу автоматически. Но я покажу еще один простой способ сделать это вручную.
- Перейти на этот сайт image.online-convert.com/convert-to-webp
- Вставьте ссылку на изображение и нажмите на кнопку конвертировать. Ваши изображения в формате WebP будут загружены
- Теперь отредактируйте исходный HTML-код, где отображается ваше обычное изображение.
Допустим, в начале HTML-код вашего изображения был таким
<img src="https://www.gulshankumar.net/wp-content/uploads/2016/09/webplogo.png" alt="gulshan kumar" width="186" height="66" />Вам нужно обернуть вышеприведенный код еще небольшим количеством HTML-разметки.
<picture>
	<source srcset="https://www.gulshankumar.net/wp-content/uploads/2016/09/webplogo.webp" type="image/webp" />
	<img src="https://www.gulshankumar.net/wp-content/uploads/2016/09/webplogo.png" alt="gulshan kumar" width="186" height="66" />
</picture>
Теперь ваш HTML-документ готов к работе с изображениями в формате WebP.
Шаг 2 : Настройте параметры сервера
Еще один шаг — необходимо настроить некоторые параметры веб-сервера Apache через .htacccess, чтобы браузер и веб-сервер могли обращаться с ним должным образом, как со всеми остальными изображениями.
Ваш сервер хостинга может не знать, какой тип mime должен обслуживать изображения такого формата. Поэтому необходимо добавить соответствующий тип mime. Также стоит установить заголовок expiry для кэширования.
# Serve Images with correct Mime Type
AddType image/webp .webp

# Setup Cache
ExpiresActive On
ExpiresByType image/webp A2592000
Обратите внимание: Убедитесь, что вы используете WordPress 5.8 или более позднюю версию.
Если вы используете WordPress старше версии 5.8, он не поддерживает загрузку изображений в формате WebP. Вы можете получить ошибку «Этот тип файла, к сожалению, не разрешен по соображениям безопасности» при загрузке изображений .webp.
Итак, необходимо исправить эту проблему, добавив этот код в файл functions.php вашей темы. Это будет полезно в том случае, если вы будете загружать изображения непосредственно из WordPress Dashboard > Media option.
function webp_upload_mimes( $existing_mimes ) {
	// add webp to the list of mime types
	$existing_mimes['webp'] = 'image/webp';

	// return the array back to the function with our added mime type
	return $existing_mimes;
}
add_filter( 'mime_types', 'webp_upload_mimes' );
Выполнено.
Если вам нужна помощь, пожалуйста, загляните в раздел комментариев или присоединяйтесь к моему форуму. Я с удовольствием помогу вам.
Дополнительные примечания
- Если вы являетесь пользователем Cloudways, вы не сможете предоставить WebP с перезаписью .htaccess, потому что они используют NGINX специально для статических файлов. В этом случае у вас есть два варианта. Попросить команду хостинга отредактировать конфигурационный файл для вас или использовать JavaScript или стороннее решение на основе CDN, такое как Bunny или CF.
Дополнительные материалы
Если вам интересно узнать больше о WebP, пожалуйста, обратитесь к этим ссылкам.
Спасибо.
I didn’t try the webp format as of now in WordPress. But now after reading this post I will try to implement it. I will compare the image quality from other formats as well. Thank you for sharing this article.
Have you experienced the WebP format causing problems for seo? is it better to use it as jpg or this way?
Google officially recommends using WebP format images along with JPG as fallback.
How to remove hyperlink for the webp image format?
I guess you want to remove .webp extension from URL. You need to try rewrite approach.
I have a question about ShortPixel method.
I use Plesk panel with NGINX
There is a section called Additional nginx directives
Here you can specify the settings for the nginx reverse proxy server that runs in front of Apache. Your directives will override the server-wide nginx configuration. For example, you may want to change the connection timeout or to pack requests with gzip. Use the same syntax as you use for nginx.conf. For example, if you want to pack all the proxied requests with gzip, add the line: ‘gzip_proxied any;’.
https://i.imgur.com/OLWu9bJ.png
can i add codes there i dont know?
map $http_accept $webp_suffix {
default «»;
«~*webp» «.webp»;
}
location ~* ^(/wp-content/.+).(png|jpe?g)$ {
set $base $1;
set $webp_uri $base$webp_suffix;
set $webp_old_uri $base.$2$webp_suffix;
set $root «<>»;
root $root;
add_header Vary Accept;
if ( !-f $root$webp_uri ) {
add_header X_WebP_SP_Miss $root$webp_uri;
}
try_files $webp_uri $webp_old_uri $uri =404;
You used these sentences!
before the server directive and inside directive.
I read your Installing WordPress at NGINX topic so
If i try to add these from codes is this right?
map $http_accept $webp_suffix {
default «»;
«~*webp» «.webp»;
}
server {
listen 80;
return 301 https://$host$request_uri;
}
server {
location ~* ^(/wp-content/.+).(png|jpe?g)$ {
set $base $1;
set $webp_uri $base$webp_suffix;
set $webp_old_uri $base.$2$webp_suffix;
set $root «<>»;
root $root;
add_header Vary Accept;
if ( !-f $root$webp_uri ) {
add_header X_WebP_SP_Miss $root$webp_uri;
}
try_files $webp_uri $webp_old_uri $uri =404;
}
# Document Root
root /var/www/html;
index index.php index.html index.htm;
server_name .example.com;
client_max_body_size 0;
listen [::]:443 ssl http2 ipv6only=on;
listen 443 ssl http2;
ssl_protocols TLSv1.1 TLSv1.2 TLSv1.3;
ssl_certificate /etc/letsencrypt/live/example.com/fullchain.pem;
ssl_certificate_key /etc/letsencrypt/live/example.com/privkey.pem;
ssl_prefer_server_ciphers on;
ssl_session_cache shared:SSL:20m;
ssl_session_timeout 20m;
ssl_ciphers ‘TLS13+AESGCM+AES128:EECDH+AES128’;
error_page 404 /404.html;
error_page 500 502 503 504 /50x.html;
location / {
try_files $uri $uri/ /index.php$is_args$args;
}
location ~* .php$ {
if ($uri !~ «^/uploads/») {
fastcgi_pass unix:/run/php/php7.4-fpm.sock;
}
include fastcgi_params;
fastcgi_param SCRIPT_FILENAME $document_root$fastcgi_script_name;
fastcgi_param SCRIPT_NAME $fastcgi_script_name;
}
location = /favicon.ico {
log_not_found off;
access_log off;
}
location = /robots.txt {
log_not_found off;
access_log off;
allow all;
}
location ~* .(css|gif|svg|ico|jpeg|jpg|js|png)$ {
expires 1y;
log_not_found off;
}
# Enable Gzip compression.
gzip on;
# Disable Gzip on IE6.
gzip_disable «msie6»;
# Allow proxies to cache both compressed and regular version of file.
# Avoids clients that don’t support Gzip outputting gibberish.
gzip_vary on;
# Compress data, even when the client connects through a proxy.
gzip_proxied any;
# The level of compression to apply to files. A higher compression level increases
# CPU usage. Level 5 is a happy medium resulting in roughly 75% compression.
gzip_comp_level 5;
# Compress the following MIME types.
gzip_types
application/atom+xml
application/javascript
application/json
application/ld+json
application/manifest+json
application/rss+xml
application/vnd.geo+json
application/vnd.ms-fontobject
application/x-font-ttf
application/x-web-app-manifest+json
application/xhtml+xml
application/xml
font/opentype
image/bmp
image/svg+xml
image/x-icon
text/cache-manifest
text/css
text/plain
text/vcard
text/vnd.rim.location.xloc
text/vtt
text/x-component
text/x-cross-domain-policy;
}
Is this right?
And what do you think about plesk how i use webp at plesk?
Thanks
Please consult a freelancer. It is out of scope to guide here.
Hi, this is a good article, but
It is better to install the plugin or put the code directly for webp
This way, each image does not create two urls. Does it cause a problem in the SEO site?
Dynamic rewriting from Server side doesn’t create two URLs instead it servers same just by changing response as per browser support.
A plugin is recommended way.
Hi Gulshan. Any free plugin(totally free) for converting jpg to webp format. God Bless you.
First option which is WebP Express.
Thank You! Gulshan
Hey Gulshan Kumar ,
Awesome post with good information. It is my first time commenting on your blog post and am glad to say that you have done a fabulous work and provided helpful & easy tips to serve webp format images in WordPress. I really like and appreciate the way you have explained the things in such a step-by-step process making the concept very clear and easy to understand. while scrolling through your blog post i have noticed that you have also discussed about the major benefits of using webp format image that are also providing good understanding. You have explained all the vital things in an easy language that are true enough to understand and educate the readers.
After going through this complete guide i really gain ideas and am sure that this post is definitely going to help lots of people & especially WordPress-users to sort out their query. Good work and keep sharing more similar post.
Eventually thanks for sharing your knowledge, ideas and such an informative post.
Regards
-Aadarsh
Hi Adarsh, Thanks for your kind words. It really means a lot to me.
Hello. Please check Hiwebp plugin wordpress.
https://wordpress.org/plugins/hiwebp/
Works a treat, thanks!
If you disable copy function then it’s better to not include any code reference. okay?
Thanks for notifying. I have allowed copying function for snippet in this article.
I have tried this method to enable WebP format images on my site, but I am encountering some unknown error. My site showing a low score on google page speed insight.
May I know please which specific method you have tried? Also, please share the screenshot of error. I will try my best to help you.
Why is not wordpress supporting WEBP format by default?Its high time now.
It works great in Chrome and Firefox on the PC/Laptop. BUT, the webp images are not displayed on iPhone (Chrome and Safari)
Safari is not supporting webP. Chrome on iOS is based on Safari, too. So webP won‘t work on iOS at all and you have to serve a fallback image.
Works a treat, thanks!
Hi,
I am not quite clear on where this needs to be inserted. I am looking to Optimise my header image to Webp. Is there a video or screenshot based write up on how I can include this?
Would really appreciate the help
Regards
Shwetha
Hello Gulshan,
Thanks for sharing this article.
I did follow the steps mentioned in here in this format.
But the image is not appearing on Firfox, and IE. Did I miss any thing in here.
Please suggest.
This code no longer works. He’s not loading. I don’t know why it doesn’t work.
It should work fine. Please share your site URL so I can check.
Hi..Just wondering if i need to edit each image tag or is there somewhere in my theme templates this could be done.
Any guidence would be great.
Thanks
Mark
Do I need to edit all the image tags one by one now? Isn’t there another way to do that?
Hi Gulshan,
Even after putting the code snippet in the function.php file.
I still have the same error message when I try to upload webp format. The message is «sorry this file type is not permitted for security reasons».
Can you help fix this?
Thanks.
Martin
Hello Martin,
At my end it’s working fine. For a demo, I have sent a quick video on your email. Please check and revert back if I can help with any thing else.
Thanks
I haven’t added anything except the last code from your post in function.php to support Webp format on all of future media uploads. Do I need to add any thing else ? or will it create any kind of issue for users whose browsers are yet unsupported to this format?
anyway keep up the good work 😉
That’s all. Now you can easily upload webp directly in your WordPress Dashboard. No extra things to do. Just feel free to use it with picture HTML tag. So, it will support for all browsers, without any issues. Thanks
The problem with the suggested HTML implementation is that Chrome will make two requests, one for WEBP and another one for JPEG resulting in double requests and increasing the page load time.
Hey dear,
It doesn’t create two requests(as you are saying) instead it automatically serve only one type image format either WebP or JPEG according to HTTP accept type.
I’d suggest please try one more time and look carefully at Network Timeline in the browser console. If you see there are double requests, please email me your HTML code and timeline screenshot also. I’d love to review it. I believe it should work fine for you too.
Thanks & Regards,
Gulshan
I installed the code into the functions.php. And as you said it did allow me to upload in my WP theme. The problem is that the image doesn’t allow cropping so it won’t allow me to use it on the site.