WebP görüntüler için kayıpsız ve kayıplı sıkıştırma sağlayan bir dosya formatıdır. Eğer kullanıyorsanız WordPress, bazı temel ayarlamalarla tüm görüntüleri WebP’de kolayca sunabilirsiniz.
Çoğu Tarayıcı WebP’yi destekler
- Caniuse verilerine göre, WebP şu anda aşağıdakilerde desteklenmektedir 94% browsers include Apple Safari, Google Chrome, Opera, Mozilla Firefox, Microsoft Edge and Android browsers.
- Desteklenmeyen tarayıcılar için yedek olarak JPEG/PNG sunmaya devam edebilirsiniz.
WebP Formatında Görüntü Kullanmanın Başlıca Faydaları
- Normal JPG veya PNG görüntüsünün boyutuna kıyasla, aynı boyuttaki görüntü WebP küçük baytlar halinde sunulabilir. Bu nedenle, Görüntüler daha hızlı yüklenecektir. Özellikle mobil kullanıcılar için faydalı olacaktır.
- Kaliteli Görüntüleri birkaç baytta sunarak bant genişliğinden önemli ölçüde tasarruf edin.
- Web sitenizi en son trendlerle güncel tutun. Bull-cart yavaş yükleme sorunu nedeniyle konuşmayı kaybetmeyin.
- WebP, Google Geliştiricileri tarafından önerilmektedir. Geçmenize yardımcı olur “serve images in next-gen format” recommendation of Google PageSpeed Insight.
Bir WordPress sitesi için WebP’yi bu şekilde sunabilirsiniz.
ShortPixel Eklentisi kullanarak NGINX’te WebP sunma
ShortPixel eklentisi, WebP dönüştürme ve Tarayıcı desteğine göre sunma ile toplu görüntü optimizasyonuna yardımcı olabilir. En iyi yanı, bu eklentinin kendi sunucularında işlem yapmasıdır, böylece sitenizi yavaşlatmaz.
- Eğer senin WordPress is hosted at Apache server kullanabileceğiniz kullanıcı .htaccess rewriting.
- Bu durumda NGINX hosting desteği yardımıyla aşağıdaki yeniden yazma kuralını kullanabilirsiniz
- Bu eklenti WP Rocket cache eklentisi ile de desteklenmektedir.
İlk olarak, şu bloğu ekleyin before the server directive:
map $http_accept $webp_suffix {
    default "";
    "~*webp" ".webp";
}
Bu bloğu ekleyin inside the server directive:
location ~* ^(/wp-content/.+)\.(png|jpe?g)$ {
    set $base $1;
    set $webp_uri $base$webp_suffix;
    set $webp_old_uri $base.$2$webp_suffix;
    set $root "<<FULL PATH OF wp-content PARENT>>";
    root $root;
    add_header Vary Accept;
    if ( !-f $root$webp_uri ) {
        add_header X_WebP_SP_Miss $root$webp_uri;
    }
    try_files $webp_uri $webp_old_uri $uri =404;
}
Yerleştirme önemlidir. Bu yüzden dikkatlice ekleyin.
NGINX’te WebP Express Eklentisini Kullanma
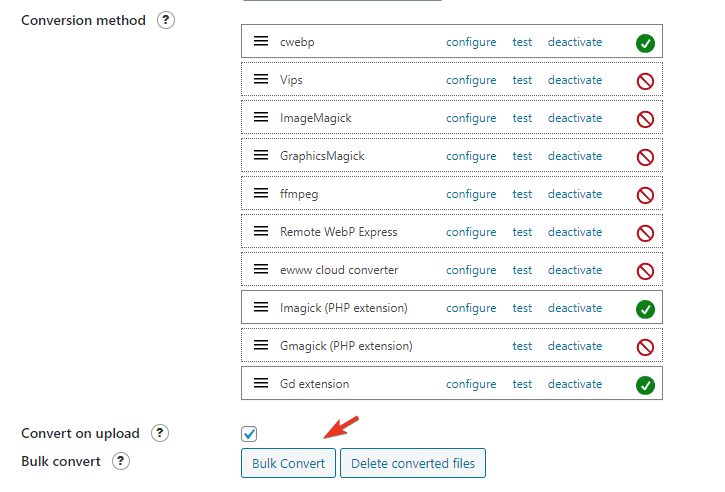
- Kurun ve Etkinleştirin WebP Express, free plugin. A huge thanks to Developer.
- Operation mode: Varied image responses.
- Scope: Upload only.
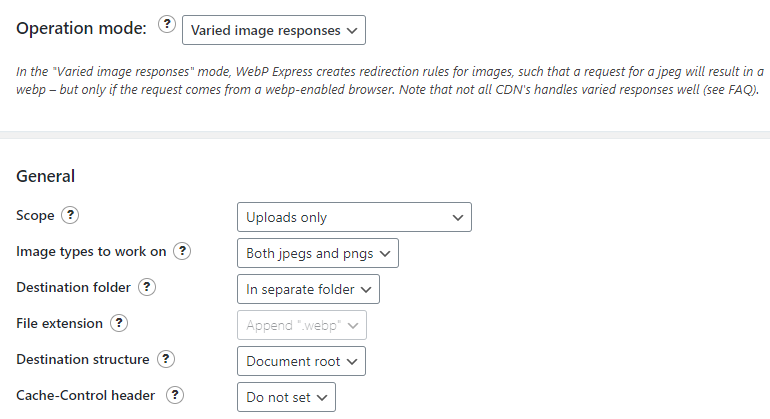
- Run Bulk Convert
- İçin WordPress hosted at Apache server, no config is required as .htaccess does all magics.
- NGINX server kullanıcının yapılandırma dosyasını root erişimi ile değiştirmesi gerekir.
Kodun daha iyi düzenlenmesi için, önce /etc/nginx/ directory with name webp.conf ardından ana sunucu bloğuna ekleyin.
Aşağıya girin command
cd /etc/nginx/ && nano webp.conf- İçine sağ tıklayarak aşağıdaki kodu yapıştırın nano editor in SSH Terminal.
# WebP Express rules
# --------------------
location ~* ^/?wp-content/.*\.(png|jpe?g)$ {
  add_header Vary Accept;
  expires 365d;
  if ($http_accept !~* "webp"){
    break;
  }
  try_files
    /wp-content/webp-express/webp-images/doc-root/$uri.webp
    $uri.webp
    /wp-content/plugins/webp-express/wod/webp-on-demand.php?xsource=x$request_filename&wp-content=wp-content
    ;
}

# Route requests for non-existing webps to the converter
location ~* ^/?wp-content/.*\.(png|jpe?g)\.webp$ {
    try_files
      $uri
      /wp-content/plugins/webp-express/wod/webp-realizer.php?wp-content=wp-content
      ;
}
# ------------------- (WebP Express rules ends here)
- Press CTRL+O and Enter key to save.
Şimdi ana sunucu bloğunu ziyaret edin.
cd /etc/nginx/sites-available && lsKendinizi düzenleyin configuration file, and put include webp.conf; aşağıda gösterildiği gibi.
# General
server {
    listen         80;
    server_tokens off;
    return 301 https://$host$request_uri;
}
server {
server_tokens off;
root /var/www/html;
index index.php index.html index.htm;
server_name .gulshankumar.net;
client_max_body_size 0;

    listen [::]:443 ssl http2 ipv6only=on;
    listen 443 ssl http2;
        ssl_protocols TLSv1.1 TLSv1.2 TLSv1.3;
        ssl_certificate /etc/comodo/cert.pem;
        ssl_certificate_key /etc/comodo/private.pem;
        ssl_prefer_server_ciphers on;
        ssl_session_cache   shared:SSL:20m;
        ssl_session_timeout 20m;
        ssl_ciphers 'TLS13+AESGCM+AES128:EECDH+AES128';

error_page 404 /404.html;
error_page 500 502 503 504 /50x.html;


# WebP Express rule goes here

include webp.conf;

# WebP Rule end

location / {
    try_files $uri $uri/ /index.php$is_args$args;
}
NGINX’i yeniden yükleyin veya yeniden başlatın.
service nginx reloadDikkat edilmesi gerekenler
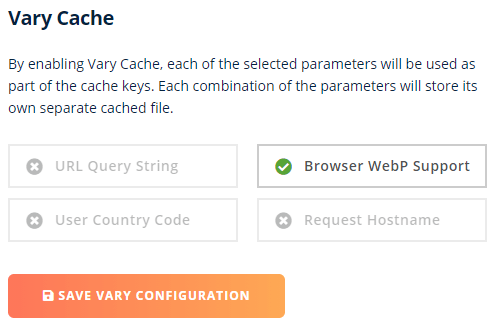
- BunnyCDN kullanıyorsanız, etkinleştirmeniz gerekir Vary Cache.
- Cloudflare Vary Cache’i desteklemiyor. Aşağıdaki alternatif yaklaşımı deneyin.
Cloudflare CDN kullanarak WebP kullanma (Eklenti olmadan)
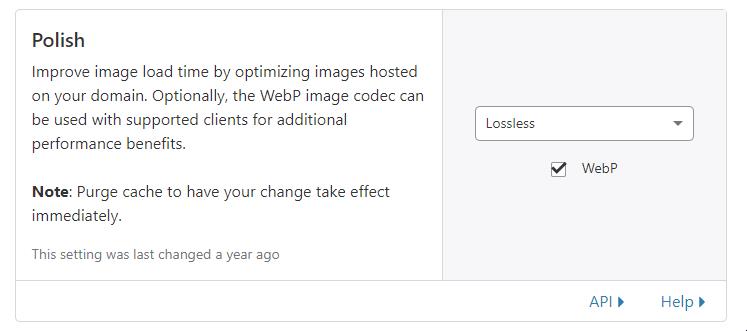
Eğer bir Cloudflare Pro kullanıcı Hız Sekmesinden tek tıklamayla WebP’yi etkinleştirebilir.
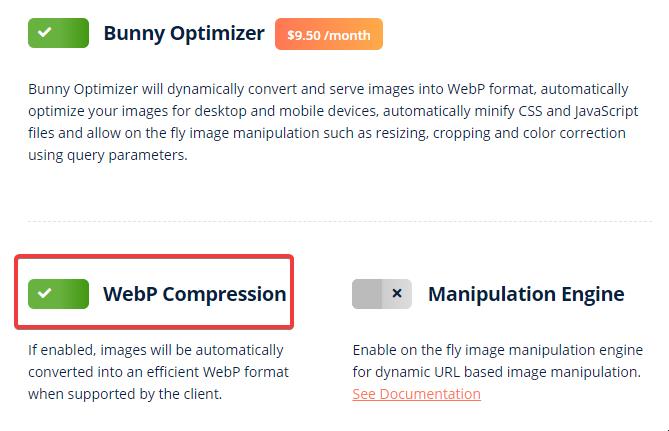
BunnyCDN Optimizer kullanarak WebP sunun (Eklentisiz)
BunnyCDN anında WebP sunma çözümü ile birlikte gelen Optimizer hizmetleri sunar. Aylık 9,5 ABD doları ek ücret karşılığında tek tıklamayla kullanılabilen bir çözümdür.
Serve WebP kullanarak JetPack Plugin
- Basitçe kurun ve etkinleştirin JetPack plugin
- Siteyi Etkinleştirin Accelerator.
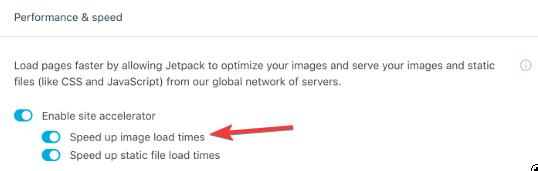
Aşağıdaki filtreyi kullanarak düzeltilebilecek görüntü kalitesinde düşüş fark edebilirsiniz.
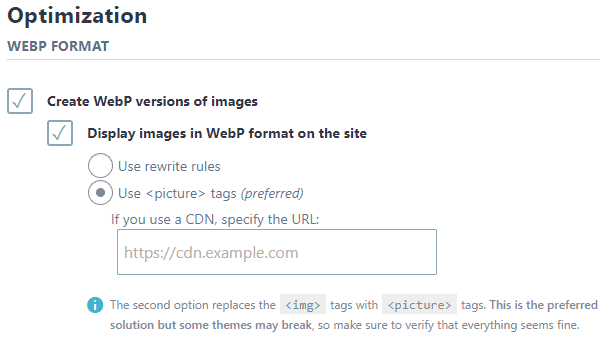
Serve WebP using Imagify
Imagify, WP Rocket’ın arkasındaki WP Media tarafından sunulan bir Görüntü Optimizasyon eklentisidir.
- Imagify eklentisini yükleyin ve etkinleştirin
- Enter the API Key
- In settings, choose Picture tags mode for quick setup.
- Alternatif olarak, bazı sunucu yapılandırmalarıyla birlikte yeniden yazma kuralını şu şekilde kullanabilirsiniz described burada. Apache ile .htaccess kod ekleme işlemi otomatik olacaktır ancak NGINX ile manuel olarak yapmanız gerekir.
WebP to JPG
WebP bazı durumlarda görüntü kalitesini biraz düşürebilir. WebP’den JPG’ye geri dönmek istiyorsanız, aşağıdaki adımları izlemeniz yeterlidir.
- WebP ile ilgili eklentiyi devre dışı bırakın ve silin.
- Yapılandırma dosyasından (.htaccess) ilgili kurulumu kaldırın
- .webp dosyalarını toplu olarak silin ve disk alanından tasarruf edin.
find . -type f -name "*.webp*" -deleteWebP dosyasını JPG’ye dönüştürmek istiyorsanız, şu adreste bulunan aracı kullanabilirsiniz CloudConvert.
Eklenti olmadan manuel yöntem
Bu bölüm sadece bilgi amaçlıdır.
Adım 1 : HTML Belgesine WebP biçimi ekleme
İlk olarak, şunları yapmanız gerekir tüm resimlerinizi WebP ve geri dönüş olarak önceki resim formatınızla birlikte. Bu işi otomatik olarak yapabilen Optimus gibi bazı eklentiler var. Ancak, bunu manuel olarak yapmanın başka bir kolay yolunu göstereceğim.
- Bu web sitesine gidin image.online-convert.com/convert-to-webp
- Resim Bağlantınızı yapıştırın ve dönüştür’e tıklayın. WebP formatındaki resimleriniz indirilecektir
- Şimdi normal Görselinizin göründüğü ham HTML kodunu düzenleyin.
Diyelim ki, başlangıçta Resim HTML kodunuz şöyleydi
<img src="https://www.gulshankumar.net/wp-content/uploads/2016/09/webplogo.png" alt="gulshan kumar" width="186" height="66" />Yukarıdaki kodu biraz daha HTML işaretlemesi ile sarmanız gerekir.
<picture>
	<source srcset="https://www.gulshankumar.net/wp-content/uploads/2016/09/webplogo.webp" type="image/webp" />
	<img src="https://www.gulshankumar.net/wp-content/uploads/2016/09/webplogo.png" alt="gulshan kumar" width="186" height="66" />
</picture>
Şimdi, senin HTML belge hazır serve images in WebP format.
Adım 2 : Configure server ayarlar
Sadece bir adım daha, bazı Apache Webserver ayarlarını şu şekilde yapılandırmanız gerekir .htacccess böylece tarayıcı ve web sunucusu bunu diğer tüm resimler gibi düzgün bir şekilde ele alabilir.
Senin Web Hosting sunucu, bu tür formatlı görüntülerin hangi mime türünden sunulması gerektiğini bilmiyor olabilir. Bu yüzden uygun mime türü eklenmelidir. Ayrıca, önbelleğe alma için süre sonu başlığını ayarlamak faydalı olacaktır.
# Serve Images with correct Mime Type
AddType image/webp .webp

# Setup Cache
ExpiresActive On
ExpiresByType image/webp A2592000
Lütfen not edin: WordPress 5.8 veya üstünü kullandığınızdan emin olun.
WordPress’in 5.8 sürümünden daha eski bir sürümünü kullanıyorsanız, WebP formatındaki görüntülerin yüklenmesini desteklemez. Hata alabilirsiniz “This file type is unfortunately not allowed for security reasons” yüklerken .webp images.
Bu nedenle, bu kodu tema functions.php dosyanıza ekleyerek bu sorunu çözmelisiniz. Resimlerinizi doğrudan şu adresten yüklerseniz yararlı olacaktır WordPress Dashboard > Media option.
function webp_upload_mimes( $existing_mimes ) {
	// add webp to the list of mime types
	$existing_mimes['webp'] = 'image/webp';

	// return the array back to the function with our added mime type
	return $existing_mimes;
}
add_filter( 'mime_types', 'webp_upload_mimes' );
Bitti.
Yardıma ihtiyacınız olursa, lütfen şu adrese bakın comment section. Size yardımcı olmak benim için bir zevktir.
Ek notlar
- Cloudways kullanıcısıysanız, .htaccess rewrite ile WebP sunamazsınız çünkü NGINX’i özellikle statik dosyalar için kullanırlar. Bu durumda iki seçeneğiniz vardır. Hosting ekibinden yapılandırma dosyasını sizin için düzenlemesini isteyin veya JavaScript ya da Bunny veya CF gibi 3. taraf CDN tabanlı bir çözüm kullanın.
Diğer okumalar
WebP hakkında daha fazla bilgi edinmek istiyorsanız, lütfen bu bağlantılara bakın.
Teşekkürler.
I didn’t try the webp format as of now in WordPress. But now after reading this post I will try to implement it. I will compare the image quality from other formats as well. Thank you for sharing this article.
Have you experienced the WebP format causing problems for seo? is it better to use it as jpg or this way?
Google officially recommends using WebP format images along with JPG as fallback.
How to remove hyperlink for the webp image format?
I guess you want to remove .webp extension from URL. You need to try rewrite approach.
I have a question about ShortPixel method.
I use Plesk panel with NGINX
There is a section called Additional nginx directives
Here you can specify the settings for the nginx reverse proxy server that runs in front of Apache. Your directives will override the server-wide nginx configuration. For example, you may want to change the connection timeout or to pack requests with gzip. Use the same syntax as you use for nginx.conf. For example, if you want to pack all the proxied requests with gzip, add the line: ‘gzip_proxied any;’.
https://i.imgur.com/OLWu9bJ.png
can i add codes there i dont know?
map $http_accept $webp_suffix {
default “”;
“~*webp” “.webp”;
}
location ~* ^(/wp-content/.+).(png|jpe?g)$ {
set $base $1;
set $webp_uri $base$webp_suffix;
set $webp_old_uri $base.$2$webp_suffix;
set $root “<>”;
root $root;
add_header Vary Accept;
if ( !-f $root$webp_uri ) {
add_header X_WebP_SP_Miss $root$webp_uri;
}
try_files $webp_uri $webp_old_uri $uri =404;
You used these sentences!
before the server directive and inside directive.
I read your Installing WordPress at NGINX topic so
If i try to add these from codes is this right?
map $http_accept $webp_suffix {
default “”;
“~*webp” “.webp”;
}
server {
listen 80;
return 301 https://$host$request_uri;
}
server {
location ~* ^(/wp-content/.+).(png|jpe?g)$ {
set $base $1;
set $webp_uri $base$webp_suffix;
set $webp_old_uri $base.$2$webp_suffix;
set $root “<>”;
root $root;
add_header Vary Accept;
if ( !-f $root$webp_uri ) {
add_header X_WebP_SP_Miss $root$webp_uri;
}
try_files $webp_uri $webp_old_uri $uri =404;
}
# Document Root
root /var/www/html;
index index.php index.html index.htm;
server_name .example.com;
client_max_body_size 0;
listen [::]:443 ssl http2 ipv6only=on;
listen 443 ssl http2;
ssl_protocols TLSv1.1 TLSv1.2 TLSv1.3;
ssl_certificate /etc/letsencrypt/live/example.com/fullchain.pem;
ssl_certificate_key /etc/letsencrypt/live/example.com/privkey.pem;
ssl_prefer_server_ciphers on;
ssl_session_cache shared:SSL:20m;
ssl_session_timeout 20m;
ssl_ciphers ‘TLS13+AESGCM+AES128:EECDH+AES128’;
error_page 404 /404.html;
error_page 500 502 503 504 /50x.html;
location / {
try_files $uri $uri/ /index.php$is_args$args;
}
location ~* .php$ {
if ($uri !~ “^/uploads/”) {
fastcgi_pass unix:/run/php/php7.4-fpm.sock;
}
include fastcgi_params;
fastcgi_param SCRIPT_FILENAME $document_root$fastcgi_script_name;
fastcgi_param SCRIPT_NAME $fastcgi_script_name;
}
location = /favicon.ico {
log_not_found off;
access_log off;
}
location = /robots.txt {
log_not_found off;
access_log off;
allow all;
}
location ~* .(css|gif|svg|ico|jpeg|jpg|js|png)$ {
expires 1y;
log_not_found off;
}
# Enable Gzip compression.
gzip on;
# Disable Gzip on IE6.
gzip_disable “msie6”;
# Allow proxies to cache both compressed and regular version of file.
# Avoids clients that don’t support Gzip outputting gibberish.
gzip_vary on;
# Compress data, even when the client connects through a proxy.
gzip_proxied any;
# The level of compression to apply to files. A higher compression level increases
# CPU usage. Level 5 is a happy medium resulting in roughly 75% compression.
gzip_comp_level 5;
# Compress the following MIME types.
gzip_types
application/atom+xml
application/javascript
application/json
application/ld+json
application/manifest+json
application/rss+xml
application/vnd.geo+json
application/vnd.ms-fontobject
application/x-font-ttf
application/x-web-app-manifest+json
application/xhtml+xml
application/xml
font/opentype
image/bmp
image/svg+xml
image/x-icon
text/cache-manifest
text/css
text/plain
text/vcard
text/vnd.rim.location.xloc
text/vtt
text/x-component
text/x-cross-domain-policy;
}
Is this right?
And what do you think about plesk how i use webp at plesk?
Thanks
Please consult a freelancer. It is out of scope to guide here.
Hi, this is a good article, but
It is better to install the plugin or put the code directly for webp
This way, each image does not create two urls. Does it cause a problem in the SEO site?
Dynamic rewriting from Server side doesn’t create two URLs instead it servers same just by changing response as per browser support.
A plugin is recommended way.
Hi Gulshan. Any free plugin(totally free) for converting jpg to webp format. God Bless you.
First option which is WebP Express.
Thank You! Gulshan
Hey Gulshan Kumar ,
Awesome post with good information. It is my first time commenting on your blog post and am glad to say that you have done a fabulous work and provided helpful & easy tips to serve webp format images in WordPress. I really like and appreciate the way you have explained the things in such a step-by-step process making the concept very clear and easy to understand. while scrolling through your blog post i have noticed that you have also discussed about the major benefits of using webp format image that are also providing good understanding. You have explained all the vital things in an easy language that are true enough to understand and educate the readers.
After going through this complete guide i really gain ideas and am sure that this post is definitely going to help lots of people & especially WordPress-users to sort out their query. Good work and keep sharing more similar post.
Eventually thanks for sharing your knowledge, ideas and such an informative post.
Regards
-Aadarsh
Hi Adarsh, Thanks for your kind words. It really means a lot to me.
Hello. Please check Hiwebp plugin wordpress.
https://wordpress.org/plugins/hiwebp/
Works a treat, thanks!
If you disable copy function then it’s better to not include any code reference. okay?
Thanks for notifying. I have allowed copying function for snippet in this article.
I have tried this method to enable WebP format images on my site, but I am encountering some unknown error. My site showing a low score on google page speed insight.
May I know please which specific method you have tried? Also, please share the screenshot of error. I will try my best to help you.
Why is not wordpress supporting WEBP format by default?Its high time now.
It works great in Chrome and Firefox on the PC/Laptop. BUT, the webp images are not displayed on iPhone (Chrome and Safari)
Safari is not supporting webP. Chrome on iOS is based on Safari, too. So webP won‘t work on iOS at all and you have to serve a fallback image.
Works a treat, thanks!
Hi,
I am not quite clear on where this needs to be inserted. I am looking to Optimise my header image to Webp. Is there a video or screenshot based write up on how I can include this?
Would really appreciate the help
Regards
Shwetha
Hello Gulshan,
Thanks for sharing this article.
I did follow the steps mentioned in here in this format.
But the image is not appearing on Firfox, and IE. Did I miss any thing in here.
Please suggest.
This code no longer works. He’s not loading. I don’t know why it doesn’t work.
It should work fine. Please share your site URL so I can check.
Hi..Just wondering if i need to edit each image tag or is there somewhere in my theme templates this could be done.
Any guidence would be great.
Thanks
Mark
Do I need to edit all the image tags one by one now? Isn’t there another way to do that?
Hi Gulshan,
Even after putting the code snippet in the function.php file.
I still have the same error message when I try to upload webp format. The message is “sorry this file type is not permitted for security reasons”.
Can you help fix this?
Thanks.
Martin
Hello Martin,
At my end it’s working fine. For a demo, I have sent a quick video on your email. Please check and revert back if I can help with any thing else.
Thanks
I haven’t added anything except the last code from your post in function.php to support Webp format on all of future media uploads. Do I need to add any thing else ? or will it create any kind of issue for users whose browsers are yet unsupported to this format?
anyway keep up the good work 😉
That’s all. Now you can easily upload webp directly in your WordPress Dashboard. No extra things to do. Just feel free to use it with picture HTML tag. So, it will support for all browsers, without any issues. Thanks
The problem with the suggested HTML implementation is that Chrome will make two requests, one for WEBP and another one for JPEG resulting in double requests and increasing the page load time.
Hey dear,
It doesn’t create two requests(as you are saying) instead it automatically serve only one type image format either WebP or JPEG according to HTTP accept type.
I’d suggest please try one more time and look carefully at Network Timeline in the browser console. If you see there are double requests, please email me your HTML code and timeline screenshot also. I’d love to review it. I believe it should work fine for you too.
Thanks & Regards,
Gulshan
I installed the code into the functions.php. And as you said it did allow me to upload in my WP theme. The problem is that the image doesn’t allow cropping so it won’t allow me to use it on the site.